
The tree is a foundational data structure in programming, one that most developers encounter every day. We use trees to power search algorithms, arrange data on the filesystem, and to assemble HTML pages like the one you’re reading right now. But any tree that is left untended can become overgrown! One of the messiest trees that you’ll encounter in web development is a React application or HTML page with deeply nested component trees. It can be tricky to reason about (or create a UI to manage) a data structure with as many unruly twigs and branches as an HTML page.
We recently encountered this challenge when we built the new Explorer interface in Retool’s visual IDE (if you haven’t already, you should try it out yourself). Every Retool application is represented as a complex tree data structure, containing configuration information about every component the developer has added to their application, along with UI state for the IDE. We wanted to provide both a bird’s eye view of the component tree for developers, and allow developers to interact with components in an intuitive way. But with such a complex data structure to represent, we had to be careful not to fall off the Bad UX tree and hit every branch on the way down.
In this post, we’ll talk about how we solved the challenge of building a UI to represent a complex tree data structure - in this case, the component tree of a Retool application. We’ll dive into design considerations and constraints, talk through goals for accessibility, interactivity, and testability, and examine how we had to tune this UI for performance.
Deriving a Tree
As background, Retool’s layout system manages hundreds of components for an individual app in a tree data structure. Near the top of the tree, we have a few frame nodes — containers that house the components Retool developers drag and drop into their apps. Most apps have a header and main content frame node. Each of those nodes could have zero to hundreds of components. Many of these components also have their own sub components that host other components, creating a tree-shaped data structure.
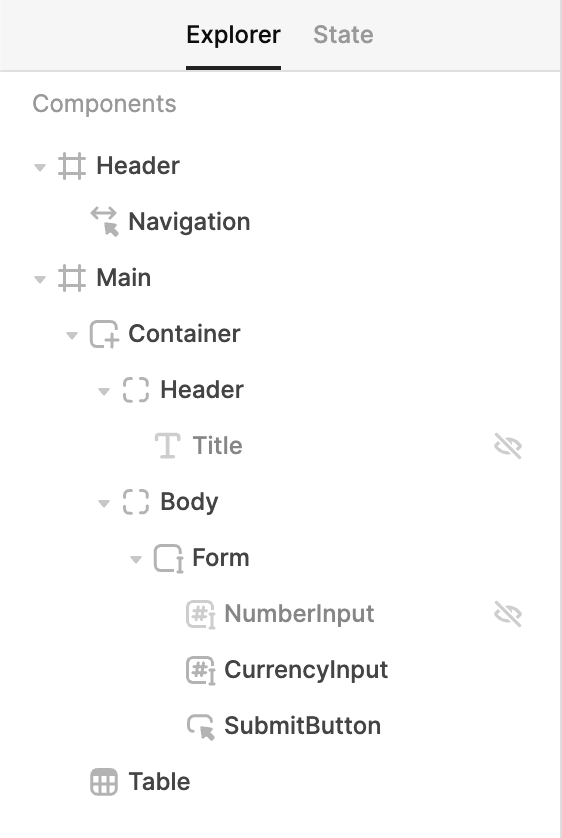
In Retool’s layout system code, we store all components in a flat map rather than a nested structure, so we can have O(1) access to any of our components. In each of these components, we have a positional object that points to a parent node elsewhere in the tree. Generating a nested tree representation of all the components in a Retool application is reminiscent of a classic computer science challenge—start at the root, find the children, iterate through those children by repeating the same steps. An expanded tree view of a Retool application might look like the following.
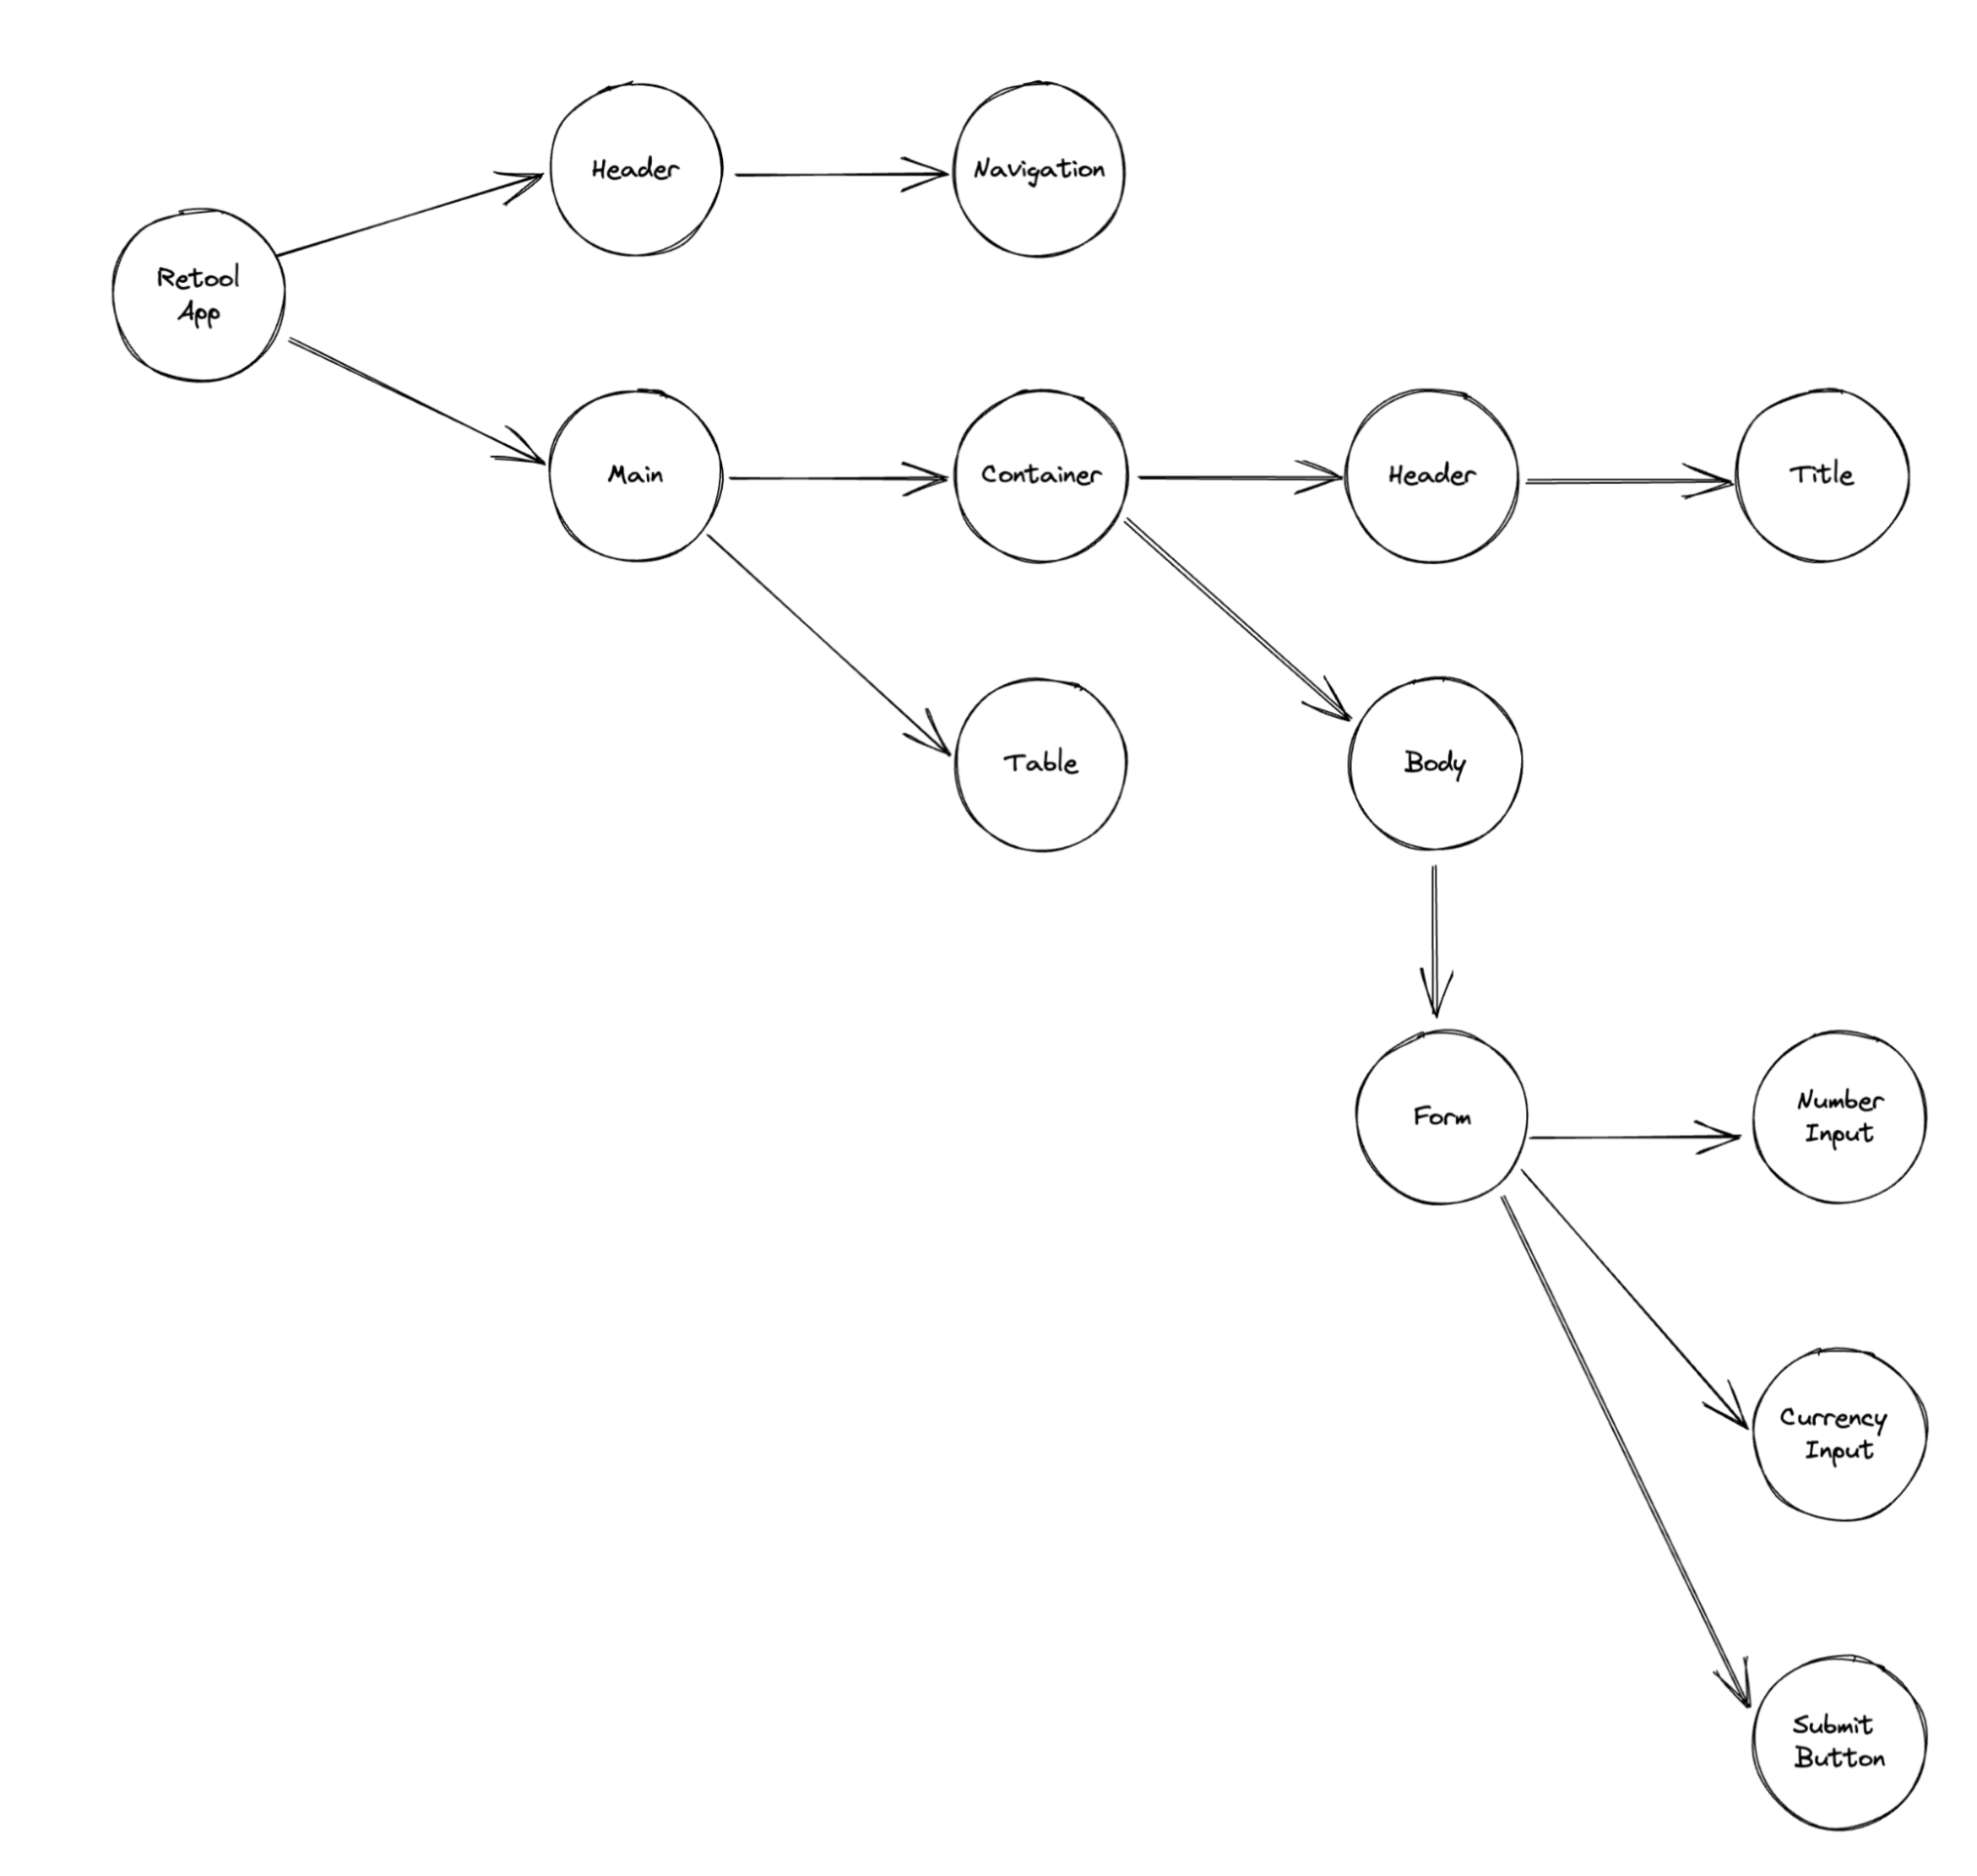
With a nested tree data structure, we have the very basic data we need to render a UI that shows the parent/child relationships between all of the components in the app. But in our editor interface, we needed to go much further. We needed to think through how a developer would like to interact with a UI containing this data. We want this tree view to surface contextually important information, show cascading properties in an intuitive way, reflect and mutate editor state, support keyboarding to quickly navigate the tree, and enable developers to take actions directly from the explorer UI.
Cascading Properties
A tree enables us to quickly scan and understand the hierarchy and relationships between moving parts in a system. If something happens to a parent node that has children, it’s possible that children will be affected. For example, if a component is hidden, what happens to its descendents?
In Retool, the ability to dynamically hide and show components is a first-order concept. Let’s say we explicitly hide the container component—what happens then? If a parent isn’t visible, descendents need to mirror the visibility state of their ancestors in the tree.
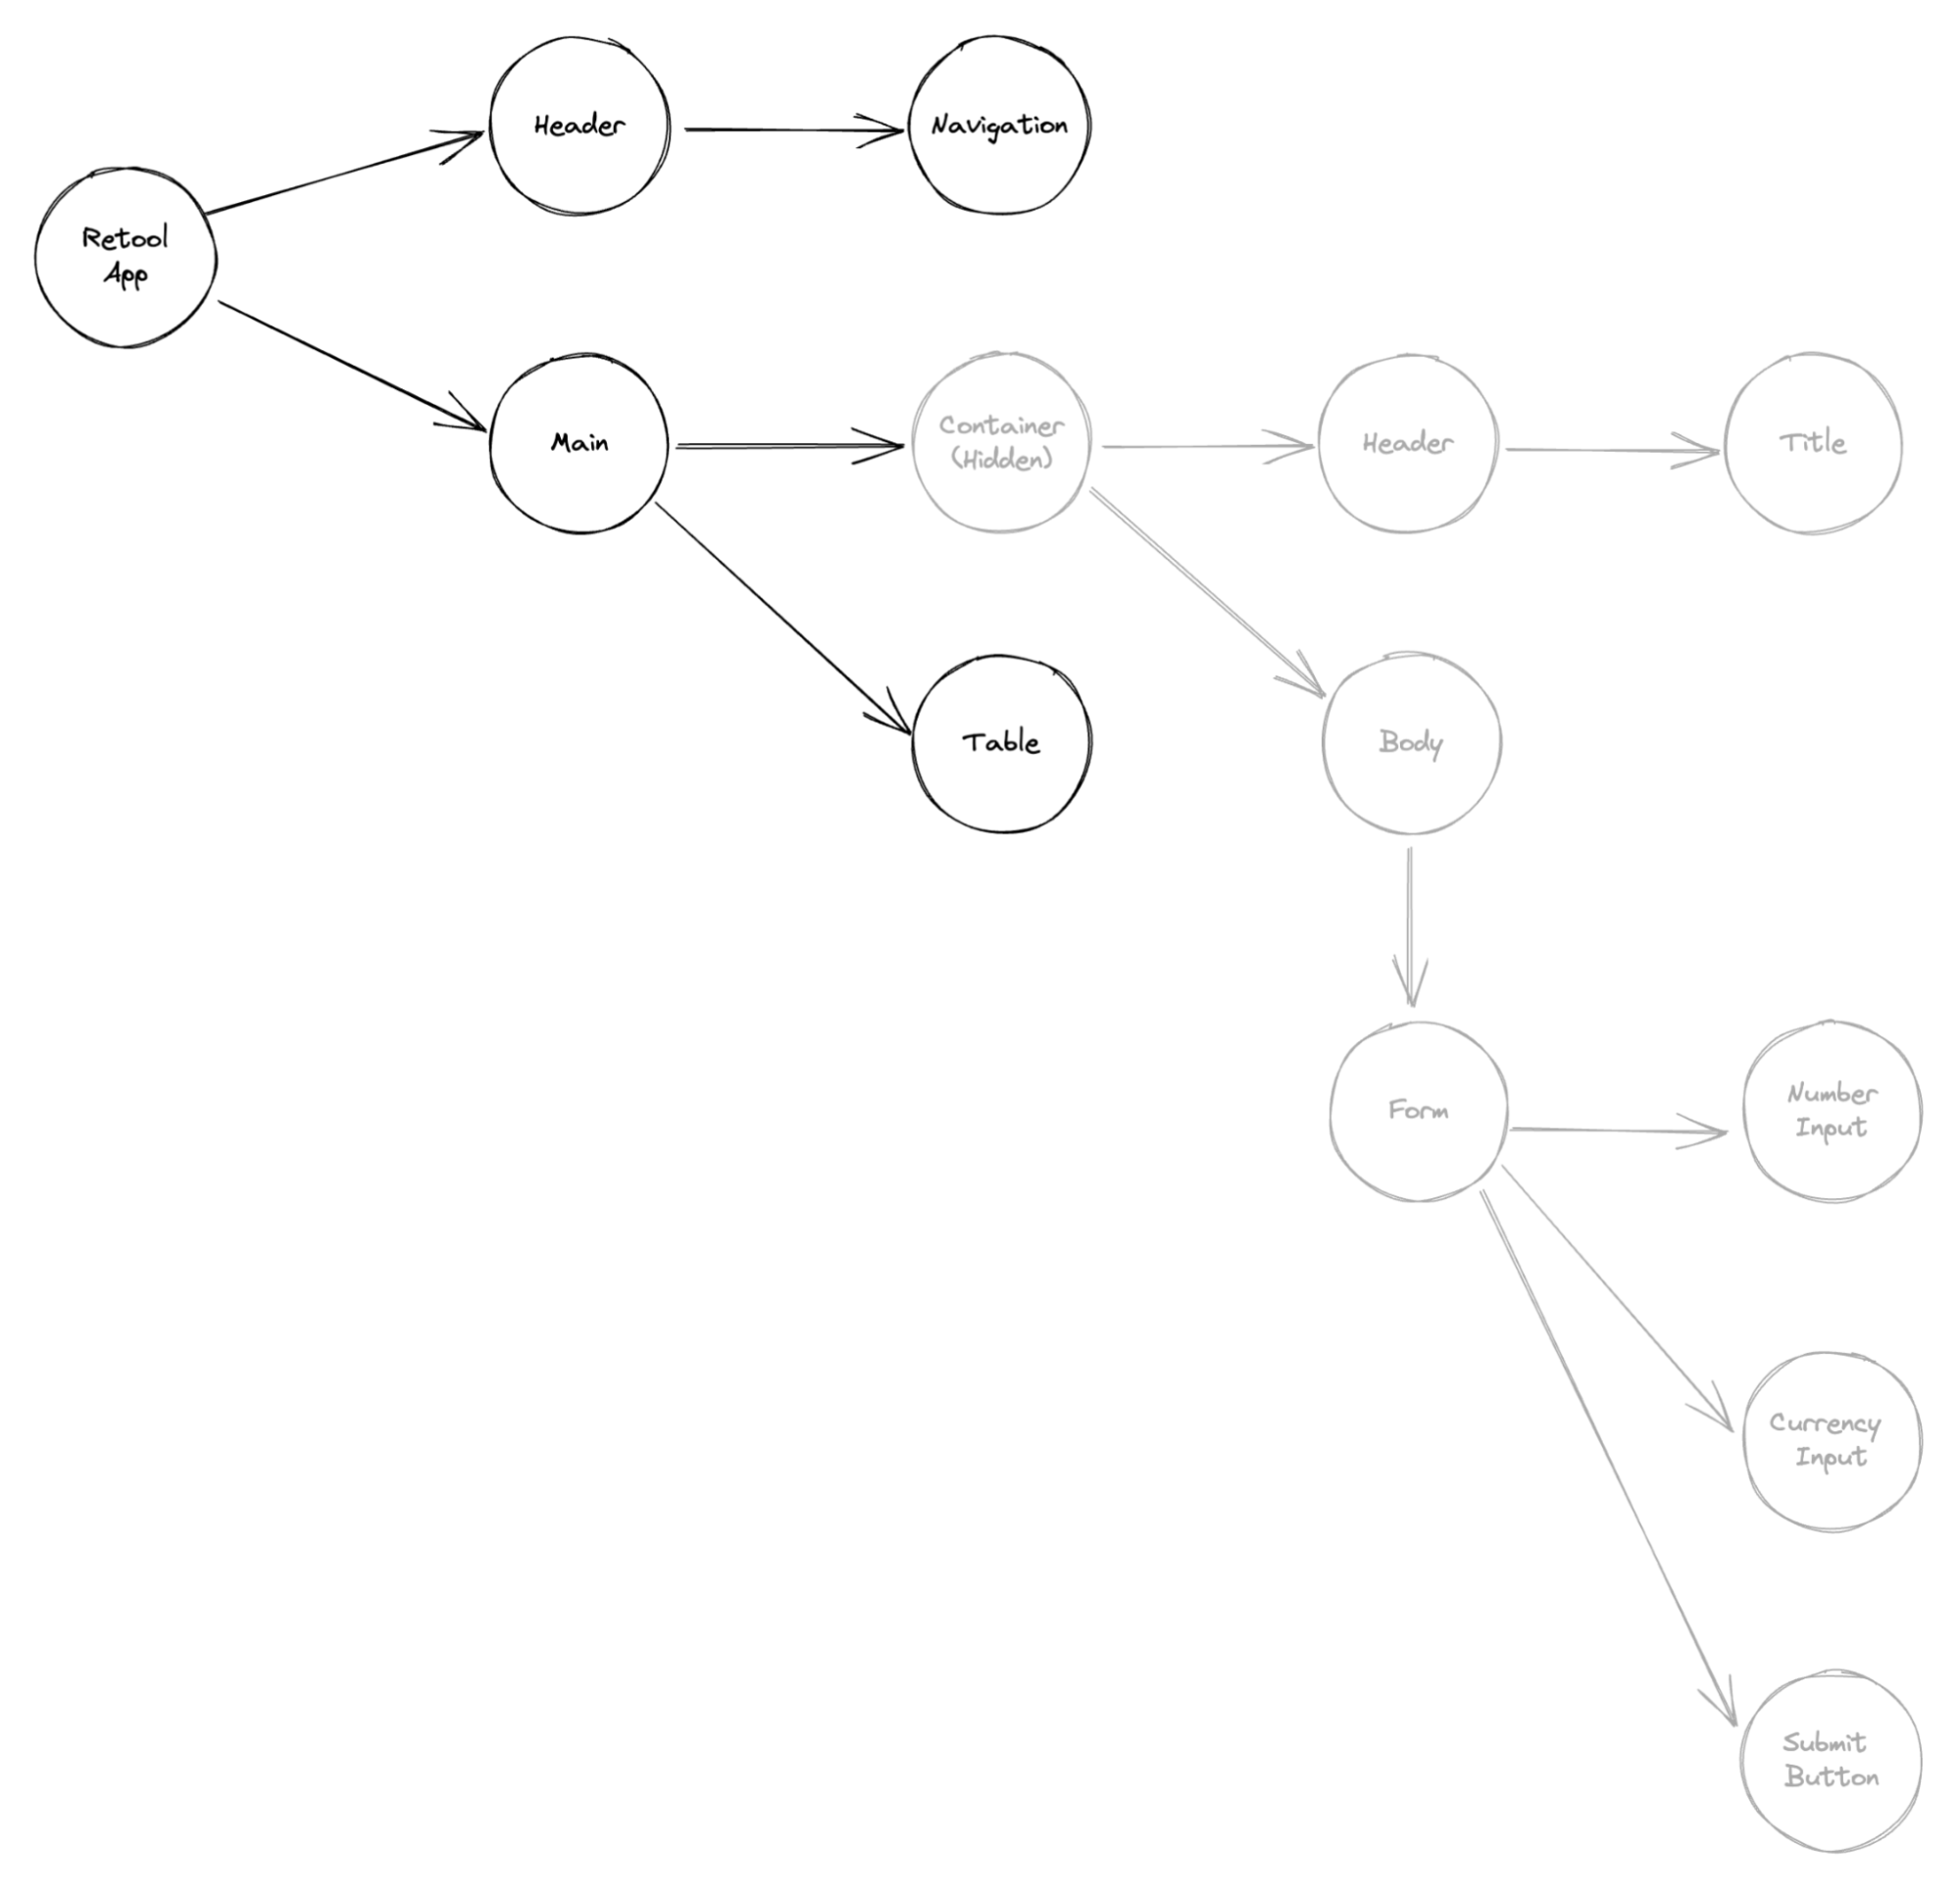
The container is marked explicitly hidden, and is displayed in a lighter color (which we would want to represent similarly in the real UI). All of the descendants inherit that hidden property implicitly, as noted by the lighter color. Technically, any component in the tree can be marked explicitly hidden, and they all are defined independently of one another. As we build up this tree representation, we are keeping track of explicit vs cascaded properties. For example, we could mark two more components as explicitly hidden.
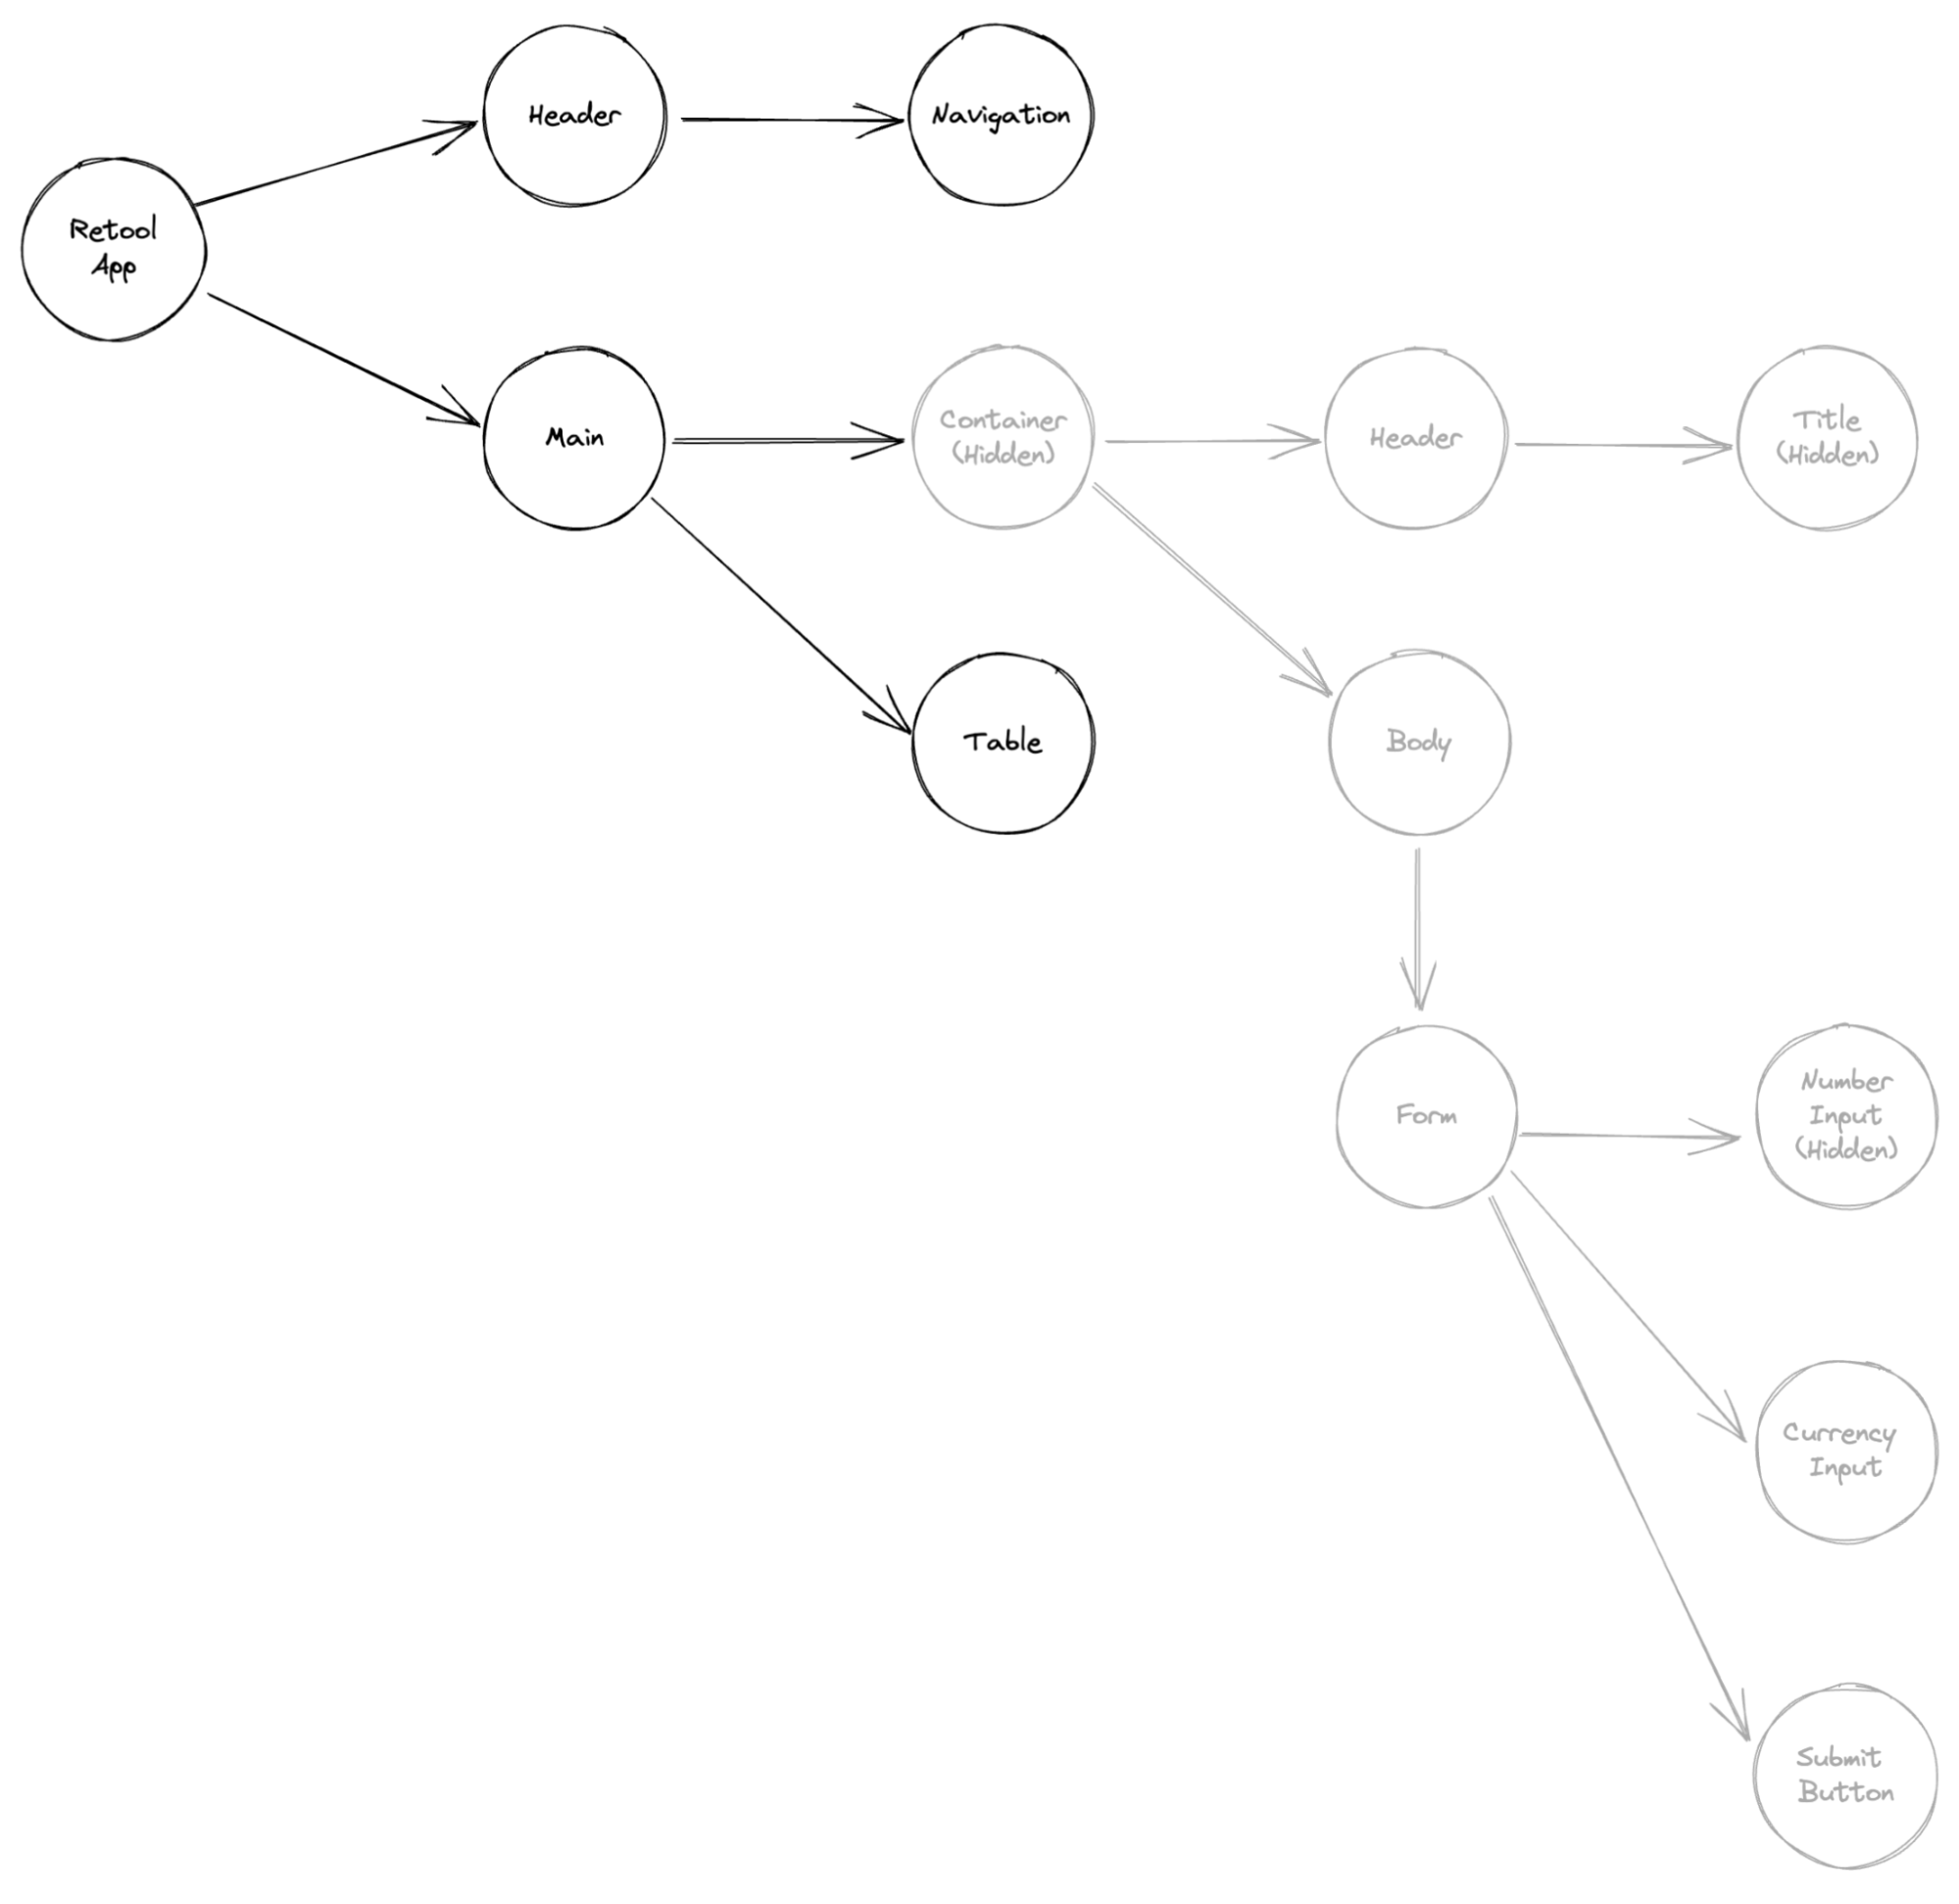
Flipping the container back to visible again would change the tree representation to maintain the explicitly hidden nodes, but revert the implicitly hidden nodes back to visible again. This requires careful juggling between implicit vs explicit state in our data model in order to derive if each node in the tree should be marked as hidden. Our new tree would look something like this:
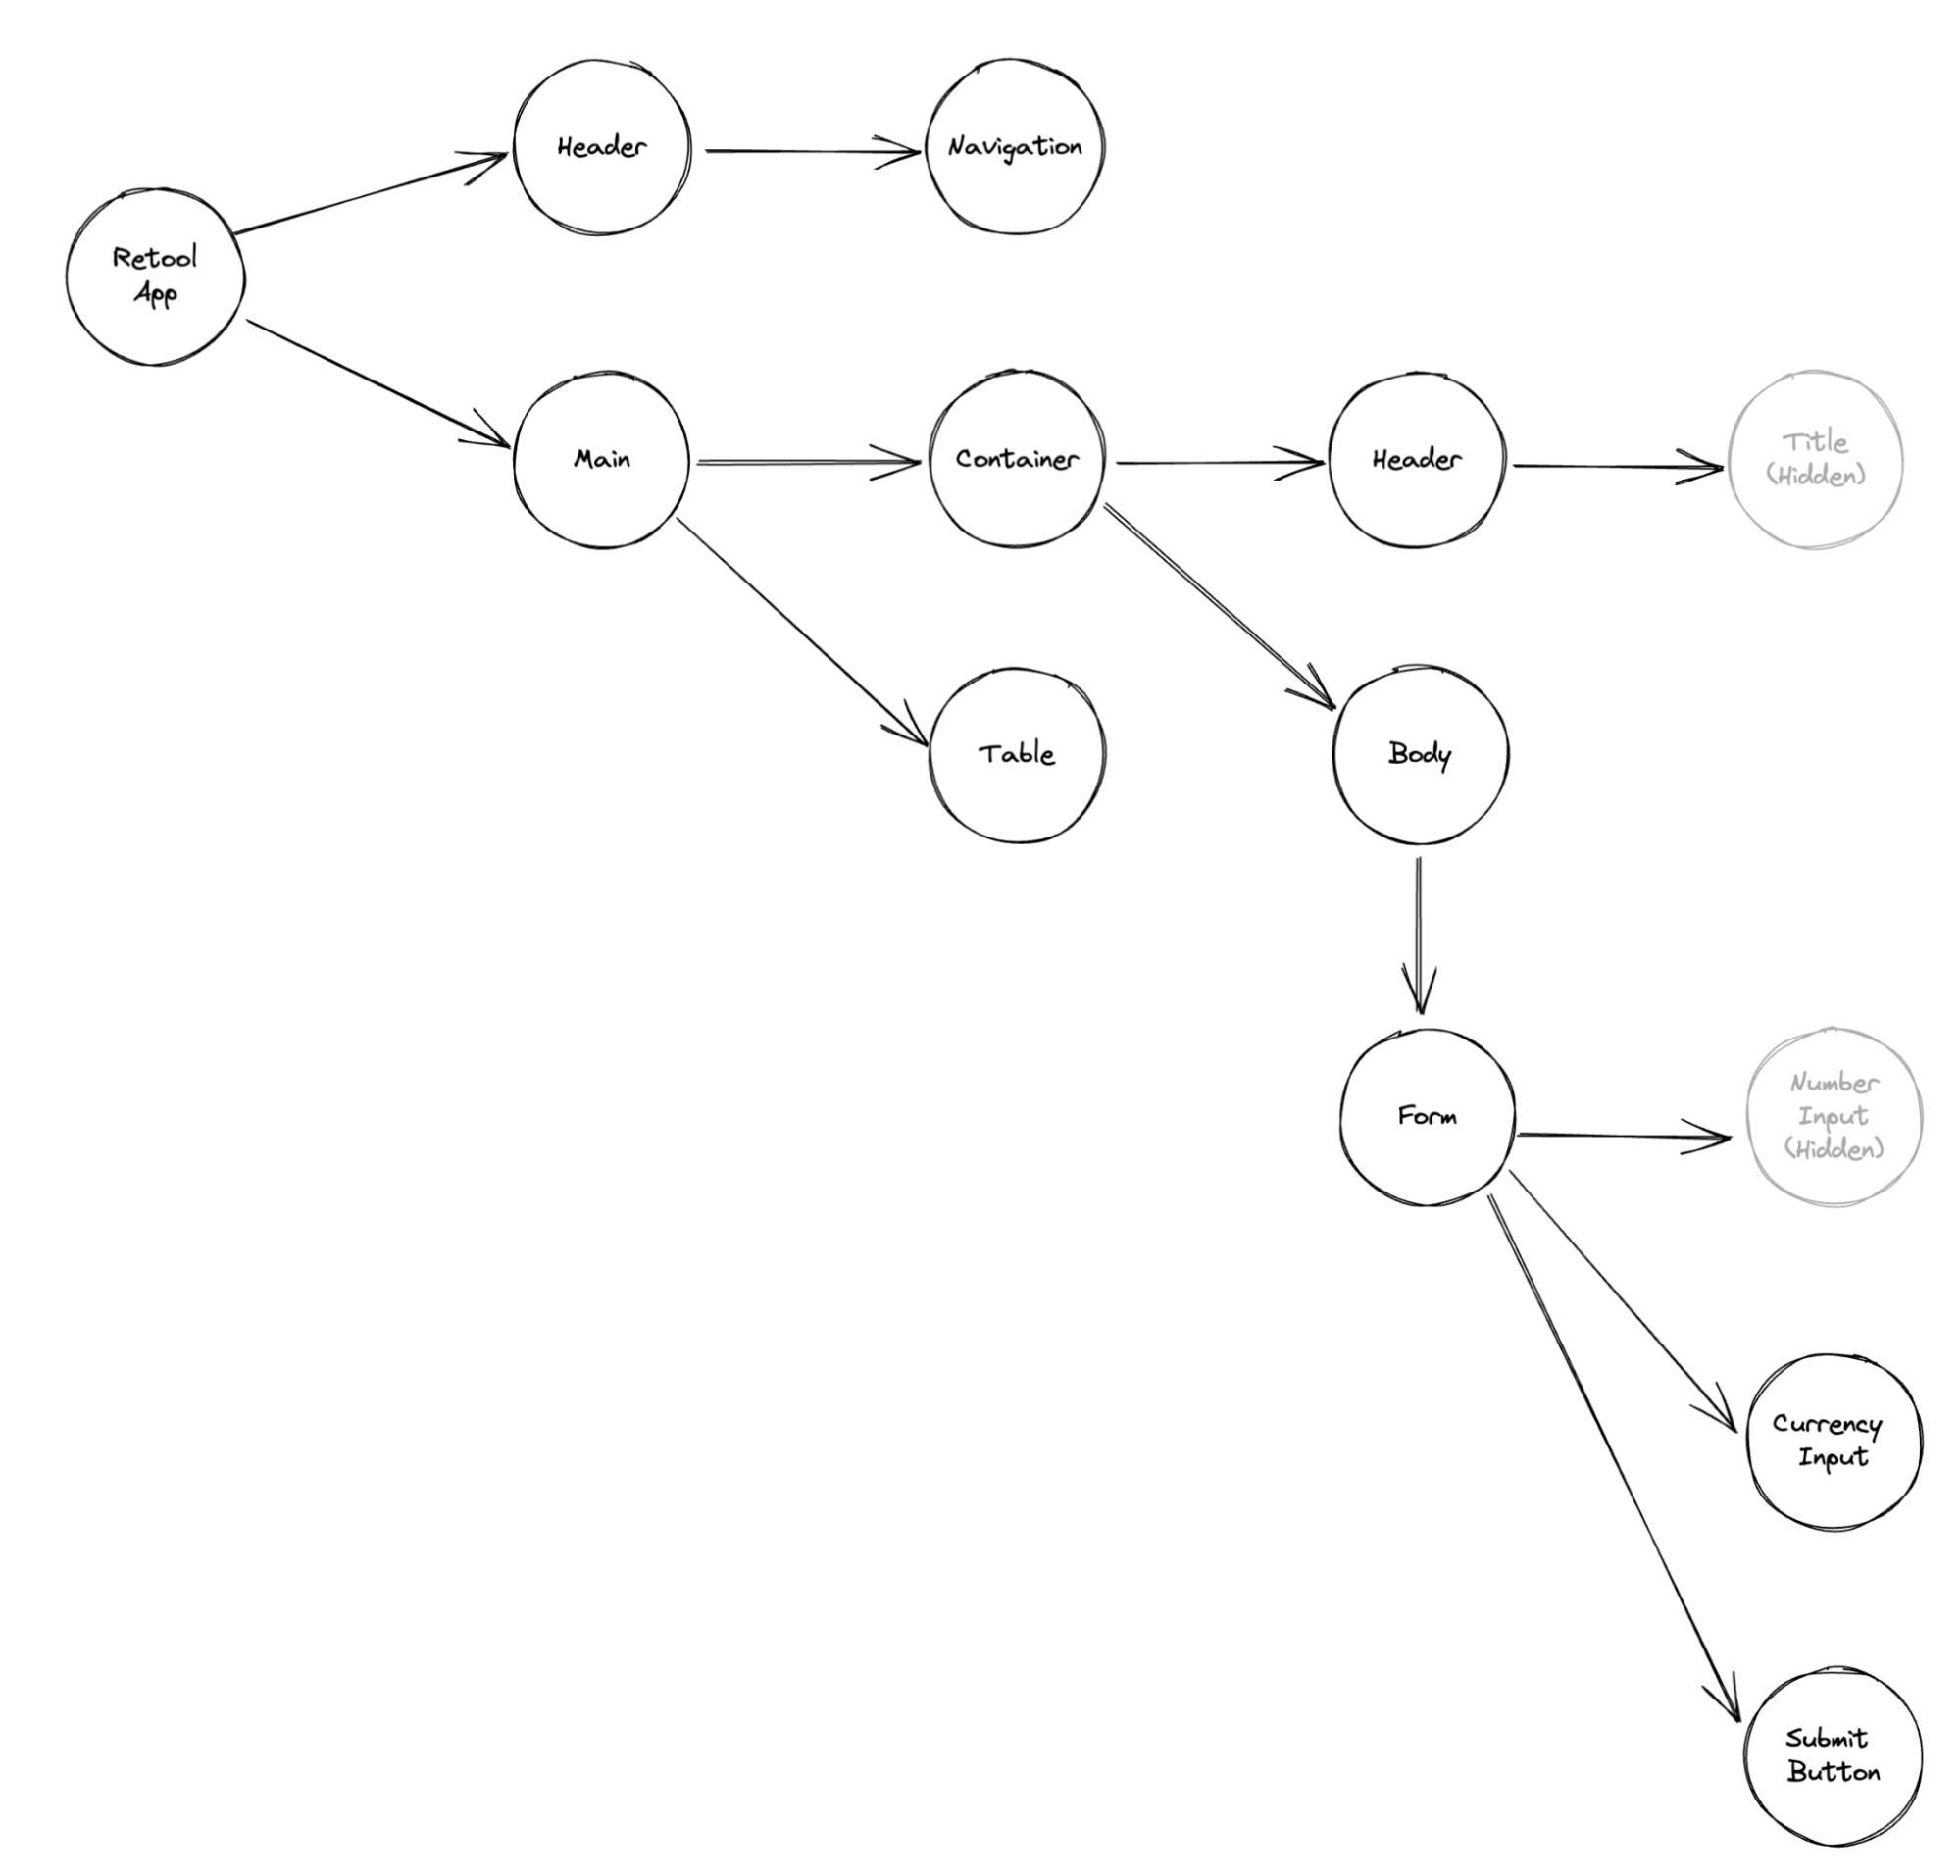
With our tree data structure beginning to take shape, it’s possible to render a familiar tree UI like this one, that correctly represents the parent-child relationships and visibility configured by the developer.
A nested tree data structure is sufficient to render the tree, but we’re not done yet. We still need to tackle other core UX needs, like accessibility and interactivity.
Keyboarding and accessibility
Given that a tree view is a common UI pattern across many tools that developers use daily (like the explorer view of VSCode, or the Finder view in MacOS) we wanted to be sure that interfacing with the Explorer view in Retool had the same level of familiarity as any other program. While tree views are ubiquitous in interfaces, there isn’t a standard implementation of it on the web. There are plenty of open-source implementations, but unfortunately, none met the high bar we hold for usability, performance, and accessibility.
“Web Accessibility Initiative - Accessible Rich Internet Applications”, which we’ll refer to as WAI-ARIA for the remainder of this document, is a technical specification outlining guidelines for how to make web applications accessible. Accessibility should always be at the forefront of every web application, and it certainly was for our work on the Explorer.
We utilized the WAI-ARIA example for Treeview as a baseline for determining how keyboarding interactions should work within our Treeview. Some of the recommendations are as follows:
- Enter or Space => Perform the default action
- Down arrow => Moves focus to the next node that is focusable without opening or closing a node. If focus is on the last node, it does nothing.
- Up arrow => Moves focus to the previous node that is focusable without opening or closing a node. If focus is on the first node, it does nothing.
- * (asterisk) => Expands all closed sibling nodes that are at the same level as the focused node. Focus does not move.
Following these recommendations makes our UI feel immediately obvious to anyone who has used compliant Treeviews in other applications.
We’re huge fans of TypeScript at Retool for many reasons, but one of those is the ability to write code that leverages the compiler to help us proactively understand all possibilities for our code. We leveraged tagged union types to explicitly write out all of our supported key inputs, along with some functions to typecheck that we are explicitly covering every possible key case.
/** All explicitly supported keys for our Tree, typed as a const assertion */
export const SUPPORTED_KEYS = [
   ' ',
   'Enter',
] as const

export type SupportedKeys = typeof SUPPORTED_KEYS[number]

/** Typeguard that asserts a given string is a valid value for SupportedKeys */
const isASupportedKey = (key: string): key is SupportedKeys => SUPPORTED_KEYS.includes(key as any)

/** Helper function for exhaustive checking of union types */
const assertNever = (value: never) => {
   throw new Error(`Unhandled value ${JSON.stringify(value)}`)
}
We wrote a custom React Hook that explicitly handles each key case we expect to handle in our Treeview. This hook is used by the React components that are responsible for rendering and plugging these key handlers into the JSX.
/** Args to our useTreeKeyboarding React Hook */
type UseTreeKeyboardingArgs = {
   onDefaultAction: () => void,
}

/** React Hook that returns event handlers that can be used by a Tree component */
const useTreeKeyboarding = ({ onDefaultAction }: UseTreeKeyboardingArgs) => {
   const onKeyDown = (event: KeyboardEvent) => {
       const { key } = event

       if (!isASupportedKey(key)) return

       switch (key) {
           case ' ':
           case 'Enter':
               event.preventDefault()
               onDefaultAction()
               break;
           default:
               assertNever(key)
       }
   }

   return { onKeyDown }
}
For this sample code so far, we are only supporting two basic keys for the Treeview. But what makes this paradigm so powerful is what happens when we add more supported key actions to our tree:
export const SUPPORTED_KEYS = [
   ' ',
   'Enter',
   'ArrowDown',
   'ArrowUp',
   'ArrowRight',
   'ArrowLeft',
] as const
After just making this single change, TypeScript proactively gives us a compiler error. By leveraging a tagged union type for keys we support, plus a switch with an assertNever() call, TypeScript is able to guide us as developers exactly to the places we need to make updates to in order for our code to support all of the cases. In this example below, TypeScript is powerful enough to let us know that we have not actually supported these cases and thus the compiler check fails.
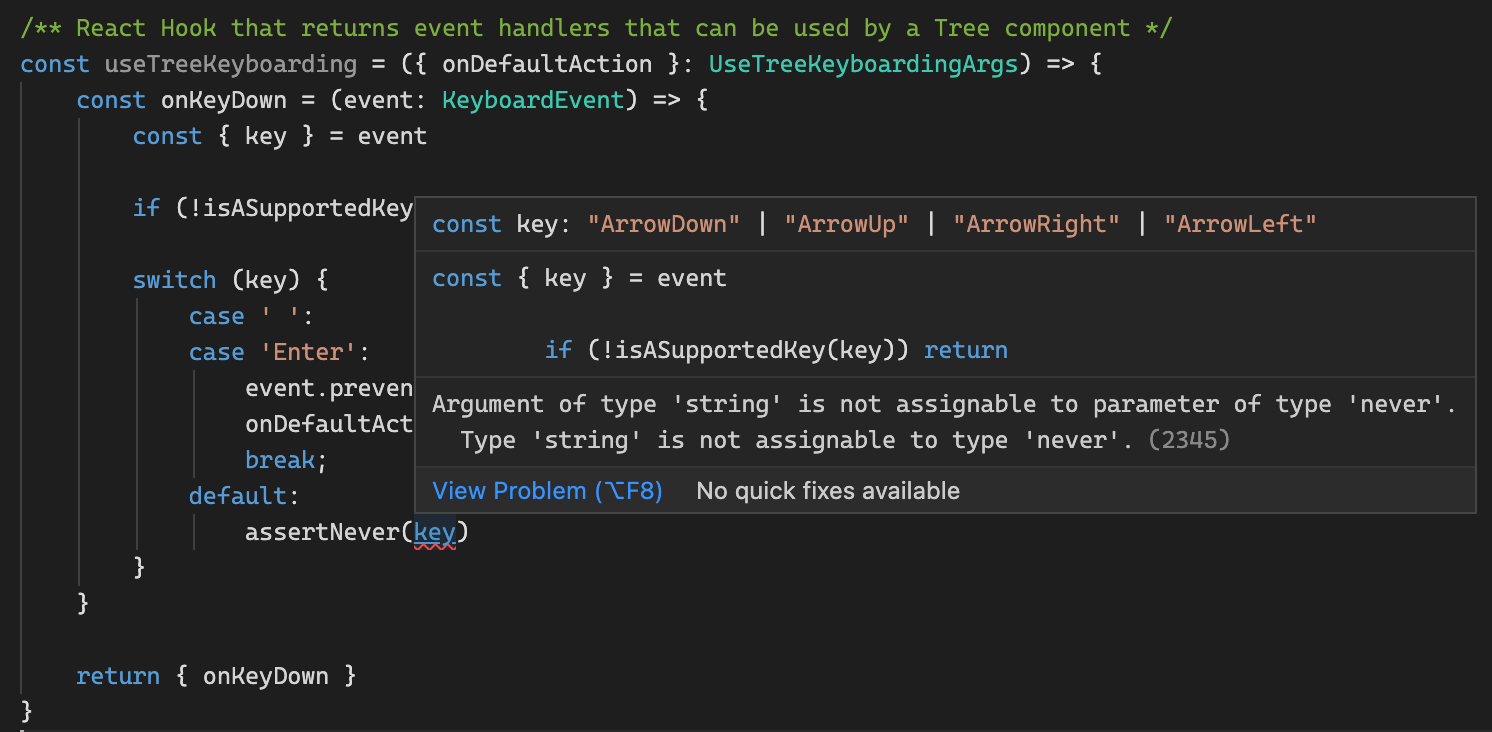
Thank you, TypeScript! With just a few more changes to our React Hook, we can successfully include support for all 4 directions of keyboarding and satisfy the TypeScript compiler check.
/** React Hook that returns event handlers that can be used by a Tree component */
const useTreeKeyboarding = ({ onDefaultAction, onSetFocusedNode }: UseTreeKeyboardingArgs) => {
   const onKeyDown = (event: KeyboardEvent) => {
       const { key } = event

       if (!isASupportedKey(key)) return

       switch (key) {
           case ' ':
           case 'Enter':
               event.preventDefault()
               onDefaultAction()
               break;
           case 'ArrowDown': {
               const nextNode = findNextNode()
               if (nextNode) {
                   onSetFocusedNode(nextNode)
               }
               break
           }
           case 'ArrowUp': {
               const prevNode = findPrevNode()
               if (prevNode) {
                   onSetFocusedNode(prevNode)
               }
               break
           }
           case 'ArrowRight': {
               const childNode = findChildNode()
               if (childNode) {
                   onSetFocusedNode(childNode)
               }
               break
           }
           case 'ArrowLeft': {
               const parentNode = findParentNode()
               if (parentNode) {
                   onSetFocusedNode(parentNode)
               }
               break
           }
           default:
               assertNever(key)
       }
   }

   return { onKeyDown }
}
Interactivity and state management
Our Explorer UI lives alongside the editing experience in Retool, where developers can quickly assemble UIs visually. Taking actions on components in the Editor such as selecting them, changing properties (like hidden state mentioned just above), and rearranging them need to be reflected in the Explorer view also. In the other direction, taking actions on component representations in the Explorer such as selecting or deleting, need to be reflected across the application as well.
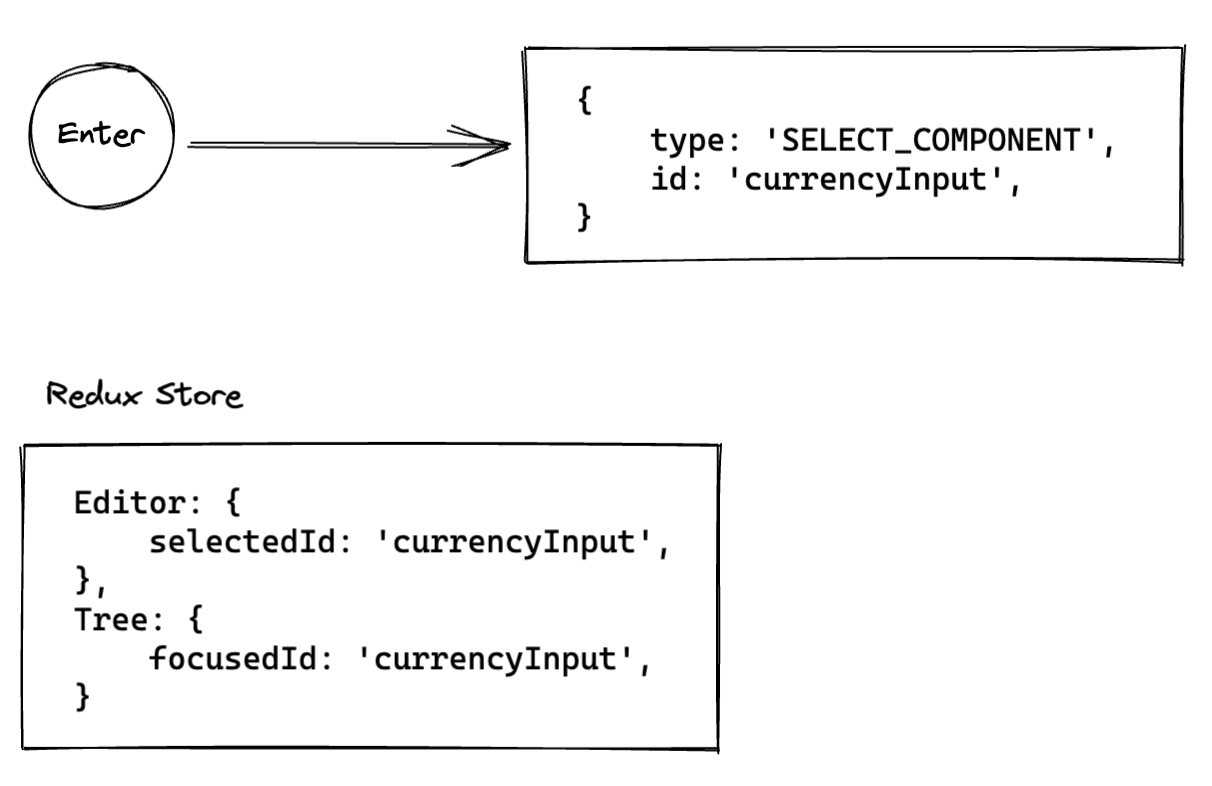
Retool uses Redux for this type of state to ensure we have a single source of truth across the Editor and the Explorer. Let’s walk through at a high-level what the state management looks like. We’ll start with a simple case where the numberInput component is selected on the Editor, and is also the currently focused node in the Tree view:
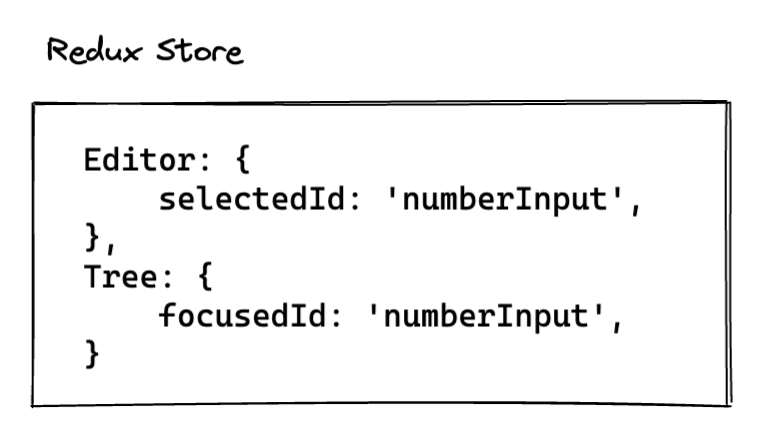
At first glance, this might look like an unnecessary duplication of state since both of the IDs in two different stores are the same. However, as per the WAI-ARIA guidelines, when interacting with the tree from the keyboard, using arrow keys will move the focus state. We’ll need to dispatch a Redux action, which in turn will update the Redux store to capture this requirement.
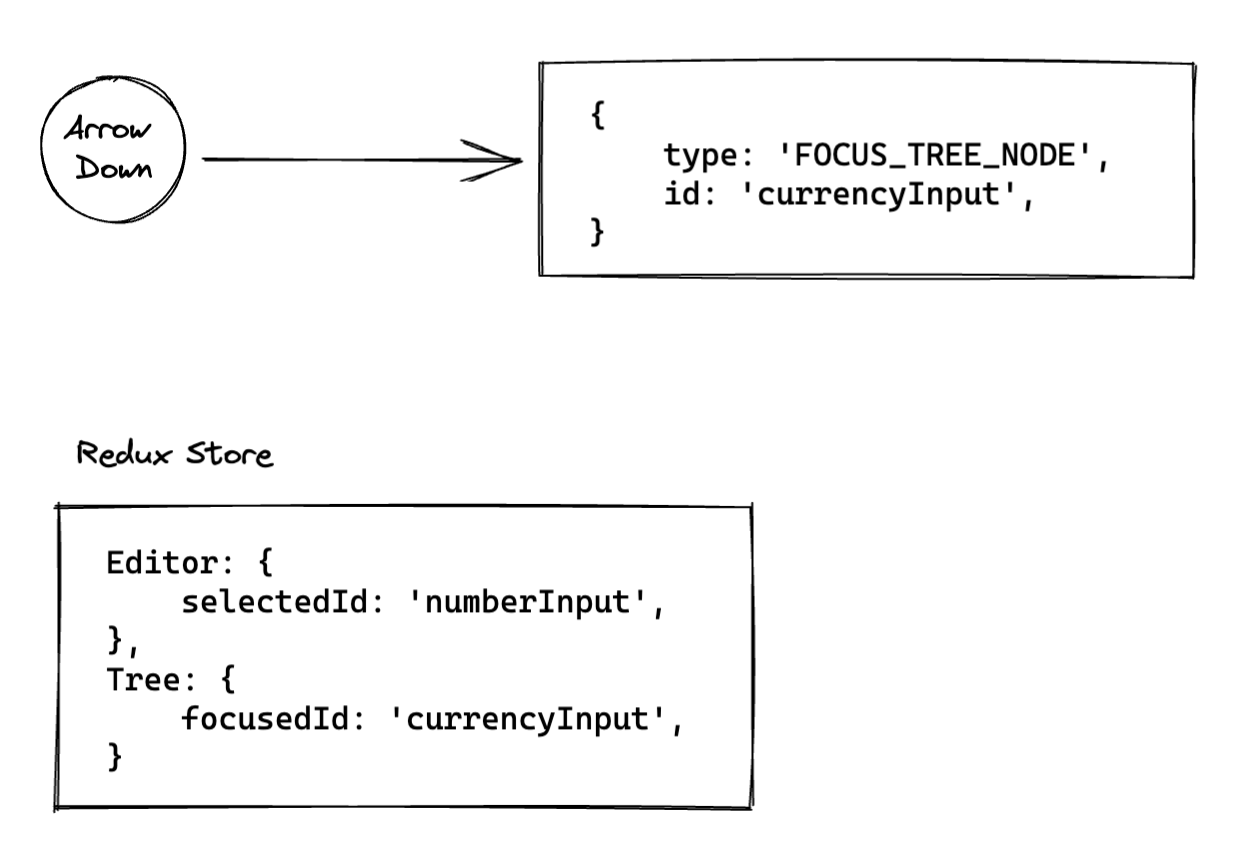
Note that we now have two different IDs in two different Redux reducers. We maintain two separate pieces of information that are both accurate. Since focusedId is not always guaranteed to be the same as the selectedId in the rest of our application, we want these to be different!
Let’s go further. Per the WAI-ARIA guidelines, when using the Enter key, it should trigger the “default action” of the item in the Tree view. For us, the “default action” is selecting the currently focused node. This will dispatch another Redux action and update our store.
Note that the selected ID property in the Editor reducer was updated. We are coincidentally back to the case where both ID fields are the same. This is an accurate state to be in since these are technically independent pieces of state from one another. Now, if a user selects a different element in the Editor, what might that look like?
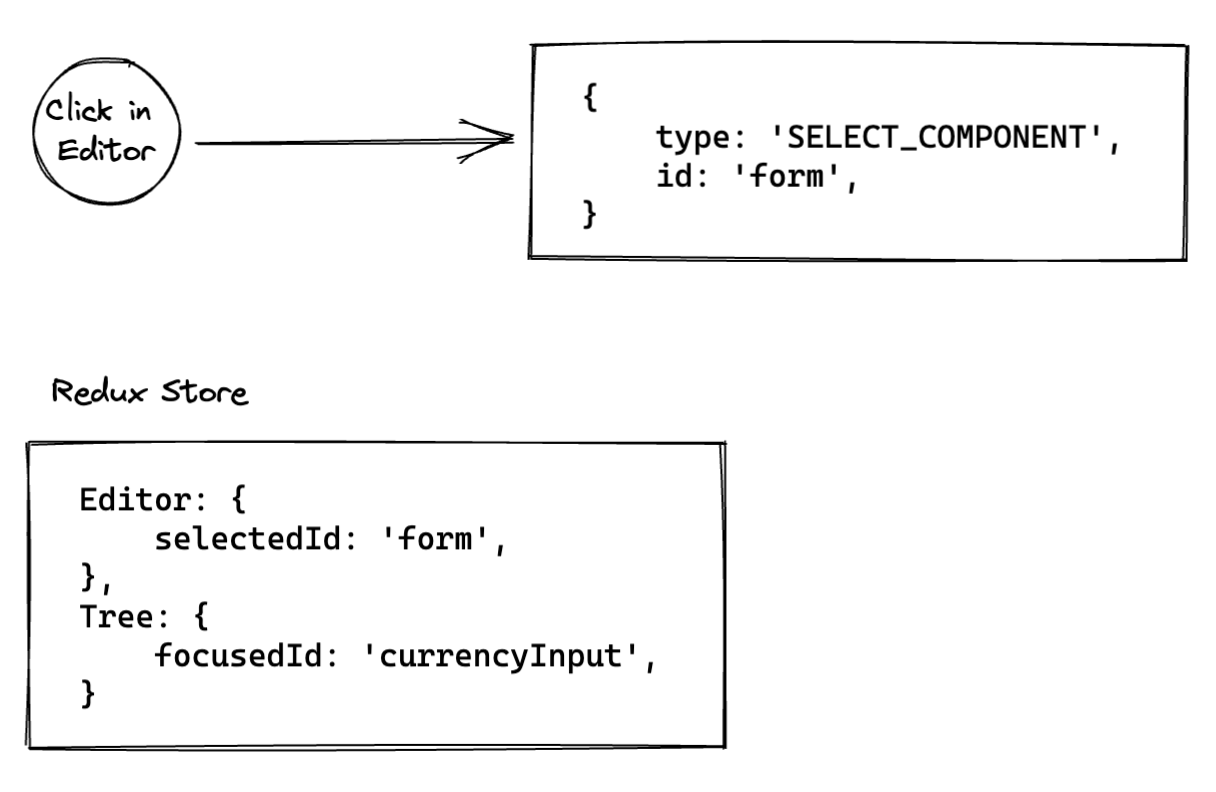
We are now in a state where the IDs are diverged again. This is accurate as we want to maintain local focus state for the Tree when actions are taking place outside of the realm of the Tree so that when focusing back on the Tree, your previous location is saved. By leveraging Redux we are able to interface bi-directionally with other pieces across our application while simultaneously keeping our business logic intact.
Testing
Testing your code is always important, but for Retool it is particularly critical. As a platform, hundreds of thousands of developers build on top of our code—if we ship code that doesn’t work, we potentially break someone else’s code too. A fast and comprehensive test cycle is required to validate all of the possible edge cases one could find themselves in, given the complexity of interactions within a tree UI. Let’s dive into how we considered testing for the Explorer UI.
We could have relied on smaller unit tests, with mocked function arguments, so that we could assert our implementation of tree keyboard handlers were working when given a mocked state. But that is too tightly coupled to the implementation, and requires a lot of fragile mocking. When we inevitably change parts of the implementation, these types of tests would also likely need to be thoroughly updated. This is a less than ideal state for tests, as they tend to be more brittle, and require more care over time, rather than being a helpful quality gate that ensures things are working as expected.
At Retool, we try to test code in exactly the same way that our users would interact with it. This gives us higher confidence that user scenarios will work, and gives us a greater separation from the actual underlying implementation so that even as the source changes, our tests will help catch issues rather than require tight coupling to the implementation. We don’t simply write tests for the sake of writing tests, we want to be absolutely positive we’re covering cases that a user would interact with.
For this case, we utilized React Testing Library user-event APIs to accomplish just that. This example shows how we test that using backspace deletes a component in the Explorer view, as we would expect.
describe('keyboard actions', () => {
   describe('when user hits backspace on a node in the Tree View', () => {
       it('handles the delete flow', async () => {
           render(<TreeView />)

           fireEvent.click(screen.getByText('MyComponent'))
           fireEvent.keyDown(screen.getByText('MyComponent'), { key: 'Backspace' })
           await waitFor(() => {
               return expect(screen.getByText('Are you sure you want to delete MyComponent?')).toBeVisible()
           })
           userEvent.click(within(screen.getByRole('dialog')).getByText('OK'))
           expect(screen.queryByText('My Component')).not.toBeInTheDocument()
       })
   })
})
An attractive aspect of this style of testing is that it reads less like a piece of code, and more like a human-readable set of actions. You can read from top-to-bottom exactly what is happening, almost completely abstracted away from how this is implemented under the hood. This strategy also allows us to write tests by simulating someone typing the keys on their keyboard all within React/Jest, without needing a full end-to-end suite, giving us a fast test cycle, and high confidence in the code we ship since we are interfacing with these components just as a user would.
Virtualization and performance
Retool enables developers to write huge applications that have to scale for incredibly complex use cases. We know that at scale, rendering this amount of information requires thoughtfulness in its performance characteristics. A technique that works well for these types of scenarios is called virtualization. Virtualization for these types of views is the concept of reserving the full width/height of possible content in a scrollable area, but only rendering what is actively within the viewport, thus allowing the rest of the non-visible items to not have an impact on render performance.
Retool takes a pragmatic approach to building software, where we thoroughly vet popular open-source solutions first, and write our own when we find it necessary. Thankfully, we found a great open-source solution for virtualization called react-window, a small yet powerful virtualization library that allows us to render any amount of items in our component tree while keeping performance high. In order to accomplish this, we had to move away from rendering each tree node recursively, to transforming the tree into a flat array so that the virtualization has enough information to render nodes as the user scrolls.
Here’s how the DOM would look with and without virtualization:
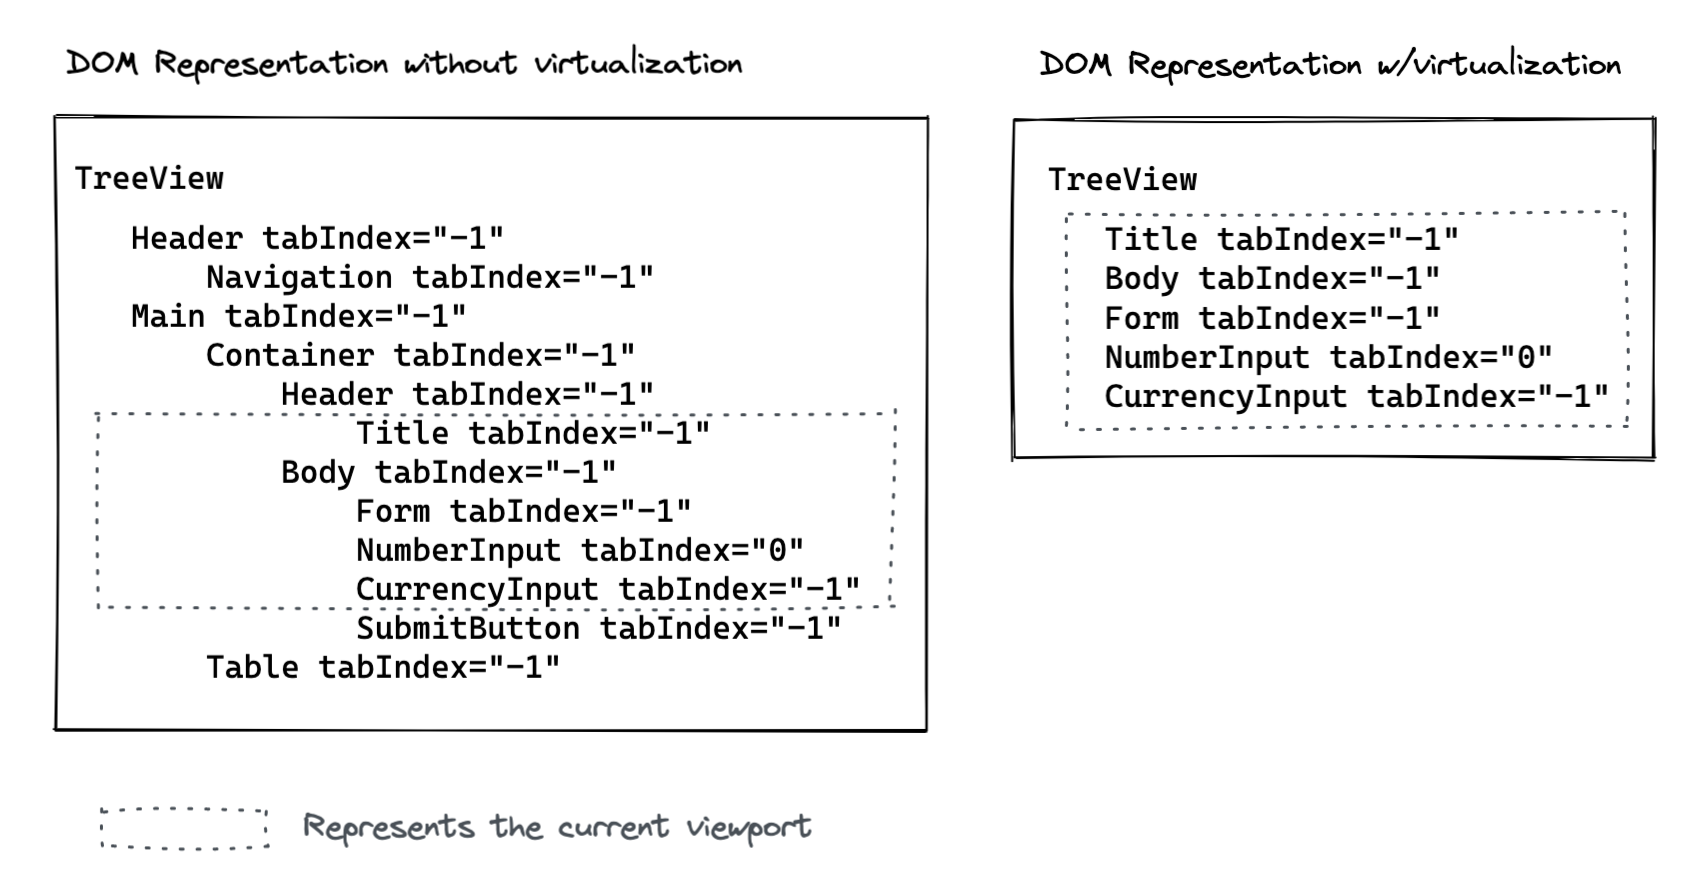
While it’s very visually easy to understand the differences between these, what’s even more subtly powerful about this is that no matter how big an application grows, the amount of elements rendered in the DOM will only be equal to what is visually on screen at a time! This equates to a huge performance improvement and continues to unlock the power of Retool for our developers allowing them to build any application they can dream of, without being constrained by the potential for trees to grow unwieldy.
Safely descending the tree
While trees are an everyday object, working with them can be very complicated. In this post, we talked about how we created and reasoned about data structures to represent a complex tree, how we implemented key UX patterns to interact with the tree, and how we tested and designed the tree UI to support developers building complex apps on top of our platform. With a little bit of work, we shipped a tree UI that should stand proudly for many years to come.
The best way to see this tree in action is to sign up for a free Retool account and try it out yourself! Let us know what you think, and we hope that this experience will help you tend to any trees that need attention in your neck of the woods.