
As a DynamoDB user, you’ve likely encountered the need for a quick and easy way to modify the data. An admin panel (GUI) lets you perform CRUD (Create, Read, Update and Delete) operations on your database.
If you prefer to follow along in a visual format, check out the video tutorial here.
Let’s start from the Retool home screen. At the top right, hit the "Create new" button and choose to create and name a new blank app.
You'll now be in the Retool canvas, where you can add different components to your UI, like charts, tables, and text inputs. You can scroll through the prebuilt UI components on the right hand panel of the Retool app.
Configure the UI for your DynamoDB GUI
Drag a table component onto the Retool canvas from the right-hand panel, then add a text component above it to give it a name. You can use Markdown to format the table's name.
Now add a tabbed container component to the right of the table to add and edit users. You can change the names of the tabs in the right-hand panel. We've named tabs "Edit User" and "New User" to match our intended functionality.
Tip: Notice how the tab names input is formatted as an array of strings.
In the left-hand panel, you can see metadata about the user and the different components you've added.
Now that we have a simple UI set up, let's bring in the data. You can create and configure your database resource as DynamoDB in the bottom panel.
Open the bottom panel, select the sample query (normally “query1”) and click on the “Resource” dropdown. You’ll see the included sample databases and any other resources that you have already created.
Scroll to the top and choose “Create a new resource”, then select DynamoDB.
On the next screen, input your AWS credentials. Then hit "Test Connection" at the bottom. Finally, Return to your app to continue building.
Note: If you're having any trouble at this step, visit our documentation to find the various AWS IAM parameters you need to set up.
Now that we have our DynamoDB resource connected and tested, let’s run a scan operation to read from the database and show it in our table.
In the bottom panel, select your query, then select the appropriate “Table” that you want to read from in the dropdown list. After that, choose the "scan" option from the Method dropdown.
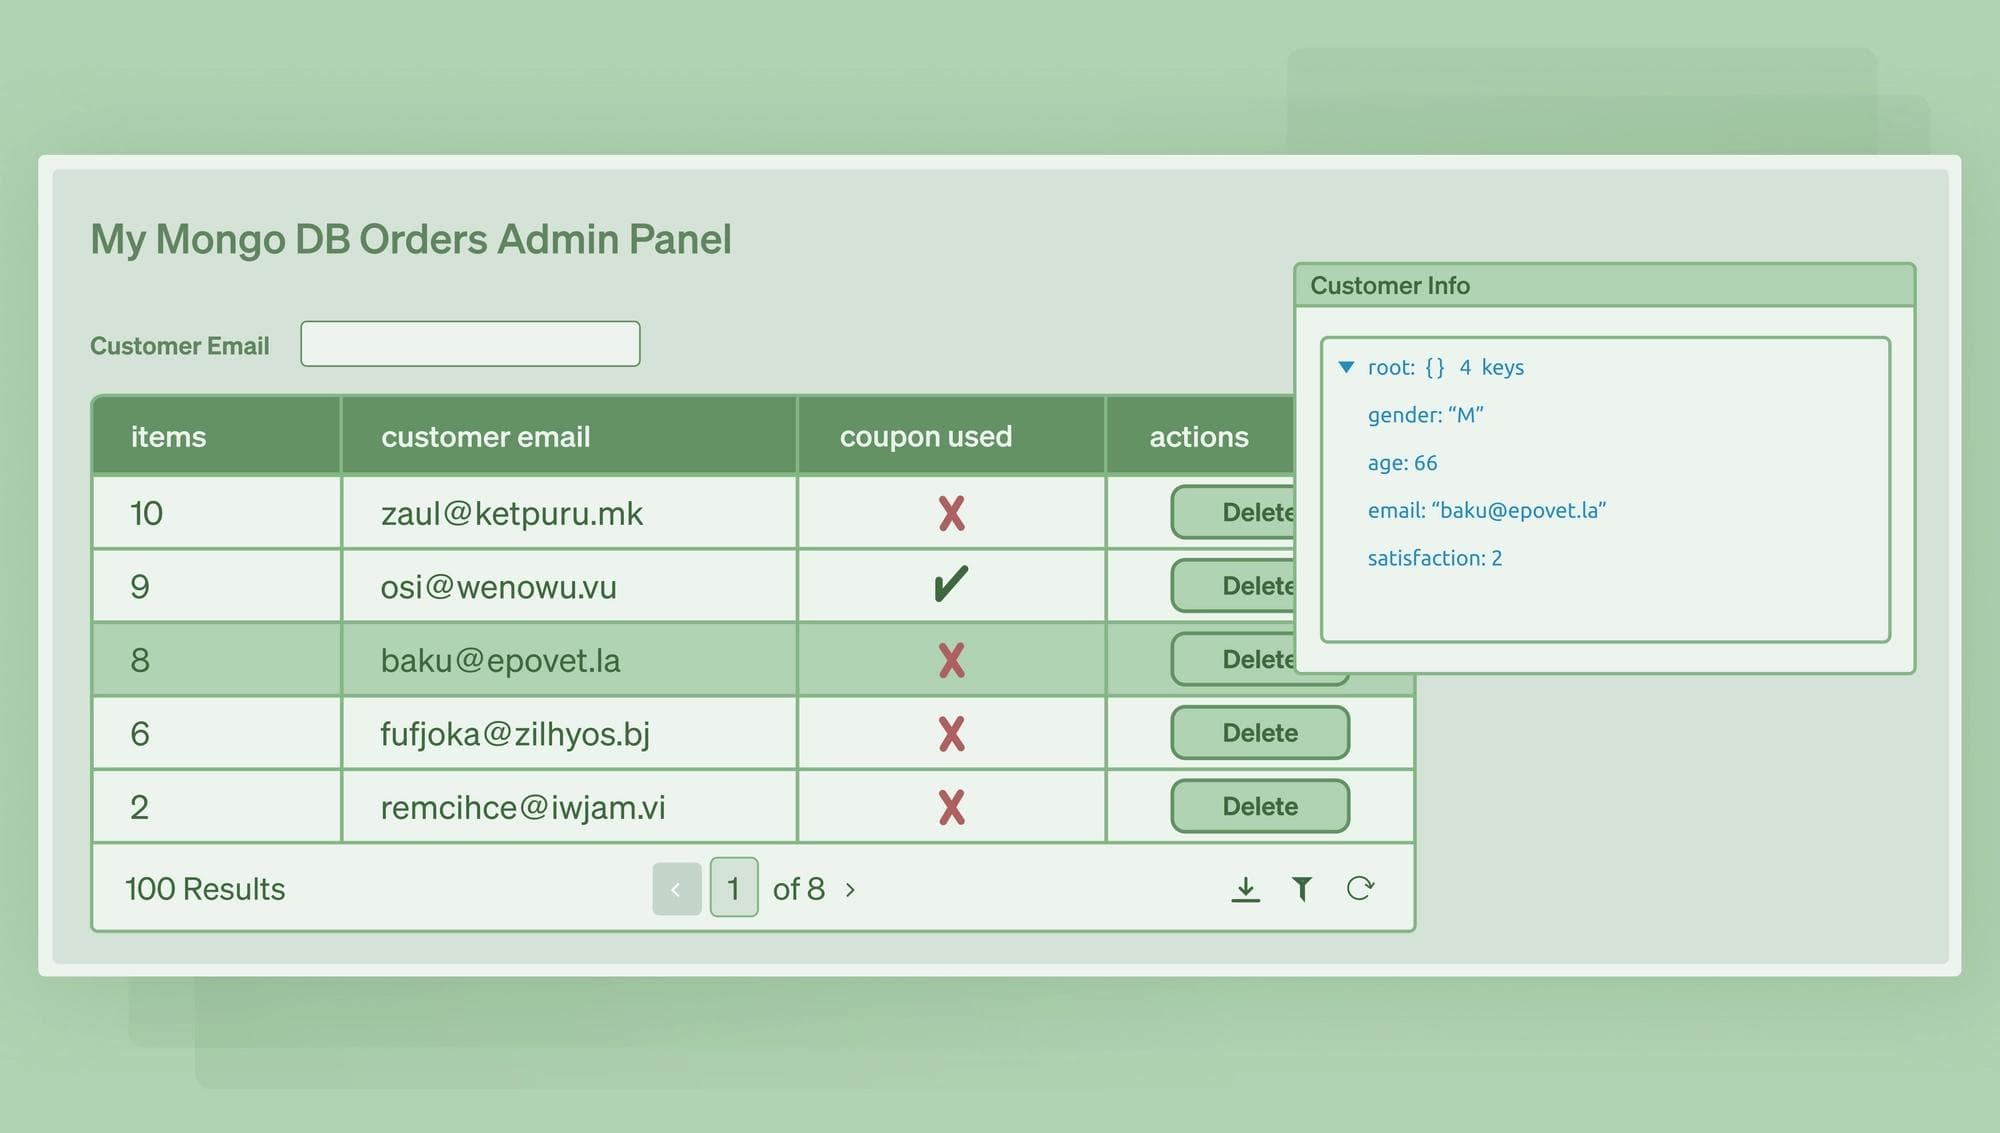
Hit “preview”. You'll see that it gives you a sample of objects from your table. In our example case, we see usernames, emails, and ages. Save and run the query.
Now you can set your table to display the data from this query. Select the table component on the canvas. On the right-hand panel go to the data input field and reference the data from your query, like so, `{{ query1.data.Items }}`.
Note that `query1` is the name of the query in the bottom panel and the data will have an “Items” property for the values returned. If you changed the name of the query you will reference that name in the curly braces `{{ QUERYNAME.data.Items }}`.
You’ll also notice that when you type the reference inside the curly braces, Retool will auto-complete your text based on the available properties in your data. You can hover over the data input field and see what the value of the referenced data is. If the data is referenced correctly, the table will update with it.
Now it's time to add an action button which will allow you or users of your app to delete a record.
To do this, select your table component and on the right-hand side of the panel, go to the "ACTIONS" area and press "+ Action." Name it “Delete”.
Next, we'll set up a query for it. Start by duplicating your read query (query1) in the bottom panel. To duplicate, click the three horizontal dots to the right of query1, then select "Duplicate." By duplicating your query, you'll keep the references for your resource setup, so you don't need to redo that work.
Name your new query "delete." You can also rename your initial query as "read."
Now under the "Method" dropdown, select “deleteitem”. Set the value for Key input so that you reference the ID of the row that's selected in your display table i.e. `{ id: {{ table1.data[i].id }} }` inside of a JSON object.
This tells our query to run the delete operation on the record ID from the selected row in the table. Hit "Save" at the top right of the query panel.
Now we need to link the delete action in our table to our newly created query so that each time the button is pressed the query will execute.
To do this, select the table component and in the right-hand panel scroll down to the “ACTIONS” section where you will click on the newly created “Delete” action. Choose your new “delete” query from the "Action query" dropdown. Now the delete button in your table is linked to your delete query.
Now when you hit the delete button on your table, your item will delete, and your table will refresh to not show it anymore.
It's a good idea to create a confirmation modal so the user must decide if they really want to delete data, especially if it is sensitive data you're working with.
In the Query panel, select the “delete” query and go to the "Advanced" tab. Check the box next to "Show a confirmation modal before running." Then enter whatever text you like in the "Confirmation message" input (e.g., “You’re about to delete an item. Please confirm.”)
Now a user will have a choice to cancel after hitting the Delete button on the table.
Ok, great success so far! Now that we’ve completed our read and delete functionality, let’s take a look at how to perform our edit and update functionality.
First, start by making two copies of the delete query. Rename them to "update" and "create," respectively.
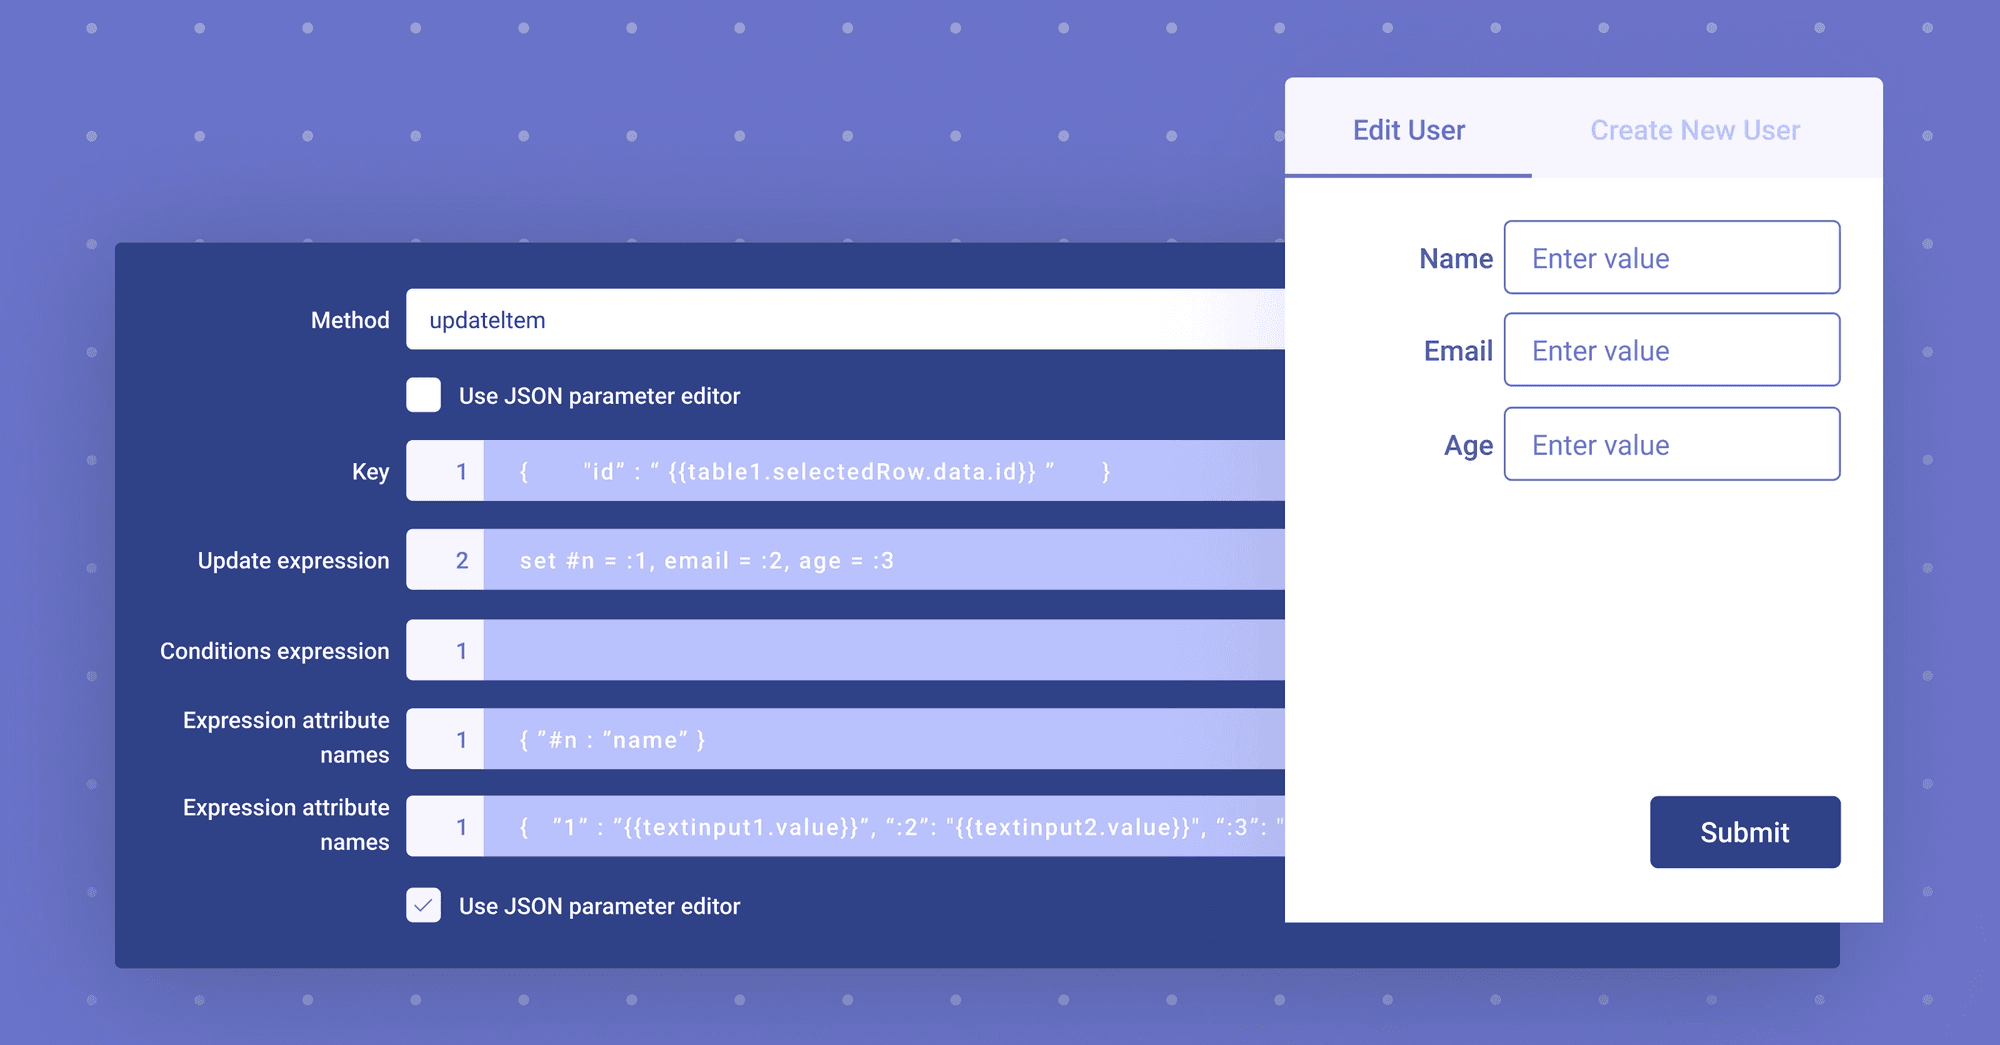
Click on the new "update" query and set the Method to “updateItem”.
Now we'll work on the UI for editing a user. Drop in two text inputs from the right-hand panel into the tabbed container to the right of your canvas. We'll set them to show the current values for the selected rows.
For the first text input, we'll choose to show the name of the current selected row. As you can see below, we've set the default value to `{{ table1.selectedRow.data.name }}. As you select different rows, the field will update to reflect data from the table.
You can recreate this step to show other data from your table. In the video, we’ve created examples for email and age. You'll change the reference at the end of the string in the "Default value" input to match what you want to show.
As an example, if you want to show email instead of name, `{{ table1.selectedRow.data.name }}` becomes `{{ table1.selectedRow.data.email }}`.
Now drop in another button from the right-hand pane in order to give the user the ability to update values. I've named my button "Update User."
In order for the button to take action, you have to set up an event handler so that when the button is clicked, it fires the “update” query we just created.
In the right-hand panel, click "+ New" in the "Event handlers" area. Change the event to "click." Change the action to "Trigger query." Select the query "update." Set debounce to run every 2 seconds (input "2000" in the "Debounce" field) to prevent any duplicate queries that might happen from multiple simultaneous clicks.
Go to the query panel below. In the "Key" input, change the string to match the fields below.
Update expression: `{ "id":"{{table1.selectedRow.data.id}}" }`
Condition expression: `set #n = :1, email = :2, age = :3`
Expression attribute names: `{ "#n":"name" }`
Expression attribute values: `{ ":1":"{{textinput1.value}}", ":2":"{{textinput2.value}}", ":3":{{textinput3.value}} }`
First, we reference the row we are intending to update and then in the next 3 fields tell DynamoDB which fields to update.
We are using an expression attribute name because “name” is a protected field in DynamoDB. By setting the condition expression to reference this name we can get around this protected field.
If you're not updating a field called name or any of the other protected values, you don't need to worry about this step.
Next we need to set our table to update and show the latest values after we update a field. To do this, open the “update” query settings in the bottom panel and set the "On success trigger" to fire the “read” query (which will run when a successful update query is ran).
Lastly, turn off the confirmation modal in the Advanced tab.
Now, when you click the "Update user" button, the table will update with your new values! Great work!
Finally, we want to give our users the ability to add a new user. To do this and save a little time, select and copy the text inputs from the "Edit user" tab and paste them to the "New user" tab.
Also, add a new text input for the id field as seen in the image below.
Now add a new button called "Create new user." Go to the "create" query in the bottom left panel. In the options in the middle of the query panel, change Method to `putItem`.
In the “Item” input, change the syntax to be an object referencing the fields from our text inputs as we've done here:
For example:
`{ "name": "{{textinput9.value}}", email:"{{textinput10.value}}", "age":{{textinput11.value}}, "id":"{{textinput12.value}}" }`
Lastly, set another “On success trigger” to fire the “read” query once again, in order to update our table which each new added user. Save your query.
Next we'll link our "Create new user" button in the canvas by setting its "Event" to "Click" and it’s “Action” to “Trigger query” with the “Query” set to “create”. Enter "2000" in the "Debounce" field.
At this point, if you enter text in the input fields and hit the "Create new user" button, you'll see a new row added to your table.
And that’s it! Feel free to try out all of the functionality by going to Preview mode which will allow you to see the app as a user will see it.
Congratulations! You’ve successfully created your DynamoDB admin panel.
To learn more about working with admin panels, but also more advanced uses of Retool, join us at community.retool.com.
Reader