

This post was written with help from Amarachi Aso.
Performance-conscious applications often utilize Redis to cache queried data. Occasionally, Redis might be implemented as the primary database or source of truth. Regardless of the setup, engineers may want to retrieve and visualize their Redis data. In this tutorial, we will use Retool to build a basic CRUD admin panel connected to a Redis instance.
First, why Retool? Retool helps developers build user interfaces for their data with prebuilt frontend components. Developers can focus on CRUD operations and search queries, connecting response data to Retool's ready-to-use familiar components. In particular, Retool is designed for developers that prefer writing SQL and Javascript transformations over React components and CSS.
In this tutorial, we will accomplish the following:
- We will load a sample list of employees into a Redis database
- We will use Retool to create a user interface to display, search, and perform CRUD operations on the employee data
Afterward, we will explore connecting that data to Retool's UI components.
We will start by loading some sample data into our Redis database. We can do this by running the following query in the Redis command line interface (redis-cli), which will create fifteen employee profiles:
1 2 3 4 5 6 7 8 9 10 11 12 13 14 15 16 17 18 19JSON.SET employee_profile . '{ "employees": [ { "name": "akash", "level": "L3", "age": 70,"married": true }, { "name": "peter", "level": "L2", "age": 42,"married": true }, { "name": "franklin", "level": "L1", "age": 24,"married": false }, { "name": "sandra", "level": "L1", "age": 27, "married": false }, { "name": "michael", "level": "L2", "age": 43,"married": true }, { "name": "simon", "level": "L5", "age": 44,"married": true }, { "name": "cindy", "level": "L2", "age": 45,"married": true }, { "name": "terry", "level": "L3", "age": 46,"married": false }, { "name": "mikol", "level": "L2", "age": 47,"married": true }, { "name": "arun", "level": "L2", "age": 48,"married": false }, { "name": "cherry", "level": "L3", "age": 49,"married": true }, { "name": "pico", "level": "L2", "age": 50,"married": false }, { "name": "beta", "level": "L1", "age": 51,"married": true }, { "name": "samt", "level": "L2", "age": 60,"married": true }, { "name": "solomon", "level": "L2", "age": 30,"married": true } ] } '
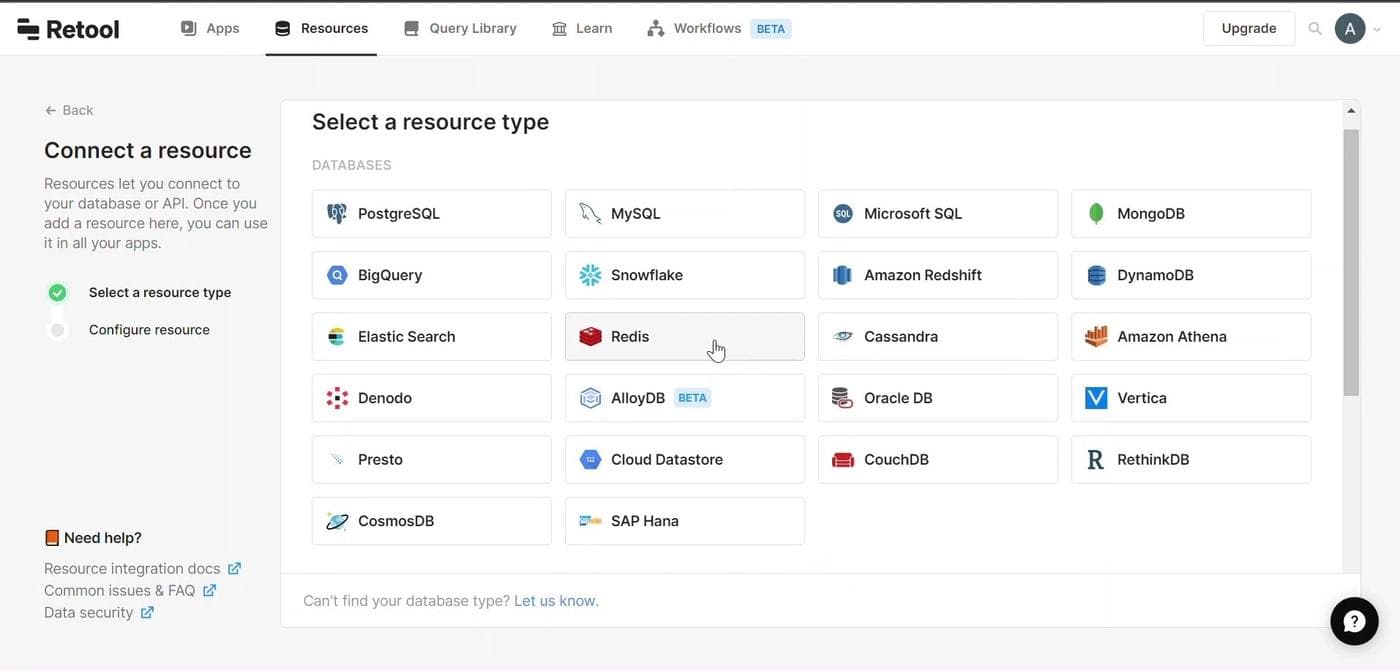
There is a tab in Retool called Resources that lets us connect to our database or API. Since we will be working with a Redis database in this tutorial, we will need to create the resource for working with Redis data.
On Retool, we need to get to the page where we can select and create a resource by clicking Resources, which can be seen on the top navigation bar. Next, we click Create new, then Resource.
Next, we select Redis as the resource.
The next screen is a form where we'll complete our Redis integration. Here, we will need our database connection credentials. If we only have our Redis connection string, we can parse out our credentials like the following example:
The connection string redis://default:pj5ztN0s1SJ7yuuVThigN6rnvFbqk0Bq@redis-16001.c259.us-central1-2.gce.cloud.redislabs.com:16001 maps to:
- Name: our database name
- Folder: We will leave the folder as the pre-selected option
- Host: redis-16001.c259.us-central1-2.gce.cloud.redislabs.com
- Port: 16001
- password: pj5ztN0s1SJ7yuuVThigN6rnvFbqk0Bq
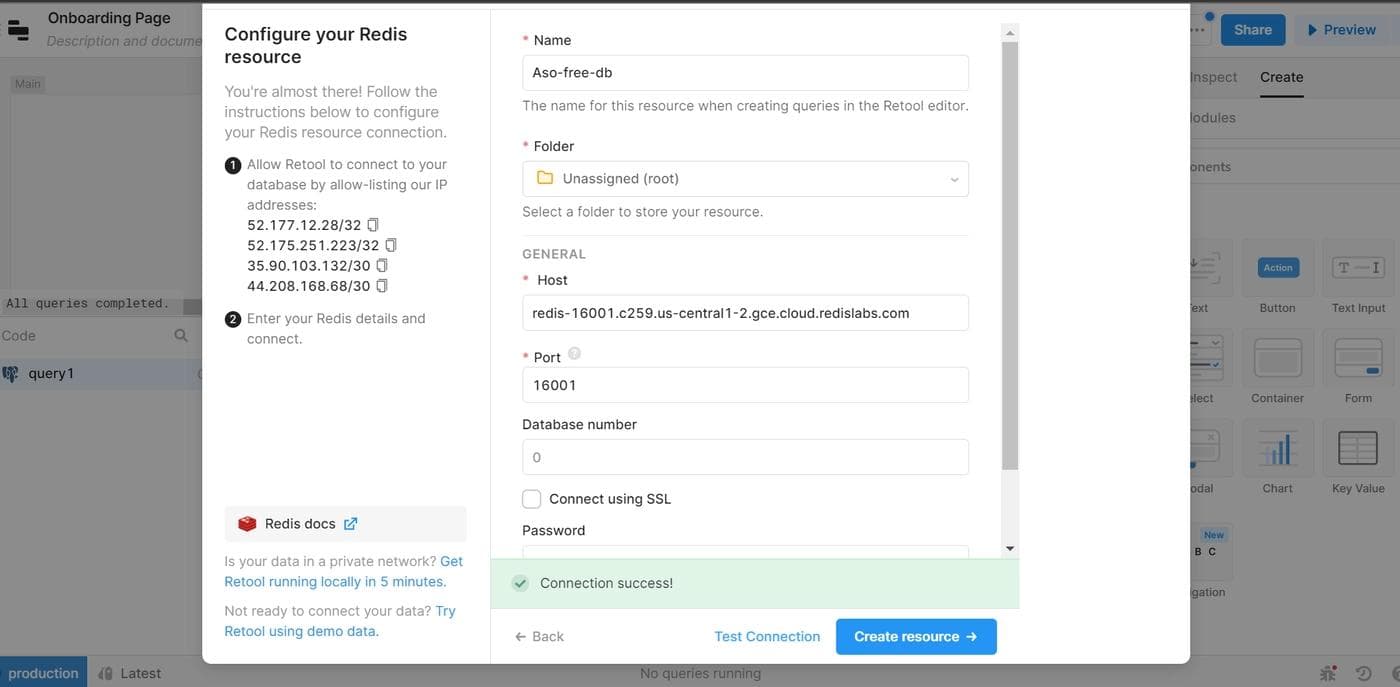
If we hit an error, we need to scan our connection details for a possible typo; otherwise, we double-check that our Redis instance is live. If successful, we click Create resource.
Note that if you just created your Retool account, you'll be redirected to the app editor and the name of the app will default to Onboarding Page.
Otherwise, the next prompt asks if we want to start building an app with this resource data. We click Create an app, and on the next screen, we type Redis-admin-panel as the name of our app.
The Retool editor features a main canvas area for building the app, alongside toggle-able left, bottom, and right panels. The panels can be closed or made visible by clicking on the corresponding button on the top navigation bar.
We will insert table components using the right panel. Next, we will replace the default data by constructing a query to fetch data from Redis.
On the bottom panel, we will navigate to the select input type labeled Resource. We select the resource name we used when we connected our Redis database. Next, an input field will appear where we can select a pre-defined Redis command or write our own raw command. For now, we'll do the latter.
The sample data we're working with is a RedisJSON data set, so in the input field, let's type in the command json.get employee_profile .employees. This command will return all the employees in the .employees array. We click Preview, then Save & Run.
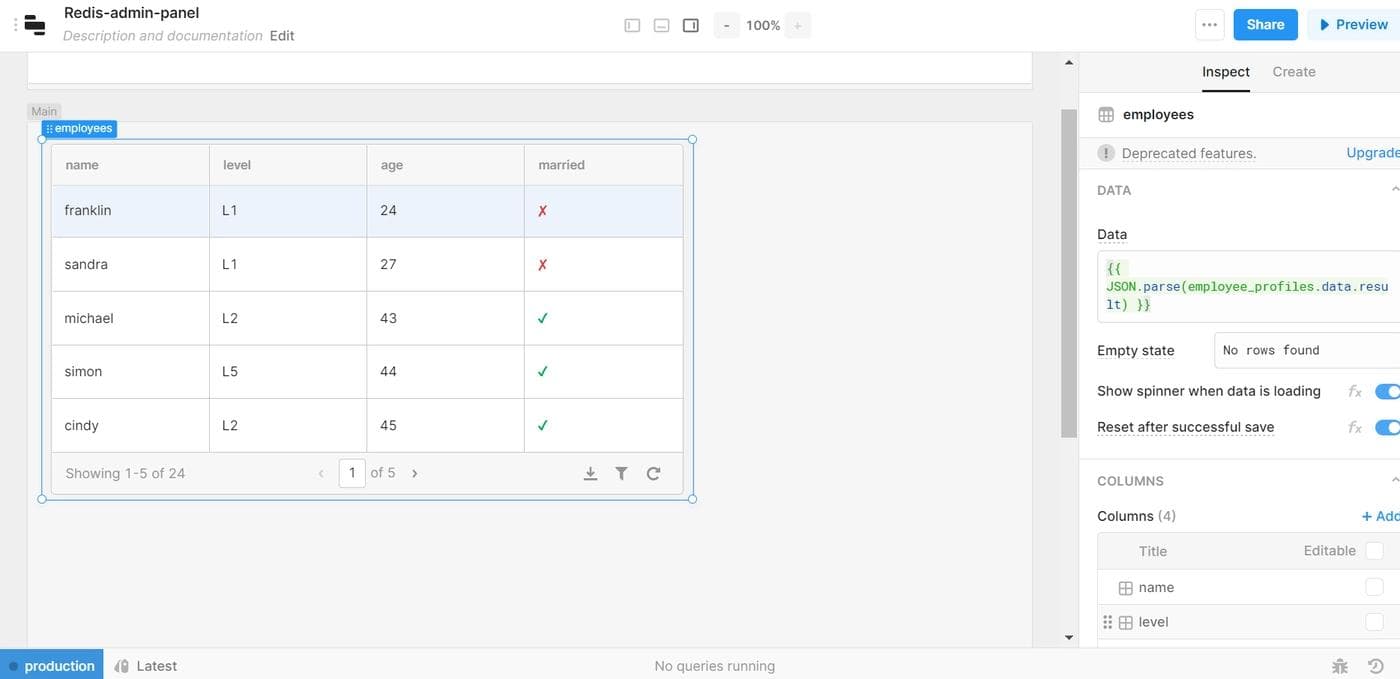
At the top of the bottom panel, we change the name of the query from query1 to employee_profiles so that it becomes easier to understand what this is for. After this, we click on the table on our canvas, then look at our right panel or open it if it's currently collapsed. Under the Inspect tab, we change our table name from table1 to employees.
Under the DATA section, we change what's currently in the data input field to {{ JSON.parse(employee_profiles.data.result) }}.
Note: In Retool, we can write JavaScript inside double curly braces {{ }}. After our employee_profiles query is run, the list of employees will be returned inside employee_profiles.data.result. RedisJSON returns the list as an array of objects wrapped in a string. Therefore, in order to remove the string around the array, we need to pass the list to JSON.parse().
Now from the canvas, we can click on the refresh icon to refresh our table. It should display our sample data.
Next, let's make it easy to create a new employee record directly from Retool.
First, we create a query for this functionality. On the left side of the bottom panel, we click + to add a new query. A dropdown menu will appear; we select Resource query. We change the name of the new query from query2 to add_employee.
Then, in the command section, we select Use raw command and paste the following command into it:
1JSON.ARRAPPEND employee_profile .employees '{ "name": "{{ employee_name.value }}", "level": "{{ employee_level.value }}", "age": {{ employee_age.value }}, "married": {{ marital_status.value }} } '
This should create a new employee record with the properties defined in the command. However, Retool will flag that certain properties are undefined; for now, this can be ignored as they'll be defined in the UI components.
Now that we have the query ready, we need to build the corresponding UI in order to be able to interact with our Redis data.
Using the right panel, we insert a blank modal. Via the Inspect tab, we change the name of the modal from modal1 to create_employee_modal and the button text to Add New Employee.
We click on the modal, then drag and drop the following inputs into the next screen that appears:
- We change
textinput1toemployee_nameand label asName. - We change
textinput2toemployee_leveland label asLevel. - We change
numberinput1toemployee_ageand label asAge. - We change
switch1tomarital_statusand label asMarried.
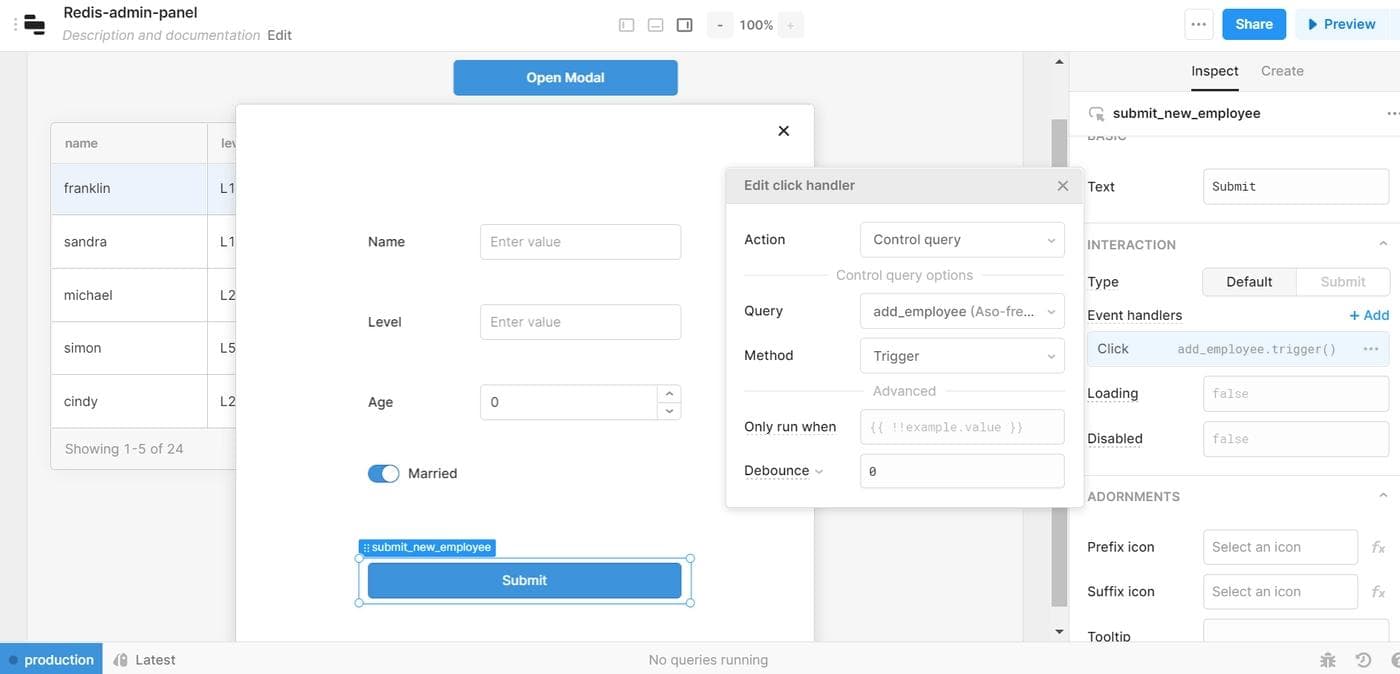
Lastly, we drag a button to the bottom and do the following:
- We change the name to
submit_new_employeeand the text toSubmit. - With the same button selected, we go under the Inspect tab, and click on the option to add an event listener.
- When a window pops up, we ensure that
control queryis selected under actions. - Finally, under Query, we select
add_employeefrom the dropdown.
Now let's try adding a new employee by clicking on the modal, filling in the inputs, and clicking Submit. To confirm that a new employee has been added, we click on the refresh icon on our table.
In this section, we'll create a feature that will allow an admin to update or delete an employee record. We start by writing the queries for these features.
We click + on the bottom panel as before. We change the query name to delete_employee. In the command input, we type the following for deleting an employee: JSON.DEL employee_profile .employees.[{{ employees.selectedRow.index }}].
This query deletes an employee on a particular index in our table. As employees is the name of our table, we're using employees.selectedRow.index to access the currently selected index on our table. Let's save our query at this point.
We start another query and name it update_employee. Under Command, we use the following command: JSON.SET employee_profile .employees.[{{ employees.selectedRow.index }}] '{ "name": "{{ update_employee_name.value }}", "level": "{{ update_employee_level.value }}", "age": {{ update_employee_age.value }}, "married": {{ update_marital_status.value }} } '.
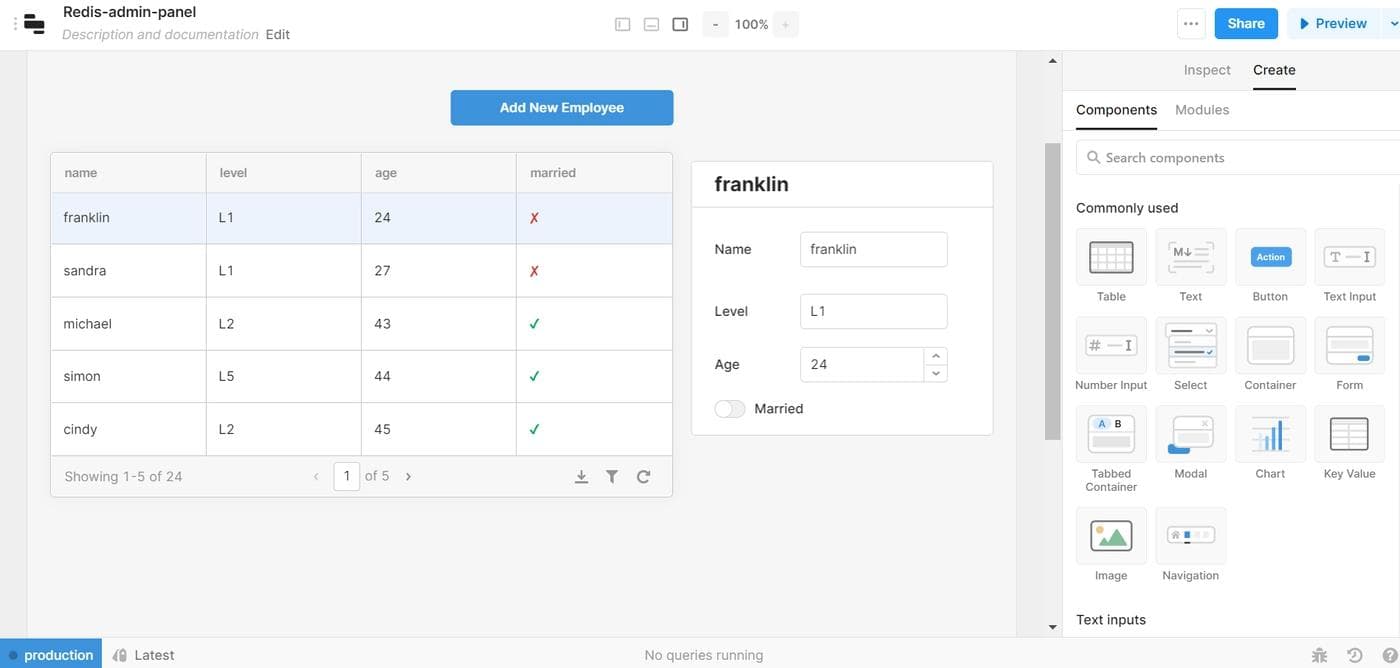
Now, we can start creating the UI where we would need the above queries. Using the right panel, we add a container, placing it to the right of our table. From Inspect, we change the value of Container Title to {{ employees.selectedRow.data.name }}.
We drag and drop the same sets of inputs we used for the Add New Employee modal, but this time we add update_ to the names of the inputs, and add default values to them as follows:
- We change
textinput1toupdate_employee_name, label asName, and assign the default value{{ employees.selectedRow.data.name }}. - We change
textinput2toupdate_employee_level, label asLevel, and assign the default value{{ employees.selectedRow.data.level }}. - We change
numberinput1toupdate_employee_age, label asAge, and assign the default value{{ employees.selectedRow.data.age }}. - We change
switch1toupdate_marital_statusand label asMarried(this already has a default value offalse).
Next, we add two buttons to the bottom of this container. They should be respectively labeled Update and Delete. We create an event handler for the Update button; under Query, we select the update_employee query, then scroll down (while still on the Inspect tab) and change the color of this button to green. We do the same for Delete; we add an event listener to this button and choose the delete_employee query, then change the button color to red.
Our final app should look like this.
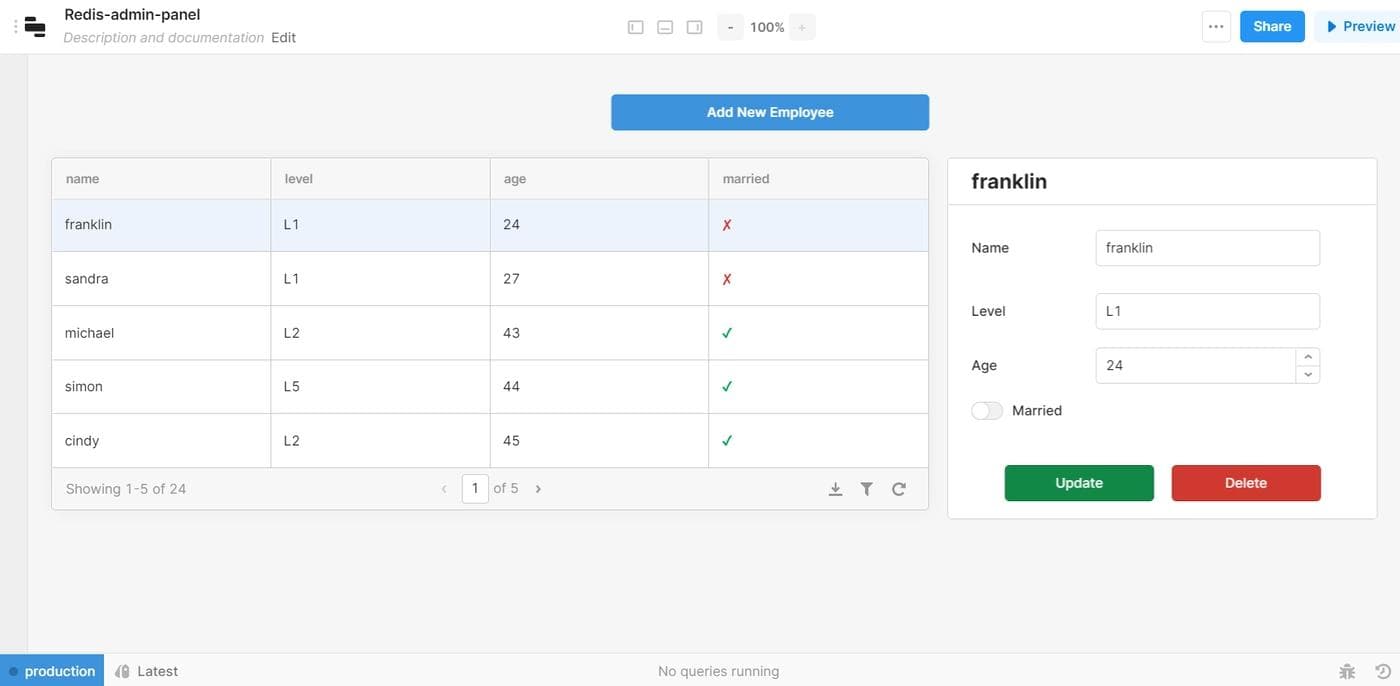
Now, we can try updating and deleting an employee, then refreshing our table to confirm that these features work as expected. To test that everything works, we can run through the entire process of creating and deleting an employee.
In this article, we used Retool to build a basic CRUD admin panel for viewing and manipulating a sample of employee profile data stored in Redis.
If this tutorial was helpful, consider exploring Retool’s prebuilt templates or check out the documentation to learn more about how Retool can help you build out other applications for your team.
Reader