

Amazon Web Services (AWS) launched in 2006 with a single offering — the Simple Storage Service (S3). It aimed to let anyone store and retrieve any amount of data, anytime, from anywhere. By any standards, S3 isn’t doing too badly — the number of objects stored on the service is now in the order of one quadrillion (1 followed by 15 zeroes).
In 2010, Amazon launched versioning for S3. When enabled, it automatically stores a version history for each file, letting you revert to previous states. Functionally, it’s like storing multiple copies of the same file. If you have 3 different versions of a 5GB file, you’ll be billed for 5GB x 3 = 15GB.
While many people use S3 to manually upload and manage static files, the S3 web UI isn’t great. Especially not when versioning is involved. S3 versioning also only applies on the bucket level — you can’t choose to version a subset of objects — a folder, say — in a bucket.
Retool can help solve these problems. We can set up versioning on a granular level within a non-versioned bucket, and build an interface to let us easily
- Upload new files to S3
- Update existing files in S3
- Download historical versions of files in S3
Let’s build this together in 5 minutes. We’ll cover some Retool fundamentals (including the native S3 integration), as well as some of its more advanced features, like Transformers.
In a standard S3 bucket, let’s set up versioning within a single folder. We’ll call this folder retool-version-controlled (or your own folder name).
Our versioning system will work by appending a datetime string to the end of filenames, denoting the time of upload. For a particular file, say File.png, we might end up with 3 different versions in S3:
File.png__2018-04-01T12:34:56File.png__2018-03-01T12:56:34File.png__2018-02-01T00:00:00
To get the list above, we can filter our S3 files by the File.png__ prefix. To fetch the latest version, we can sort the list, descending alpha-numerically, and select its first member. And to fetch previous versions, we can simply select other members of the list.
Retool has a native integration with S3 to make it easier to interact with your files. For this walkthrough, you have two options for connecting to S3:
Retool has a library of templates that come bundled with their own data sources:
- Go to Retool’s S3 File Explorer template
- Click the Use Template button
- Follow the steps to clone the template
Click on the Retool logo in the top-left to go to your dashboard, and click the Create button to make a new app. Your S3 resource will be named [demo] S3 in your Retool apps.
- Go to Resources > Add > Amazon S3
- Enter your S3 credentials. The Label field will set the name of your S3 resource in your Retool apps.
- Follow the instructions here to configure your S3 account
Click on the Retool logo in the top-left to go to your dashboard, and click the Create button to make a new app.
Retool lets you read and write to any data source using Queries. The native S3 integration makes it easy to interact with the S3 API.
- Go to the Query Editor at the bottom of the screen, and change
query1to use the your S3 resource. - Under “S3 Action”, select List all files in bucket.
- Under “Prefix to filter results”, enter
retool-version-controlled/(or your own S3 folder name). - Press Preview to check that your query works, and press Save.
- Double-click on
query1and rename it to something more descriptive, likelistAllFiles.
Let’s show our file list in a table.
- Drag on a Table from the Components list on the left-hand side.
- In the table’s Data field, enter
{{listAllFiles.data.Contents}}.
Your table should now display a list of files in the S3 folder we specified above. We now need a way to upload new files to the folder. We now need a way to upload new files to the folder.
Retool comes with a component specifically for uploading files to S3: the File Picker. We want to be able to select a file, set the S3 file name, and then upload it to S3. We’ll use a Text Input to let the user set the file name, and a Button to trigger the actual file upload to S3.
- Drag on a File Picker from the Components list on the left-hand-side.
- Do the same for a Text Input and Button component.
- Click on the Text Input and set its Default Value to be
{{filepicker1.file ? filepicker1.file.name : ''}}. If there’s a file selected, this will automatically fill the Text Input with the file name. If not, it won’t. - Double-click on
textinput1and rename it to something more descriptive, like fileName.
You can test whether (3) worked by clicking on your File Picker component twice (once to select it, and once to trigger it), and selecting a file. The Text Input should show the file name, but you can still customize it.
So far we’ve got the components we need. Next, we need to create the query that actually uploads our files:
- Go to the Query Editor at the bottom of the screen, and press New Query. Use the Resource dropdown to select the [demo] S3 resource (or your own).
- Under “S3 Action”, select Upload Data.
- Set the “Export File Type” to Binary.
- Set the “Upload File Name” to
retool-version-controlled/{{fileName.value}}. This will fetch the current value of your text input, and will update dynamically. - Set the “Upload Data” to
{{filepicker1}}. This will automatically retrieve the selected file in your File Picker, and extract its binary data.
After an upload, we’d like to refresh the files list in our table to include our new file.
- Scroll down to the “After this query runs” section, and under On success, trigger these queries, select your
listAllFilesquery. - Press Save to save your query. Double click on the query tab to rename it to something more descriptive, like
uploadFile.
We have our components, and we have our query. Now, we need to put them together.
- Select the Button component that you dragged on earlier.
- Under “Action”, select Run a query, and then select your
uploadFilequery. - Under “Display Options” > “Disabled?”, enter
{{!filepicker1.file}}. This will disable your file upload button when there’s no file selected.
So far, this app will just upload new files to S3. Let’s add our versioning system in.
Our system needs a way to generate versioned file names, and a way to view and interact with files, mostly without worrying about versions.
We need to apply a simple transformation to go from a file name (File.png) to its versioned counterpart (File.png__2018-01-01T00:00:00). In Retool, we can use a Transformer to do this.
- Expand the Model Browser by clicking the icon in the top-right of the screen.
- Click “Create JS Transformer”.
- Select
transformer1that you just created, and go to the right-hand side of the screen where you can edit your transformer. Double click ontransformer1to rename it to something more descriptive, likeversionControlledFileName. - Enter
return {{fileName.value}} + "__" + moment().format(). Transformers are custom JavaScript functions. Retool can make use of external libraries like moment.js. - Press “Test Run” to see if it works.
We now need to modify our S3 query to upload files using our transformed file names.
- Navigate to the uploadFile query you created in the Query Editor.
- In the “Upload File Name” section, enter
retool-version-controlled/{{versionControlledFileName.value}}. - Press Save to save the changes to your query.
- Test your upload flow. Your table should refresh and include your uploaded file.
Now, instead of showing one row for every version of each file, we’d like our table to show a single row for each file. To do this, we’ll have to transform the output of our listAllFiles query.
We’ll need to group together each record with the same filename prefix (e.g. File.png). We’ll then have to create a data structure that the Table component can parse into table columns.
- Create a new Transformer as before.
- Enter the following:
1 2 3 4 5 6 7 8 9 10 11 12 13 14 15const allFiles = {{listAllFiles.data.Contents}}; const groupedFiles = _.groupBy(allFiles, fileName => { return fileName.Key.split("__")[0]; }); const tableData = { fileName: [], versions: [] }; Object.keys(groupedFiles).forEach(key => { const fileName = key.split({{versionControlledFolderName.value}} + "/")[1]; const versions = groupedFiles[key].map(file => file.Key.split("__")[1]).sort(); tableData.fileName.push(fileName); tableData.versions.push(versions); }); return tableData;
- Rename your transformer to something more descriptive, like
versionedFileList. - Go to your Table component, and replace its Data property with
{{versionedFileList.value}}.
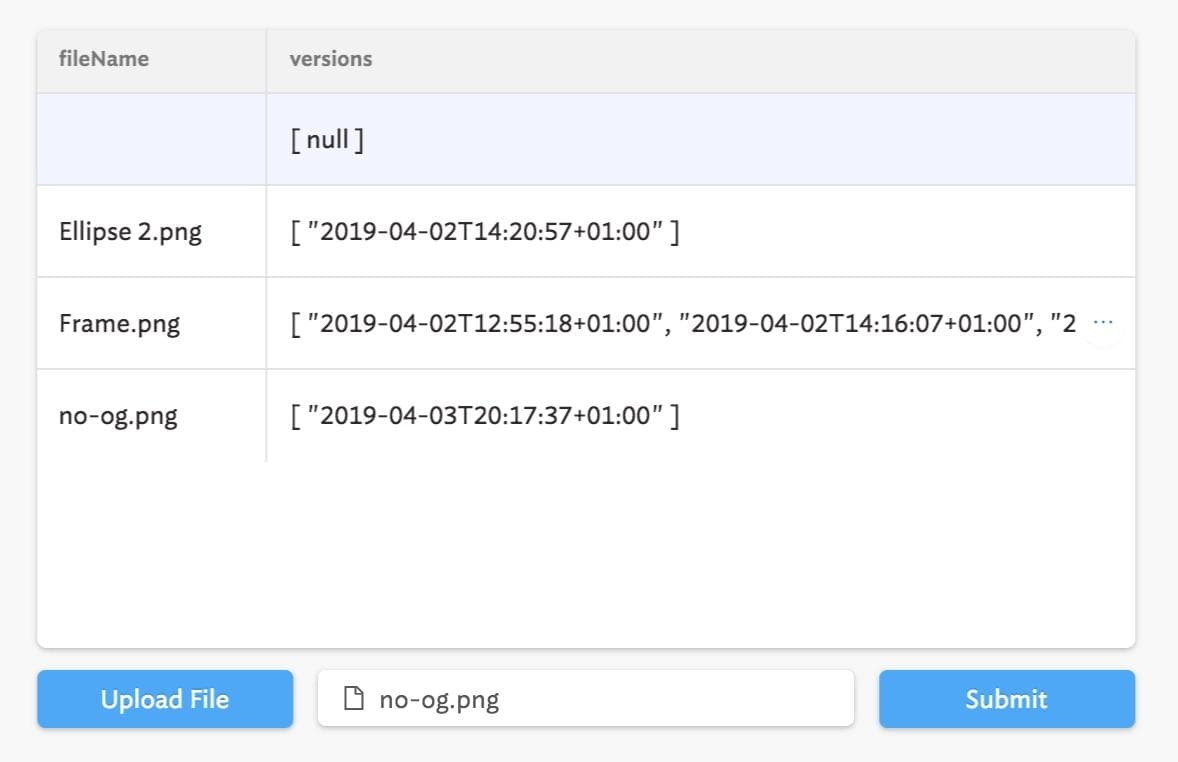
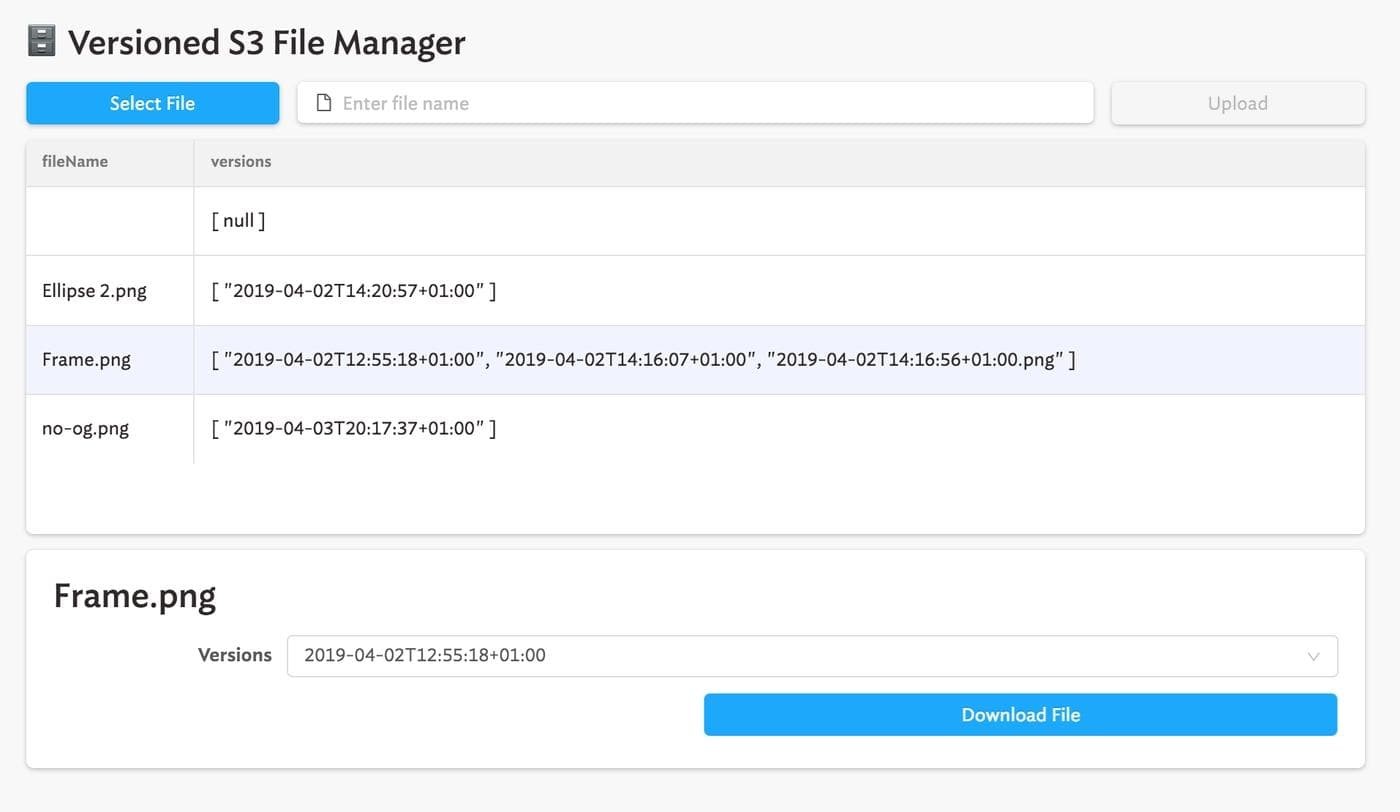
Finally, we’d like to be able to select a row in the table to drill down into a file — see its version history, download previous versions, and upload new versions.
Let’s create an area where we can show details of each file.
- Drag on a Container from the Components list on the left-hand-side.
- Drag on a Text component. In its Data property, enter
{{table1.selectedRow.data.fileName}}. You can use Markdown inside the Text component, so prepend###to your data expression to convert it into a heading. - Check that this works by clicking on a new row in the table. Your heading should update.
Now let’s build a way to download previous versions. First, we’ll create a drop-down list to select a version:
- Drag on a Dropdown from the Components list on the left-hand-side.
- Under Label, enter something descriptive, like
Versions. - In the Values field, enter
{{table1.selectedRow.data.versions}}. Enter the same in the Labels field. - Under Default value to display, enter
{{table1.selectedRow.data.versions[0]}}. - Check to make sure your drop-down works.
Next, we’ll add a button that downloads the our selected file version.
- Drag on a Button from the Components list on the left-hand-side.
- In its Action section, select Run a query for “On click”, and then select Create a new query underneath.
- Use the Resource dropdown to select your S3 resource once again.
- Under S3 Action select Download a file from S3.
- Under S3 File Key enter
retool-version-controlled/{{table1.selectedRow.fileName}}__{{select1.value}}. When you hover over the expression, it should show a preview of the file key.
- Press Save.
Retool lets you customize your app to make it your own. You can use the Text component to enter arbitrary HTML or Markdown, as well as custom styles using CSS. For now, let’s use Markdown to give our app a title.
- Drag on a Text component from the Components list on the left-hand-side.
- Enter your desired title in the component’s Value property. Prepend ### to turn it into a heading.
Rearrange the components in your app however you want!
Press the Play button in the top-right to enter End-user Mode, from which you can use your app. You can send a link to this page to others on your team, letting them use it too.
You can see a live demo of this app here.
This app that covers the basics of what Retool can do with S3. You can extend your app to interact with the rest of your data, wherever it is. Retool integrates with any database or API, and has native integrations with dozens of other services.
Sign up for a free account here: https://tryretool.com/
Reader