
In today’s fast-paced business landscape, effectively managing bank cards is a vital aspect of operations. Whether you’re issuing physical cards to track expenses, virtual cards for streamlined order fulfillment, or any other scenario that requires efficient card management, finding a seamless solution to create, distribute, and manage them is a game-changer. This is where Stripe’s Issuing API comes in, providing businesses a hassle-free way to create, manage, and distribute payment cards.
It's equally important to have a user-friendly interface for non-technical administrators, HR personnel, and others to efficiently manage those cards. By combining Stripe’s Issuing API with Retool’s app builder, you can empower your administrators to manage cards with ease through a user-friendly interface. This eliminates the need to provide administrators direct access to Stripe’s dashboard while enabling them to perform essential card management tasks effortlessly.
In this two-part blog post, we’ll walk you through building a comprehensive card management dashboard using Stripe’s Issuing API and Retool.
In the first post (this), we’ll focus on setting up the foundation for our card management dashboard. We’ll start by obtaining API credentials from Stripe and setting up Stripe API as a resource in Retool. Then we’ll walk through creating GET-related user stories that cover common card management tasks such as viewing all issued cards, searching cardholder results, and filtering by status.
In the second post, we’ll focus on extending the functionalities of the card management dashboard, with POST-related user stories—issuing new cards and blocking/unblocking/canceling a card.
Here’s the JSON export for the final application—feel free to import it to your own Retool instance to try it out. (You’ll still need to set up your own Stripe API Resource as described below.)
Let’s get started!
Before we can connect Stripe’s Issuing API to Retool, we first need to get our hands on the API credentials from Stripe. These credentials act like a unique key, granting us secure access to interact with Stripe’s data.
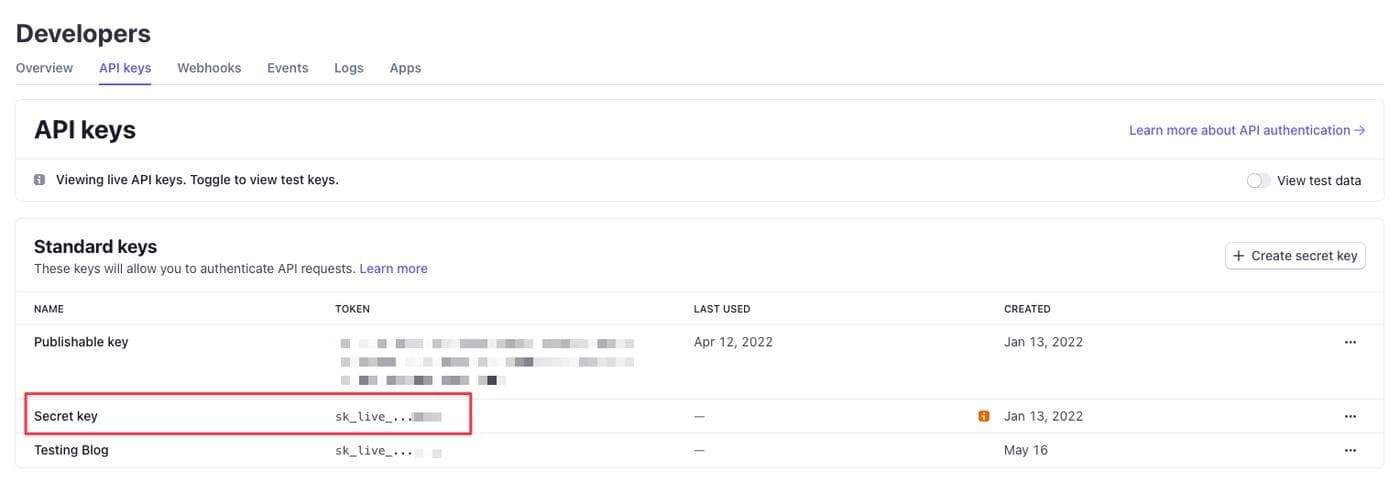
Stripe provides two modes for API keys: live mode and test mode. Live mode keys process real transactions, while test mode keys allow you to test your integration without affecting any real data. The data created with test mode is separate from live mode, and vice versa.
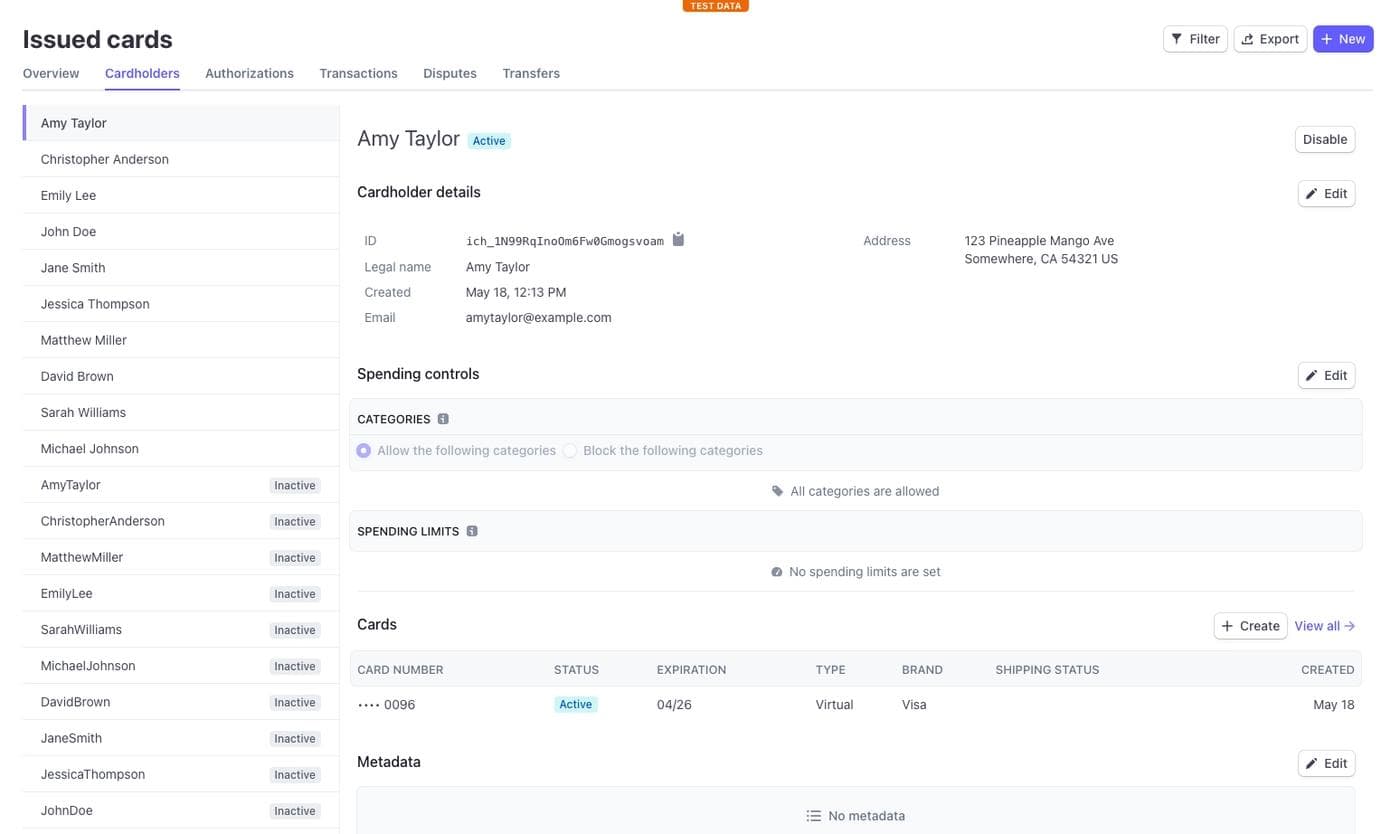
For the purpose of this blog post, we’ll be working in test mode. We’ve added a few cardholders to the test account using Stripe’s dashboard. If you’re starting fresh and don’t have any test data yet, you can add a few cardholders quickly using Stripe’s dashboard. You can toggle between live and test mode at the top of the Stripe dashboard.

You’ll notice two types of keys: a Publishable key and a Secret key. The Publishable key is used in areas of your code that your customers can see and serves to identify your Stripe account with Stripe’s servers. The Secret key is the real deal, which lets you interact securely with Stripe’s servers. It's called “secret” for a reason: it should be kept confidential, as it can give anyone access to interact with your Stripe account programmatically.
The Secret key is hidden by default, but you can reveal it by clicking on the “Reveal live key token” button. Once it’s visible, go ahead and copy this key. We’ll use this Secret key in the next section to establish our connection with Stripe’s Issuing API in Retool.
Log in to Retool and navigate to the Resources section to create a new resource. To add a new resource, click the 'Create new’ button. You’ll see a variety of resource options, but we’re in luck! Retool offers built-in integration with Stripe, so let's pick 'Stripe' from the list.

Next, you'll be asked to name your new resource. This name is for your reference, so pick something descriptive that will help you remember its purpose. For our purposes today, we’ll call it “My Stripe API”.
The next step is key (literally). You’ll see a text box asking for your API key. Paste the Secret key that you copied from Stripe earlier into this box.
Before we finalize the setup, it’s always a good idea to test the connection. Click on the "Test Connection" button. If all goes well, you’ll see a success message, which means our bridge is strong and secure.
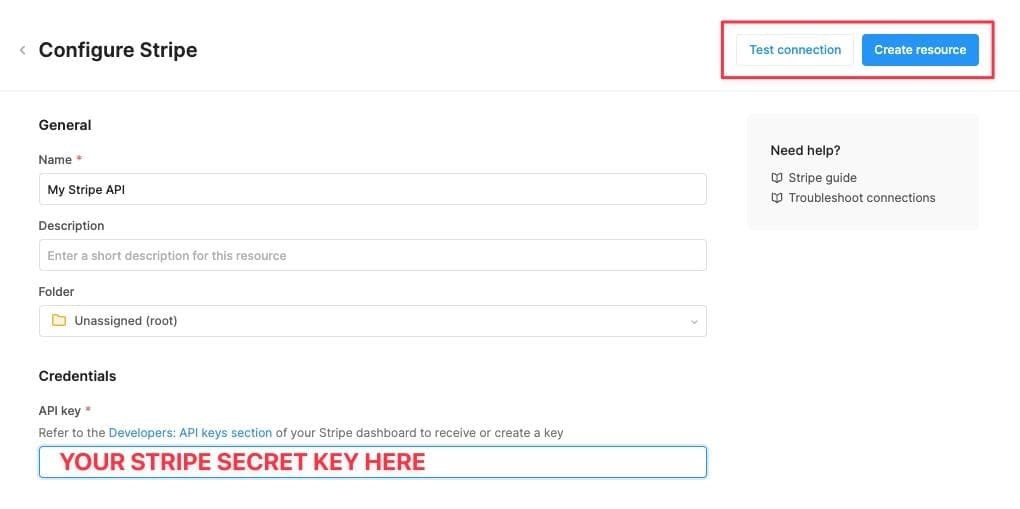
Finally, click "Create Resource" to cement the connection. Voilà—your Stripe API is connected to Retool, ready to help us build a powerful card management system.
Now that we have the connection to Stripe API done, we’re ready to build our card management dashboard.
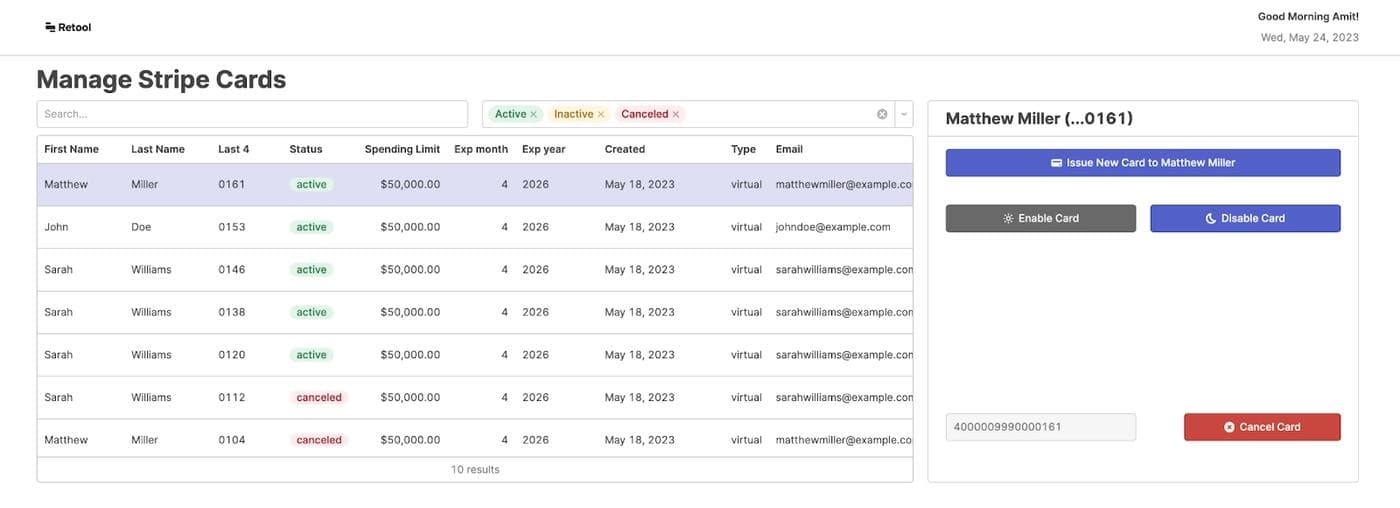
In this section, we’ll build a powerful and user-friendly card management dashboard by focusing on three user stories. These user stories represent different use case scenarios that card administrators may encounter in their day-to-day operations, and will guide us as we develop the necessary features and functionality to meet their needs and provide an optimal user experience.
- Admin can view all issued cards: Create a comprehensive overview of all issued cards at a glance.
- Admin can search and filter cardholder results: Enable admin to easily search and filter cardholders by name and card information.
- Admin can filter cards by status: Quickly filter and view cards based on their status, such as active, inactive, or canceled.
Imagine you’re an admin responsible for managing the cards issued to employees. Your need to keep a close eye on all the issued cards, ensuring their smooth operation and timely updates. To enable this, we need to create a user-friendly interface that allows you to view all the issued cards at a glance.
We’ll use the following components to design this interface:
Table component: The main component of our UI will be a Table that displays the list of all issued cards. The columns of the table would include details such as 'Card ID', 'Cardholder Name', Status', 'Expiration Month/Year', 'Spending Limit', etc.
Text Input component: Above the table, we’ll place a search bar (Text Input component) that allows admins to quickly find specific cards by searching for particular details (e.g., card ID or cardholder name). This search functionality should support real-time filtering of the table below as the admin types into the search box.
Multiselect component: Alongside the search bar, we’ll add a Multiselect component to provide a set of filters that let the admin filter cards based on certain parameters such as 'Card Status' (Active, Inactive, Canceled). Choosing a filter would immediately apply it to the table, showing only the cards that meet the chosen criteria.
This simple yet effective design will give admins a clear overview of all issued cards and enable them to find specific cards or card details quickly and efficiently.
We’ll also use the Button component to allow admins to enable/disable, cancel, and issue new cards.
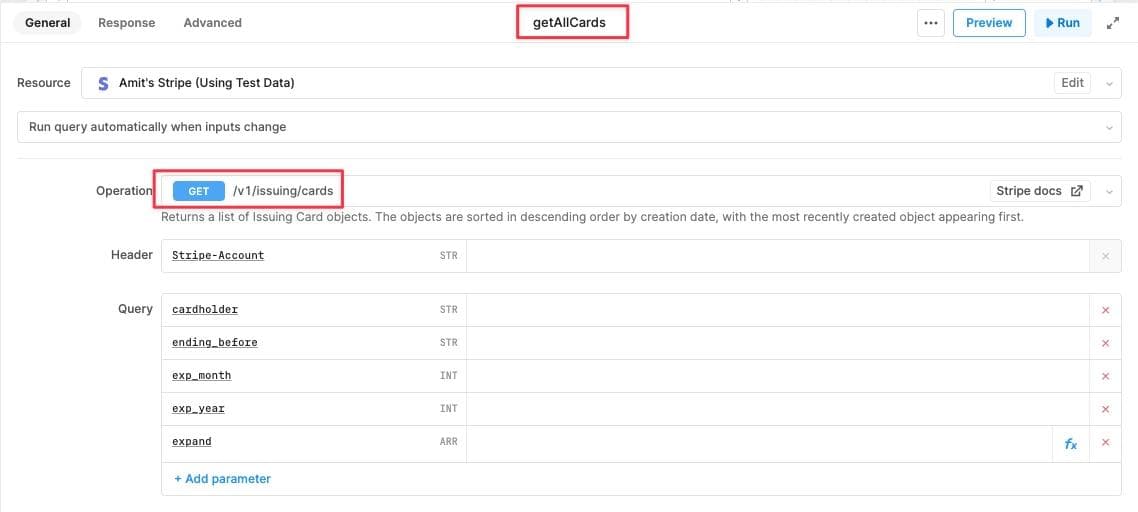
To populate our Cards table with data, we’ll utilize Stripe’s /v1/issuing/cards endpoint.
Let’s create a new Resource Query using the Stripe resource we set up earlier and name it getAllCards.
From the 'Operation' dropdown, select the /v1/issuing/cards endpoint. At this point, we don’t need to provide any specific parameters. Our objective is to retrieve all the cards that have been issued.
To display the card data we obtained, let’s add a Table component to our canvas. Once the Table component is in place, we can connect it to the data query we created earlier. In the inspector window, select the getAllCards option from the 'Data source' dropdown.
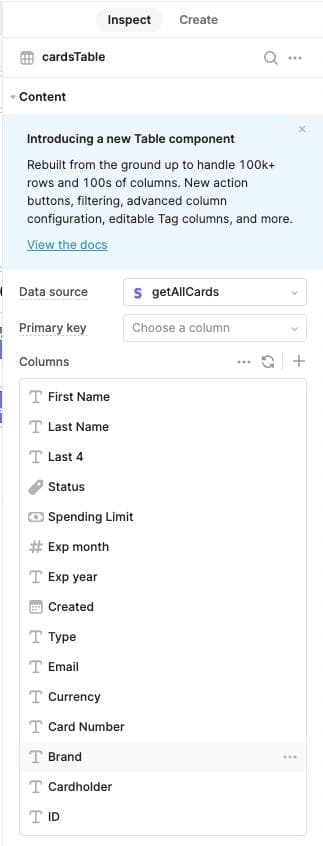
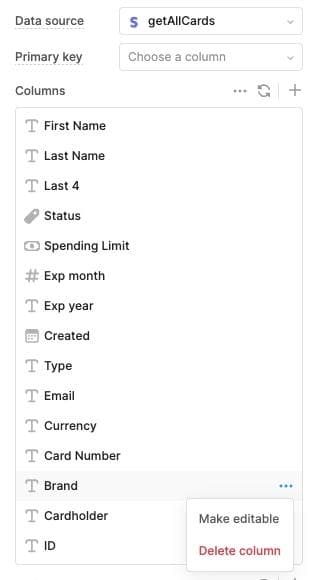
This will populate the table with the data. As you’ll see, we can clean this table up a bit by removing the columns we don’t need to display and updating the datatypes for a few columns.
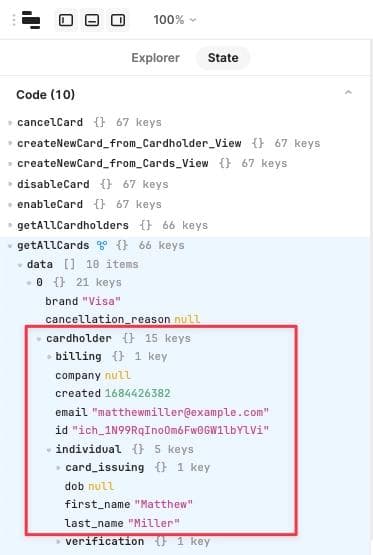
To display the first and last names of the cardholders in our Table component, we’ll add custom columns.
This information is nested within the cardholder.individual.first_name object returned by the getAllCards query, as indicated in the JSON available in the State tab. We need to map our custom column to that data.
To do this, click on the plus sign next to the columns in the inspector window. Set the label for the new column to First Name, and set the value to:
1{{ currentSourceRow.cardholder.individual.first_name }}
We’ll repeat this for Last Name by setting the value to:
1{{ currentSourceRow.cardholder.individual.last_name }}
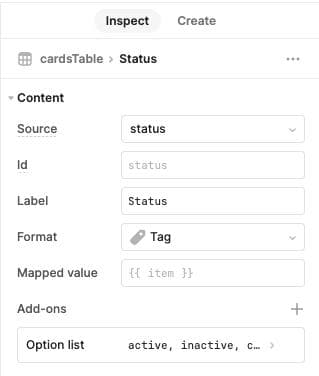
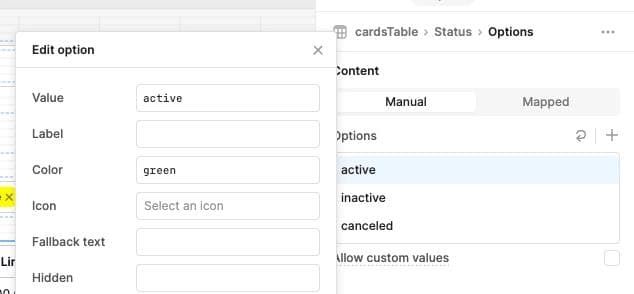
Retool automatically color codes tags for enhanced visual appeal and quick readability, but you can also customize the colors by adding options to the column's Options list and assigning corresponding colors. For example, green for active status, yellow for inactive, red for canceled.
Stripe’s Issuing API returns extensive data containing various columns that aren’t necessary to display in our table. We can customize the displayed columns to include only the relevant information by removing some of these columns from the Columns section in the Table’s properties.
In this story, we’ll enhance our dashboard by adding a search and filter functionality for cardholder results. This will allow administrators to easily search and filter cardholders by their name and card details, making it more efficient to find specific information within the cardholder table.
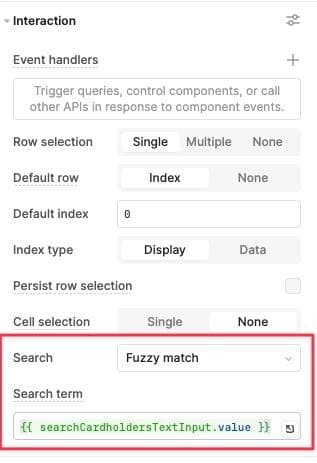
To enable search functionality in our Table component, we’ll add a text input component called searchCardholdersTextInput. This will allow users to search by cardholder name or the last four digits of the card number.
The Table component comes with a built-in search feature that automatically filters the results based on the user’s input. To set up the search functionality, navigate to the interaction section of the Table component properties in the inspector. Locate the "Search term" property and connect it to the searchCardholdersTextInput component by typing the expression {{ searchCardholdersTextInput.value }}.
That’s it! Users can now enter their search queries into the text input, and the Table component will dynamically filter the results based on the cardholder name or the last four digits of the card number.
As an admin might want to view only the active cards to check their usage or monitor any suspicious activities. With the filtering feature in place, they can easily select the "Active" status option and instantly see the relevant cards in the dashboard.
To enable admins to quickly view cards with specific statuses like “canceled,” “active,” or “inactive,” we’ll add a Multiselect component for filtering. This allows admins to choose multiple values to filter the card data.
Drag and drop a Multiselect component onto the canvas. Set the default value property of the Multiselect component to an array of options: ["active","inactive","canceled"]. You can also customize its colors to match the table’s status colors.
Update the getAllCards query by enabling the Transformer feature. This will allow us to perform some filtering based on the tags selected in the Multiselect component - active, inactive, and canceled before returning the results back to the table.
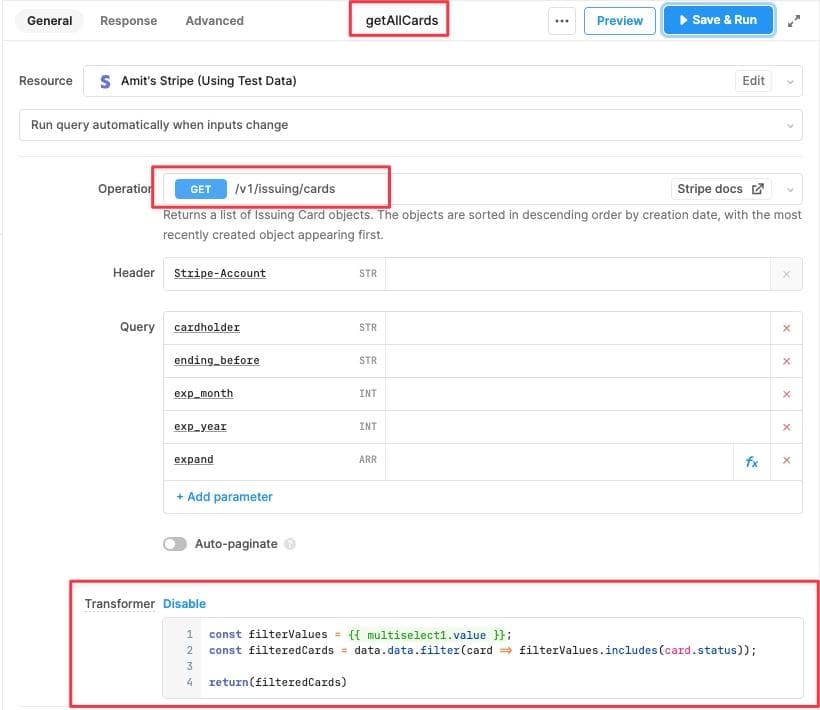
Within the Transformer code section, use the following code to filter the results based on the options selected in the Multiselect component:
1 2 3const filterValues = {{ Multiselect1.value }}; const filteredCards = data.data.filter(card => filterValues.includes(card.status)); return(filteredCards)
This simple JavaScript snippet retrieves the selected filter values from the Multiselect component and filters the card data accordingly. It checks if a card’s status matches any of the selected filter values, retaining the matching cards in the filteredCards array. Finally, the filtered data is returned to the table for display.
Alright, that’s a wrap for now. With this walkthrough, you learned how Retool’s built-in integration for Stripe can help you quickly whip up a simple yet powerful card management dashboard that empowers card administrators to manage their cards and cardholders efficiently.
This, however, is just the tip of the iceberg. There’s a whole world of possibilities that can be added to this dashboard. Managing cardholder data, updating billing addresses, and building nifty reports to track transactions and balances… the sky's the limit.
In Part 2, we’ll continue our journey and dive into additional functionalities to enhance our card management dashboard. We’ll focus on important actions like blocking/unblocking/canceling cards and issuing new cards. To check it out, head on over to the next installment.
If you have any questions or want to share your ideas with me, you can reach out on Twitter (I’m @amit), or say hello in our Discord community.
Reader