

If you got started using Firebase before last year, chances are you’re working with the (now legacy) RealtimeDB and not Firestore. This guide will walk you through how to do basic CRUD on your giant JSON object (“database”)—creating, reading, updating, and deleting objects. We’ll also go over setting up db security, as well as some notes on data structure best practices.
For our example, we’re working with the database’s REST API, but the principles apply to the Node / iOS / Android / any other client library.
Any URL within the Firebase RealtimeDB can be used as a REST endpoint by adding .json to the end. One important thing to note is that all requests must be sent over HTTPS, not HTTP. You can use any request client that you want for this tutorial, but we are going to use cURL because it’s easy to use and works right from your terminal.
Let’s pretend that we’re creating an internal app for an online retailer. The users of the internal app will be customer support reps who will need access to a table full of customer data. Using the Firebase RealtimeDB REST API, we’ll give our customer support reps the ability to create, read, update, and delete data from the Firebase RealtimeDB.
Note: We're using test mode, so we don't need to authenticate our requests. To read more about authentication check out our section below. on data security.
For this tutorial, we’ll use the following data:
1 2 3 4 5 6 7 8 9 10{ "eantoni": { "name": "Erika Antoni", "state": "California", "emails": { "primary": "eantoni@example.com", "secondary": "erika@work.com" } } }
Each object in the “users” database will have a unique key (made from the user’s first initial and last name), name, state, and emails, which are a nested object containing a primary and secondary email.
One thing to note: the RealtimeDB has a “test” mode that you can configure when you create it, which means that no authentication is required. It’s useful for testing, but remember not to put any sensitive data there.
To get started, we’ll first need to grab the URL of the database so we know where to send our requests. When you log in to Firebase, you should see something like this:
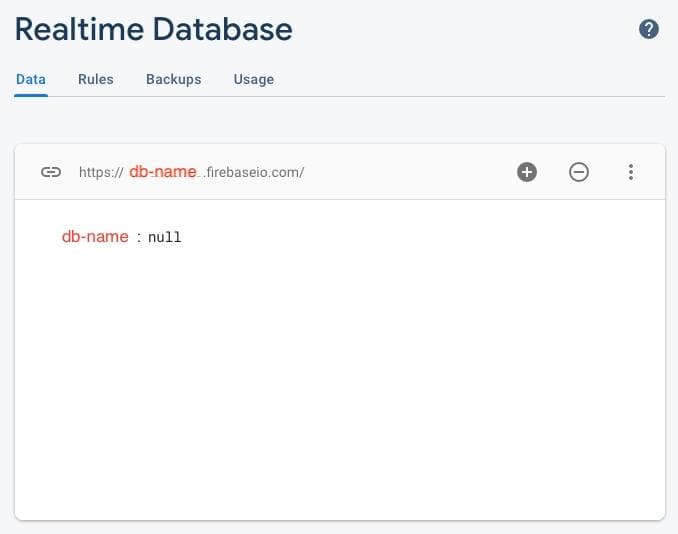
The base of the URL you are going to use is that one at the top:https://{db-name}.firebaseio.com. Instead of {db-name}, you’ll use the auto-generated db name.
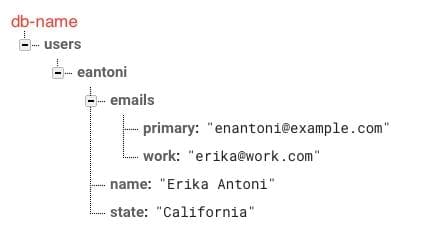
We may have a database created, but right now, there’s nothing in it. Let’s change that. We’re going to create a record for an example user—Erika Antoni—in our database. To do this, we will use PUT instead of POST since we want to define the unique key for the user.
Note that the URL we are going to use has users.json at the end of it. This endpoint doesn’t really exist - we’re actually creating a top level “users” object (via the endpoint itself) then and populating it with our payload, all in one request.
1 2 3 4 5 6 7 8 9curl -X PUT -d '{ "eantoni": { "name": "Erika Antoni", "state": "California", "emails": { "primary": "eantoni@example.com", "secondary": "erika@work.com" } }' 'https://{db-name}.firebaseio.com/users.json'
Now, when we return to our database in the Firebase console, we should see our data as a JSON tree:
To read data from our Firebase RealtimeDB, we are going to use GET with the added URI parameter “print” at the end because we don’t like looking at long, confusing lines of JSON.
1curl 'https://{db-name}.firebaseio.com/users/eantoni.json?print=pretty'
And here is our output:
1 2 3 4 5 6 7 8 9{ "address" : "55 S. 5th St., Denver, CO", "emails" : { "primary" : "enantoni@example.com", "work" : "erika@work.com" }, "name" : "Erika Antoni", "state" : "California" }
Notice how we specified the URL to read from the eantoni node. If we wanted to read the whole users database, we would simply have it go to users.json instead of users/enantoni.json. These endpoint ergonomics can be really useful if you structure your objects correctly (refer to the Firebase docs about structuring your data). We’ll cover more about structuring later on.
You probably don’t want to return your entire database at once, so let’s try filtering our request. Maybe we want to order the data alphabetically by the user’s state. Here is our sample data:
1 2 3 4 5 6 7 8 9 10 11 12 13 14 15 16 17 18{ "eantoni": { "name": "Erika Antoni", "state": "California", "emails": { "primary": "eantoni@example.com", "secondary": "erika@work.com" } }, "mmiller": { "name": "Michelle Miller", "state": "Arizona", "emails": { "primary": "mmiller@example.com", "secondary": "michelle@work.com" } } }
All we need to do is add an orderBy URI parameter to the end of our request and specify that “state” is the child key we want the ordering to be based on.
1curl 'https://{db-name}.firebaseio.com/users.json?orderBy="state"&print=pretty'
This is the response we’ll get:
1 2 3 4 5 6 7 8 9 10 11 12 13 14 15 16 17 18{ "mmiller": { "name": "Michelle Miller", "state": "Arizona", "emails": { "primary": "mmiller@example.com", "secondary": "michelle@work.com" } }, "eantoni": { "name": "Erika Antoni", "state": "California", "emails": { "primary": "eantoni@example.com", "secondary": "erika@work.com" } } }
You can check out the rest of the URI parameters for GET requests in the Firebase docs. You can also limit the results of your query (by first or last results).
Say we want to add a field to our user, like an address. To do this, we’ll use PATCH and clearly specify the path when writing the data for the object. We can do this by changing the endpoint:
1 2 3curl -X PATCH -d '{ "address": "123 1st St., San Francisco, CA"}' \ 'https://{db-name}.firebaseio.com/users/eantoni.json'
. . . or by specifying the path for the data in the request payload:
1 2 3curl -X PATCH -d '{ "eantoni/address": "123 1st St., San Francisco, CA"}' \ 'https://{db-name}.firebaseio.com/users.json'
Now we’ve added Erika’s address without disturbing the rest of her data:
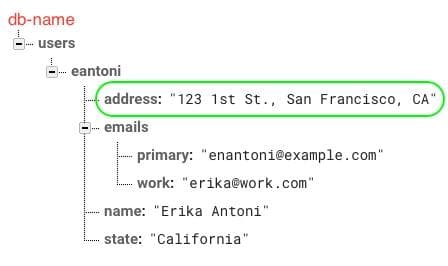
Keep in mind that neglecting to append the new path to the URL or data will result in overwriting the entire node.
Similarly, if we want to update an existing field (instead of adding a new one), we just form the request using PATCH and the specific path. Say we found out that Erika moved to Colorado. We can actually update both the “address” and “state” fields for Erika at the same time like this:
1 2 3 4 5curl -X PATCH -d '{ "address": "55 S. 5th St., Denver, CO", "state": "Colorado" }' \ 'https://{db-name}.firebaseio.com/users/eantoni.json'
And here is our updated record:
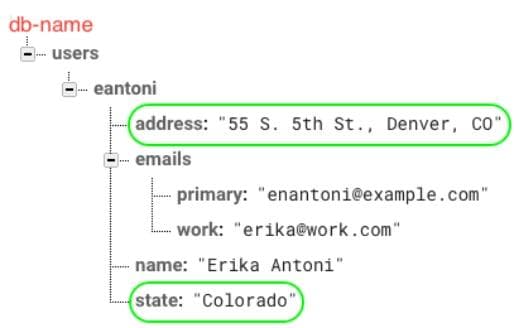
Now Erika lives in Colorado. Sweet. ⛰️
If you want to give your users the ability to delete a record, use DELETE.
1curl -X DELETE 'https://{db-name}.firebaseio.com/users/eantoni.json'
This will delete Erika’s entire record. If we only wanted to delete a field in her record, we could do so like this:
1curl -X DELETE 'https://{db-name}.firebaseio.com/users/eantoni/emails/work.json'
Again, this is where the endpoint-based record location comes in the clutch - referencing and deleting nested fields just requires a deeper endpoint. And just like that, all of our data for Erika is gone, and we’re right back where we started.
Like you’d be able to do with something like Postgres, Firebase allows users to set Rules so your DB isn’t open to random traffic. You can configure Rules via the GUI on Firebase’s website, or you can use the Rules REST API.
Rules are structured similar to a JSON object and give you the ability to specify read and write permissions at path-level, using .read and .write as keys in an object definition. For instance, if we wanted our database to be global read-only, we would do this:
1 2 3 4 5 6 7 8{ "rules": { "users": { ".read": true, ".write": false } } }
“Users” is our root database ref, so the rules in its object get applied to the whole database.
.read and .write don’t have to just be boolean values. We can also use variables and write conditionals. Let’s say that we only want our user, Erika Antoni, to be able to access her data object. We would do so like this:
1 2 3 4 5 6 7 8 9 10{ "rules": { "users": { "$uid": { ".read": "$uid === auth.uid", ".write": "$uid === auth.uid" } } } }
$uid and auth.uid are built-in variables that come from Firebase Authentication (which you can configure to work with your app).
First, you’ll need to generate an access token to be able to write Rules via REST (follow this guide for using Google’s OAuth2). Then, use PUT with the Rules object as your payload and be sure to include your newly generated access token.
1 2 3curl -X PUT -d '{ "rules": { ".read": true, ".write": false } }' 'https://{db-name}.firebaseio.com/.settings/rules.json? access_token={access-token}'
It’s important to remember that any Rules you add via REST API will overwrite any existing ones that have been configured. To avoid overwriting Rules, you can first GET configured Rules like this:
1 2curl 'https://{db-name}.firebaseio.com/.settings/rules.json? access_token={access-token}'
You can always use the GUI if you’re afraid of overwriting everything.
Once you’ve set up your Rules, you simply need to add an auth URI parameter to each request, like this:
1curl -X GET 'https://{db-name}.firebaseio.com/users/eantoni.json?auth={cred}'
In this case, cred is either an auth token or a Firebase app secret. You can read more here.
If you don’t want to use Firebase’s Authentication, you can set up your own custom authentication. First, you will need to generate a Google OAuth2 access token using an account that has permissions to your Realtime Database project. Use OAuth2 to generate a new private key, then use a client library of your choosing to generate the token.
If we were to use the Node.js client library, it would look like this:
1 2 3 4 5 6 7 8 9 10 11 12 13 14 15 16 17 18var {google} = require(“googleapis”); var key = require(“path/to/your/service/account/key.json”); var jwt = new google.auth.JWT( serviceAccount.firebase_database, null, key.private_key, [“https://www.googleapis.com/auth/firebase.database”], //scope ); // generate access token jwt.authorize(function(err, tokens) { if (err || tokens.access_token === null) { console.log(“error”); } else { var access_token = tokens.access_token; } });
Once your access token is generated, you can use it to authenticate with the REST API, just like using the Firebase Authentication, like this:
1curl -X GET 'https://{db-name}.firebaseio.com/users/eantoni.json?auth={cred}'
You can read more about setting up authentication for REST requests in the RealtimeDB docs.
Firebase’s RealtimeDB stores data as a JSON tree (which makes simple data management easy, but will make you sweat if you need to organize something more complex later on). The objects we’ve been working with in this post fit that bill:
1 2 3 4 5 6 7 8 9 10 11 12 13{ "users": { "eantoni": { "name": "Erika Antoni", "state": "California", "emails": { "primary": "eantoni@example.com", "secondary": "erika@work.com", }, }, ... } }
When designing a database that uses a JSON tree structure (as opposed to the document and collection structure in Cloud Firestore), there are a few key things to keep in mind:
- Try not to nest data. When you fetch data, all child nodes are returned with the one you fetched. This means that not only are you being inefficient by grabbing extra data, but you’re also unnecessarily exposing that data to the client.
- Flatten your data structures. Keep only relevant data in each path and make the client do separate calls to get the data they need. This will keep code clear and understandable while helping you avoid writing lots of loops.
- Create indexable data. If you have lots of data, iterating through all of it to gather the information you need on a regular basis isn’t feasible. Instead, create groups with indexes to indicate membership. For example, let’s say we have our “users” table from above. We often need to find a list of all customers who live in the same state. We could do this by iterating through every customer and checking their “state,” but instead, we can do the following:
1 2 3 4 5 6 7 8 9 10 11 12 13 14 15 16 17 18 19{ "users": { "eantoni": { "name": "Erika Antoni", "state": "California", ... }, ... }, "states": { "california": { "residents": { "eantoni": true, ... }, }, ... } }
Now “states” can be easily indexed to find the members, which scales super well. For more information on structuring your data, check out Firebase’s docs.
Retool provides you with pre-built components for quickly building Firebase CRUD apps right out of the box. Check out the Firebase admin panel template, generate a simple CRUD app using mock data or a public dataset, or start building for free on Retool today.
Reader