
This post was written with help from Ben Force.
Have you ever had an idea for an app but weren’t sure if you should invest a lot of time in it? That’s a good reason to use a tool like Retool. We provide a graphical interface to build and test applications quickly; possible use cases could be a question editor for a quiz application or an admin panel for customer support more Retool templates here.
This article will demonstrate how to build a prototype application using Retool with SQL Server for your data store, as well as how to perform CRUD (Create, Read, Update, and Delete) operations against it. You’ll build an application to track fuel economy for a fleet of vehicles.
The final application can be found in this GitHub repository.

In rapid prototyping you quickly create a usable app so you can determine what features are missing, get feedback from users, pitch it to investors, or release it to the market.
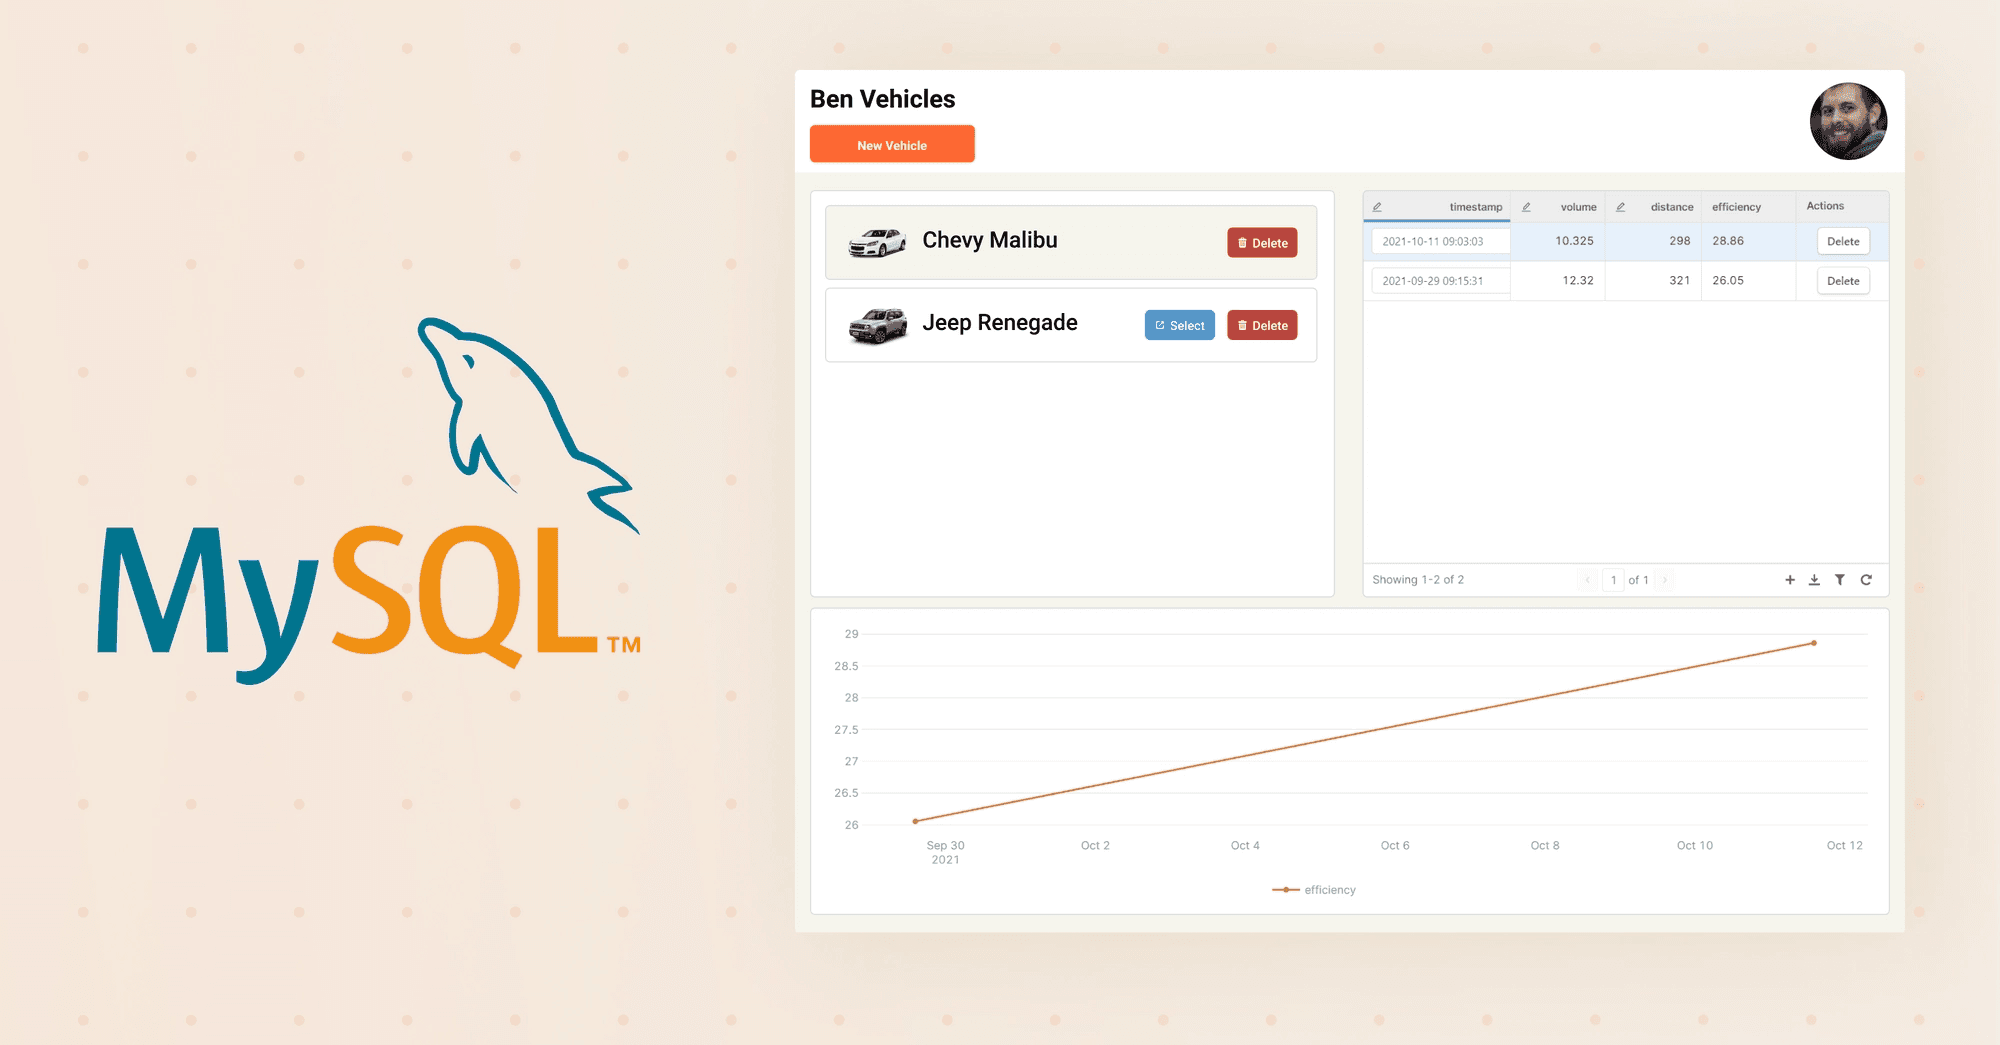
To demonstrate this process, you’ll create a prototype of an app that tracks your vehicle’s fuel economy using Retool. The app will allow you to select and delete vehicles, add fuel expenses, and chart those expenses over a period of time. The app will also be accessible by multiple users in your organization and publicly shareable.
If you don’t have a Retool account, create one here.
The first step is to set up your database with some mock data. You’ll need to create a Microsoft SQL server that can be accessed from the internet. Once you’re logged into the server, create a table to store your entries using this SQL script:
1 2 3 4 5 6 7 8 9 10 11 12 13 14 15 16 17CREATE TABLE vehicle ( vehicle_id int NOT NULL IDENTITY PRIMARY KEY, user_id varchar(32) NOT NULL, name varchar(128) NOT NULL, image_url varchar(256) ) CREATE TABLE fillup ( fillup_id int NOT NULL IDENTITY PRIMARY KEY, vehicle_id int NOT NULL, timestamp datetime NOT NULL DEFAULT GETDATE(), volume float NOT NULL, distance float NOT NULL, efficiency AS distance / volume, CONSTRAINT FK_Vehicle FOREIGN KEY (vehicle_id) REFERENCES vehicle (vehicle_id) )
Before you can start on your user interface, you’ll need to configure Retool to connect to your database. To do this, go to the Retool console, open the Resources tab and click Create New.

This will open a new page with all of the connection types that can be added. Select the Microsoft SQL resource to continue. You’ll be taken to another page to enter your connection details. After that, click Test Connection at the bottom. You should see “Connection success!”
Now you are ready to implement the front-end GUI.
Switch to the Apps tab at the top of the screen. Click Create New, then Create a Blank App. A dialog will open asking for a name. Enter “Fillups” and click Create App.

You’ll be taken into the editor. You should see a blank application with a default table and query.
The vehicle table has a user_id field because your application is going to allow multiple users. Retool handles authentication for you and provides the details of the current user in the current_user variable which you can find by opening the left hand panel data browser and scrolling to the bottom section.
Set the application’s header using the current user information. You should see a list of available components in the sidebar on the right. Select the Text component and drag it into the top left of the header area.

The new text component should automatically be selected and the sidebar on the right should switch to “Inspect” mode. At the top of the inspector, change the Value field to # {{current_user.givenName}}'s Vehicles.
Tip: You can write inline JavaScript inside the curly braces throughout your Retool app .
You should see a “welcome” title at the top of the page. If desired, add your profile picture.
Switch back to the Insert tab and search for “image.” When the results appear, grab the “Circular Image” component and drag it to the right side of the header. In the inspector, change “Image source” to {{current_user.profilePhotoUrl}}.

Next you’ll begin the vehicle editor setup.
In order to give your users the ability to add vehicles to the list, go back to the Insert tab and find the Modal component. Drag it into the header, just below your title. In the inspector change the button text to New Vehicle.
Click on the button. A dialog box should open in the middle of the screen. Drag a button, text input, URL input, and image component into the dialog box. Modify them to look like this:

Select the name and image URL components in the dialog and give them the names txtName and txtImageURL in the inspector tab. Then select the image component and set its image source to {{txtImageUrl.value}}.

Select the button component on the canvas and in the right hand panel, scroll down to Events. You need to create two event handlers.
First make sure the dialog closes. Click the New link to the right of Event Handlers and select Control Component under the Action drop-down. Select your Modal component—there should only be one in the list. Under Method select Close.
Now that the dialog is closing when you click Save, you can add another event handler to write the new vehicle entry to the database. Click New again and select Create a New Query in the “Query” dropdown.
You should see the new query selected in the query editor at the bottom of the screen. Select your database in the Resource drop-down. Make sure GUI Mode is selected in the drop-down just under the resource selector. Next select the dbo.vehicle table and set Action Type to Insert a record.
Now that the query is set up, set the values you want to save. In the Changeset section, set user_id to {{current_user.id}}. Set the name column to the value of the name textbox in your dialog box. To reference that value, use the name of the component and the value property, like this: {{txtName.value}}. Finally, set the image_url column to the value of your image URL component.

Click the Save button, then click on the title and change it to something like “CreateVehicle.” Save your changes.
The new vehicle dialog is set up. Open the dialog and enter a name and image URL. Click Save and the dialog should close.
Next, create a list so that you can see the vehicle you created.
To list a user’s vehicles, you’ll need to run a SQL query. In the query editor, double-click on the default query query1 and rename it to ListVehicles. Make sure your database resource is selected, then enter select from vehicle where user_id = {{current_user.id}} into the query field. Click Save & Run and you’ll see a list with the vehicle you added.

You’ll want to update this list whenever you add a new one. To do that, open the CreateVehicle query again. Under Event Handlers click New and select ListVehicles in the query drop-down.
Go back to the Insert tab and drag a List View onto the main area of the application. In the inspector, set Number of rows to {{ListVehicles.data.vehicle_id.length}}. This tells the list view how many records it needs to display. You’ll reference a special variable i when creating the records in the list. Finally, make sure the Dynamic Heights toggle is selected.
Now create the item display. Drag a Container component into the list view area. In the inspector make sure Height is set to Hug contents. Add an image to the container and set the Image source to {{ListVehicles.data.image_url[i]}}.
Add a Text component to the container and set its value to {{ListVehicles.data.name[i]}}. You should see a list of vehicles. Add another vehicle to watch your list update automatically.

You need to do two things with your vehicles in the list: delete them and select them. For the delete function, add a button to the vehicle container and change the text to Delete. Under the Style section, set the background color to red so no one accidentally clicks it. Add a new event handler and select Create a New Query in the query list.
In the query editor, set the table to dbo.vehicle and change the action type to Delete a record. Since this query will be triggered by a button in the list view, you’ll have access to the i property in this query. To use it, under the “Filter by” section set vehicle_id to {{ListVehicles.data.vehicle_id[i]}}. Add an event handler that triggers the “ListVehicles” query, similar to what you did in the “CreateVehicle” query. You should be able to click the button and delete the vehicle.
Next add a table to track fuel efficiency for a selected vehicle. Add a button that will allow users to select a vehicle. Drag a button to the left of the delete button and change its text to Select.
Add an event handler to the select button, setting the action type to Set Local Storage. It should use the “Set value” method and set a key of selectedVehicle to {{ListVehicles.data.vehicle_id[i]}}. Indicate which vehicle is selected by hiding the select button on it.
In the inspector, go to the Layout section. Set the “Hidden” property so that when the selected vehicle is equal to the current vehicle’s id, it resolves to true: {{localStorage.values.selectedVehicle == ListVehicles.data.vehicle_id[i]}}.

Now that you can create, delete, and select vehicles, you can add functionality to save fill-up records. Add a new SQL query called “ListFillups.” The query should return all records where vehicle_id is equal to the currently selected vehicle.
1select * from fillup where vehicle_id = {{localStorage.values.selectedVehicle}}
Drag a table component onto your app. Since you had the “ListFillups” query selected, the new table will use that query by default. The table can display every column in the query results, but you don’t need to show all of them. With the table selected, scroll down in the inspector panel to the Columns section and click the eye icon on the right side of the fillup_id and vehicle_id columns in order to toggle the visibility for these columns.

To let users add new records, enable the “Show add row button” toggle toward the top of the inspector. You’ll see a new + button appear in the bottom right corner of the table. Click it to open the new record editor.

All of the columns are non-editable by default. To change that, go back to the Columns section in the inspector. Select the timestamp column and set its Column type to Datepicker. Continue down the list, setting volume and distance to “Float” column types, and toggle the Make Editable switch on both.

Add a new event handler to the table. The event should be Save New and it should trigger a new query. Set the query resource to your database and use the GUI mode. Make sure the fillup table is selected and the action is set to Insert a record.
When you open the new row editor, the values in the editor are added to the table’s newRow property. You can use this property to populate the database’s new record columns. Add values for vehicle_id, volume, distance, and timestamp in the editor using the corresponding properties from newRow.

Add an event handler to trigger the “ListFillups” query. Name this query and save it. Now try adding a couple records. They should show up in the table, and when you select a different vehicle they’ll disappear.
If you make a mistake when creating a record, you’ll want to be able to update it. To do that, go back to the inspector with the table selected. Add a new event handler for the Save Changes event. It should trigger a new query. Use the GUI mode again and set the action type to Update an Existing Record.
When you’re saving edits from a table, Retool provides an array of the changed rows on the table component’s recordUpdates property. To keep things simple, use the first record and ignore the rest.
Tip: You can use a JavaScript query to batch process a set of changed rows.
In the query editor set the fillup_id filter to match recordUpdates and add volume, distance, and timestamp values to the changeset. Again, make sure you add an event handler to the query that runs the “ListFillups” query. Give the query a name and save it.

The last action you’ll be able to do from this table is to delete a record. Create a query to delete the row in the GUI mode and set the action to Delete a Record. You can use the table’s selectedRow property in this query to set the fillup_id filter {{fillups.selectedRow.data.fillup_id}}.
Open the inspector with the table selected. Scroll down to the Actions section and click New. Select Action 1 in the Actions section. In the popup, change the text to “Delete” and set the action query to the new delete query you just created.
One last thing for the app is a chart of the selected vehicle’s fuel efficiency. Select the “ListFillups” query and add a Chart component to your app. In the inspector, change the Chart Type to Line Chart and click the eye icon next to everything in the “Datasets” list except for “efficiency.”
Test your app by clicking the Preview button in the upper right corner of the page. You should see your app running without the editing interface.
Now you know how quickly you can build a GUI or build an admin panel on your SQL Server database with Retool. Using the same knowledge you can build many different types of apps. Unfamiliar with SQL? Learn more about our "What is SQL" article.
If you need to extend beyond basic database administration and build more robust apps on top of your data, you can do that too. What's more, you can share your apps across your organization, integrate with other APIs and database types, and customize your interface with code whenever you need to. Check out [Retool templates] (https://retool.com/templates/) for one way to get started, and Retool Docs if you’d rather start from scratch.
light Reader