

Remember when the shortage of Taylor Swift tickets led to a Senate Judicial meeting on the state of the ticketing industry? Maybe if Taylor was using Square and Retool, President Biden wouldn't have had to release a tranche of tickets from the nation's strategic reserve.
In this tutorial, I’ll guide you through the process of building a lightweight ticket-selling dashboard that's both powerful and easy to create. With the help of Square's Payment APIs and Retool's intuitive drag-and-drop interface, you'll be able to create a customized ticket-selling experience that specifically caters to your use case. Whether you're a beginner developer or a JavaScript veteran, by the end of this tutorial you should have the skills to make this application as your own.
Before you begin this tutorial, ensure that you have:
- A free Retool instance
- A Square Developer account with API access enabled
- Basic knowledge of Retool, JavaScript, and the Square API
Setting up your Square API resource
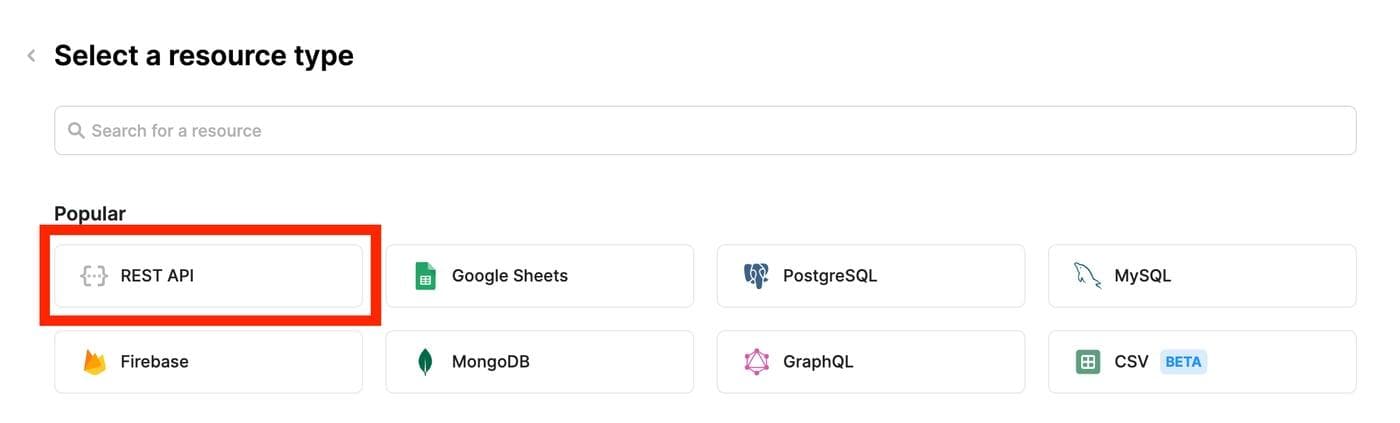
The Square APIs are easy to use and have fantastic documentation. They also have a very neat API Explorer and even a GraphQL Explorer to help you navigate and test your API calls. In your Retool Resources section, create a new Resource under REST API and create a new Square connection.
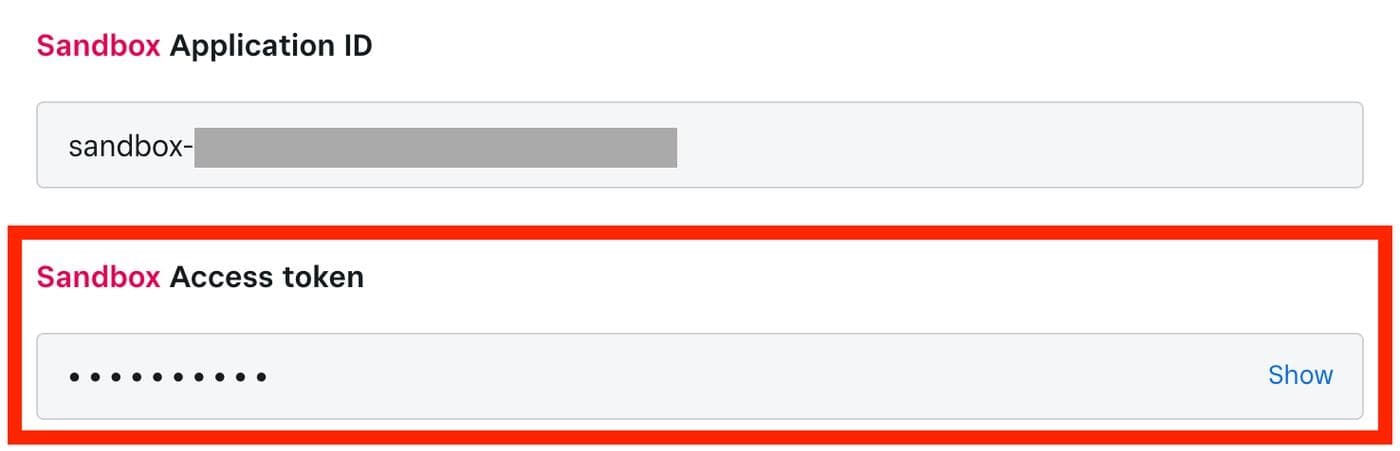
This is where we input the authentication for our API connection. You can find your own Square access token by navigating to the Apps Homepage of your Square Developer Account. Click on the application that you want to develop, and under Credentials, simply copy and paste the code that is in the Sandbox Access token. You'll need this for the next step.
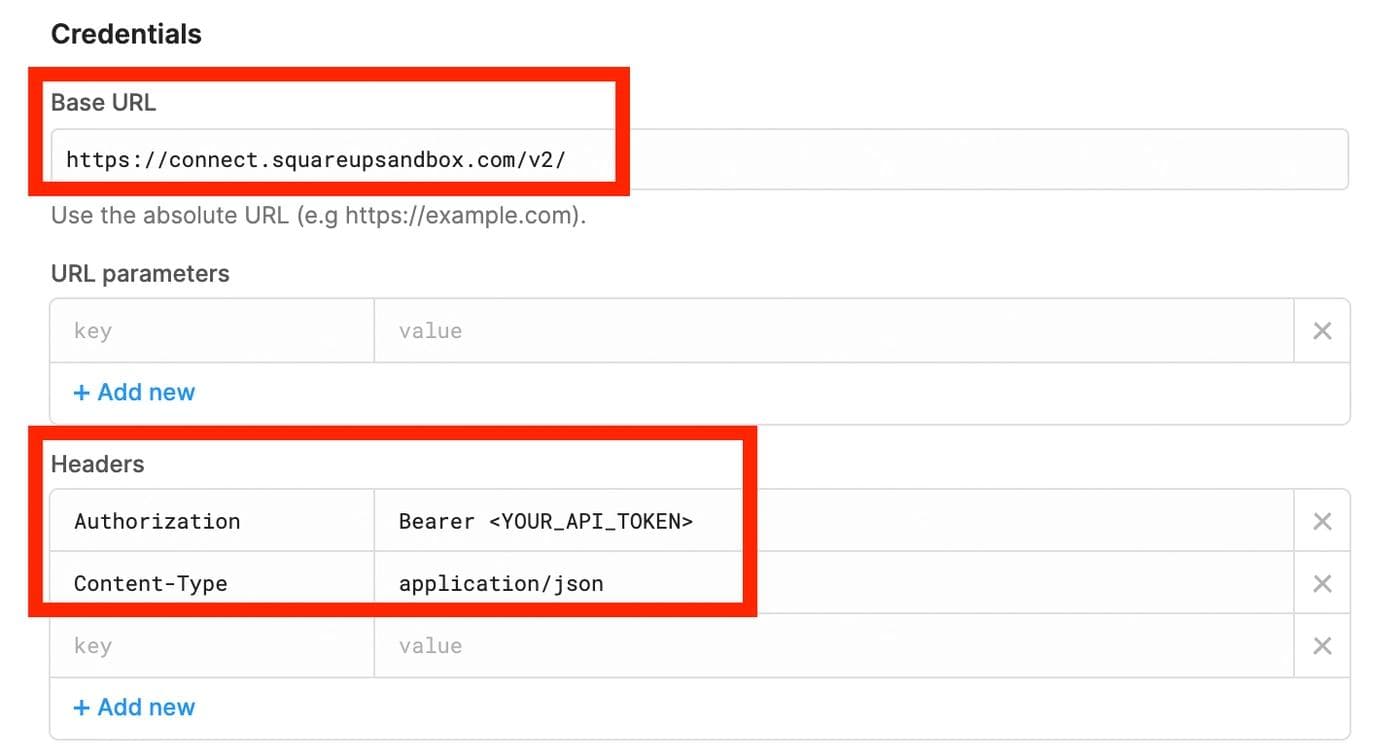
Navigate back to the Retool Resource query where we're setting up our Square API connection, and fill out the following fields like so:
- Base URL: https://connect.squareupsandbox.com/v2/
- Headers
Authorization: Bearer <TOKEN>Content-Type: application/json
After you set this up and test the connection, we can move forward with creating our Resource Queries in our Retool app, which will use this connection in order to make API calls.
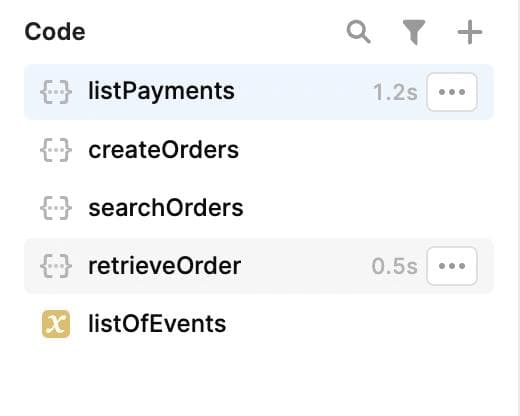
Create a new Retool application with the Square Resource as a connection. In the bottom left of the canvas, we will create 4 new resource queries. I've added my own temporary variable to store the list of events I want to sell tickets to as well.
We'll use four APIs in our application today:
- listPayments -
GEThttps://retool.com/payments/ - createOrder -
POST /locations/{location_id}/orders/ - searchOrders -
POST/v2/orders/search - retrieveOrder -
GET /v2/orders/{order_id}
We won't go over each one in-depth, but we’ll talk a bit about the ones that need a bit more context.
createOrder
The createOrder API is used to create a new order, and there are a few things we need to add in order to make sure it works correctly. The first thing you'll need is to find a Location ID in your account. Each account comes with a default test location, so if you don't know your location ID, use the API Explorer to query the Locations endpoint and find out the ID of the location you want to be creating orders from. You'll need to put this location ID in the URL of your POST request.
Next, in the body JSON, you'll need two fields. The first is an idempotency_key. You'll need a unique one for each transaction. Personally, I've used this simple JavaScript to generate a random string of numbers:
1{{Math.random().toString(36).substr(2, 9)}}
The next item you'll need in your body is the order, which I've filled with dummy data to hit our sandbox endpoint:
1 2 3 4 5 6 7 8 9 10 11 12 13 14 15 16 17 18 19 20 21 22 23 24 25 26 27 28 29 30 31 32 33{ "reference_id": "{{Math.floor(Math.random() * 900000) + 100000}}", "line_items": [ { "name": {{listOfEvents.value.events[idx].event_title}}, "quantity": "{{numOfTix}}", "base_price_money": { "amount": {{listOfEvents.value.events[idx].event_price}}, "currency": "USD" } } ], "taxes": [ { "name": "Sales Tax", "percentage": "10.0" } ], "shipping_address": { "address_line_1": "123 Main St", "locality": "San Francisco", "administrative_district_level_1": "CA", "postal_code": "94102", "country": "US" }, "billing_address": { "address_line_1": "456 Second St", "locality": "San Francisco", "administrative_district_level_1": "CA", "postal_code": "94103", "country": "US" } }
searchOrders
This is also a POST request, but make sure you have the following fields filled out in your Body JSON to make it work:
Return_entries:trueLimit:20(You can set this to whatever you want)Location_ids:[LOCATION_ID]
retrieveOrder
This is a GET request that's used to give you more detailed information about an order given an order ID. Note that you need the specific order ID in the URL to actually make this request. I'll go into more detail on how I got this to query dynamically in the dashboard below.
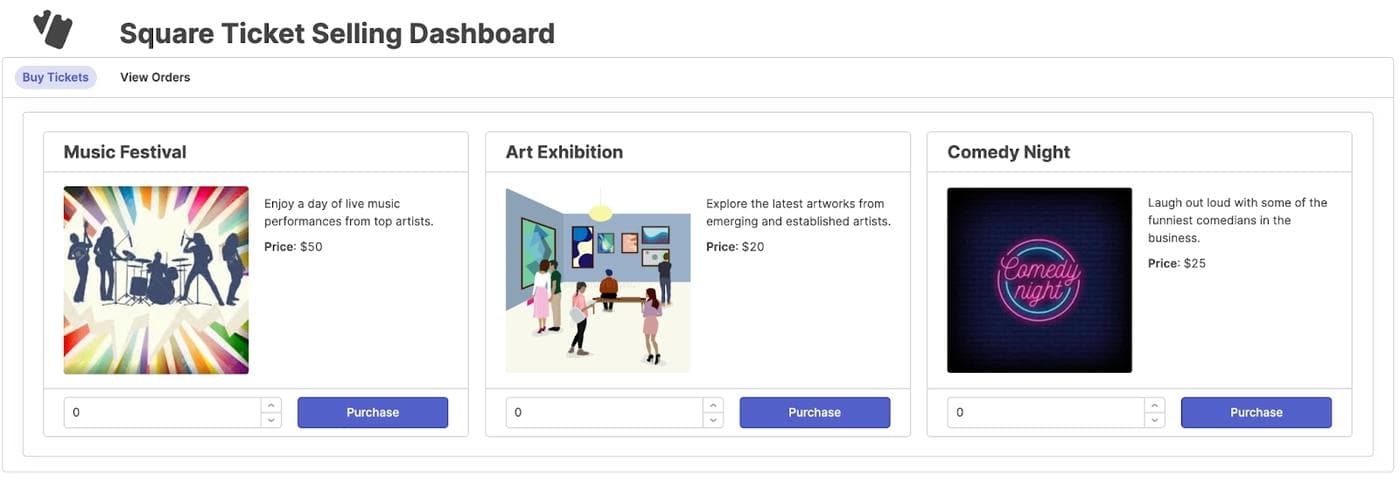
First, you'll need to create a new Retool app and set up the basic structure of the dashboard. Add a Tabbed Container component with two main views: 'Buy Tickets' and 'View Orders'. These views will have different components and interactions for ticket purchasing and order management, respectively. You may need to navigate between these views in the app as you work through the tutorial, so keep this structure in mind as you follow along.
Buy Tickets view
Now that we've set up our Square APIs and resource queries, we can move on to building the front end of our application in Retool.
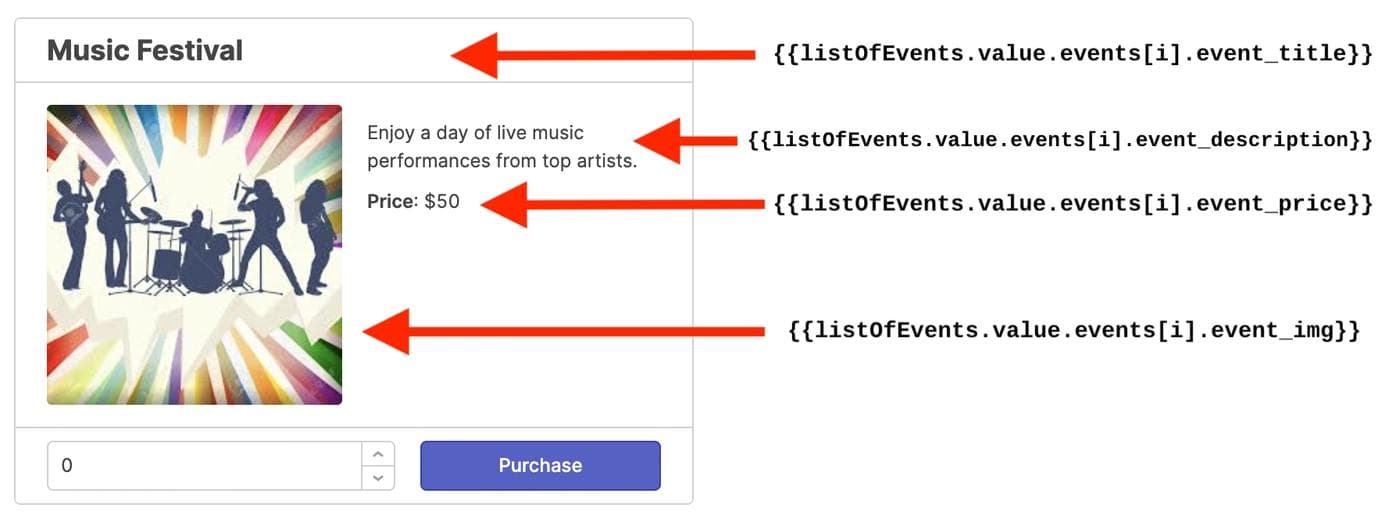
1. First, add a ListView component in your "Buy Tickets" tab to display the events for which tickets can be purchased. Populate the ListView with relevant information about each event, such as its name, date, and available ticket types. Currently, I'm using a temporary state to store this information, but I highly recommend connecting your own database or trying out RetoolDB for this purpose.
Here's the JSON of my listOfEvents object:
1 2 3 4 5 6 7 8 9 10 11 12{ "events": [ { "event_title": "Music Festival", "event_description": "Enjoy a day of live music performances from top artists.", "event_img": "https://encrypted-tbn0.gstatic.com/images?q=tbn:ANd9GcSm5l69C3JRRsQAccWBmfZzNDXjCfI3T3Q-4Q&usqp=CAU", "event_price": 50.00 }, ... ] }
2. Each event listing is actually a Form component I've added to the ListView container, which automatically comes with a submit button that we've renamed to "Purchase". Add an event handler to run a Custom Script onto the submit button so that it automatically runs your Create Order API call on click.
3. When clicking the button, send an API request to Square's 'Create Order' endpoint using the event information stored in your temporary state variables mentioned above. This will submit the order and initiate the payment process.
- Note that the additionalScope context is used to pass the index of the current ListView object, as well as the number of tickets the user wants, to the API.
1 2 3 4 5 6createOrders.trigger({ additionalScope: { idx: i, numOfTix: buyTicketForm[i].data.ticketsToBuy } });
View Orders view
1. In the 'View Orders' tab, use the Square API's 'Search Orders' endpoint to fetch a list of all orders at the specified location. Throw that data into Retool’s brand-new Table component.
2. Use this table to display a full list of orders, including essential details like order ID, event name, and item type.
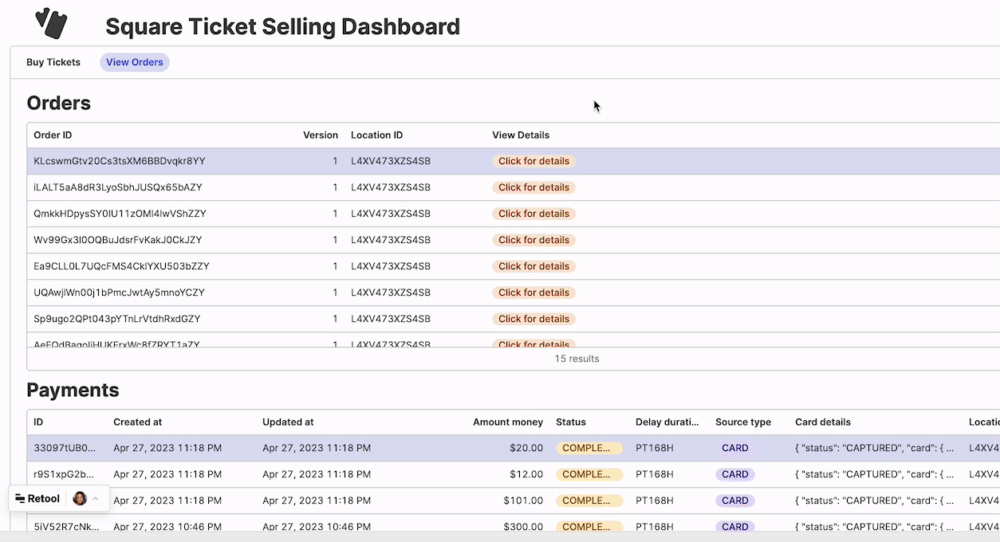
3. Add a View Details button next to each order by creating a new custom column on the table. I used a Tag type column, but you can use a text, link, or even an image. When clicked, this button will send an API request to Square's 'Retrieve Order' endpoint via an event handler, fetching the full order details to display in a modal.
- In order to dynamically query the API endpoint every time I click on the table cell, I simply use
{{ordersTable.selectedRow.order_id}}in the URL for the resource query. This selects theorder_idof the row that I just clicked, and seamlessly transfers that data to the API request directly.

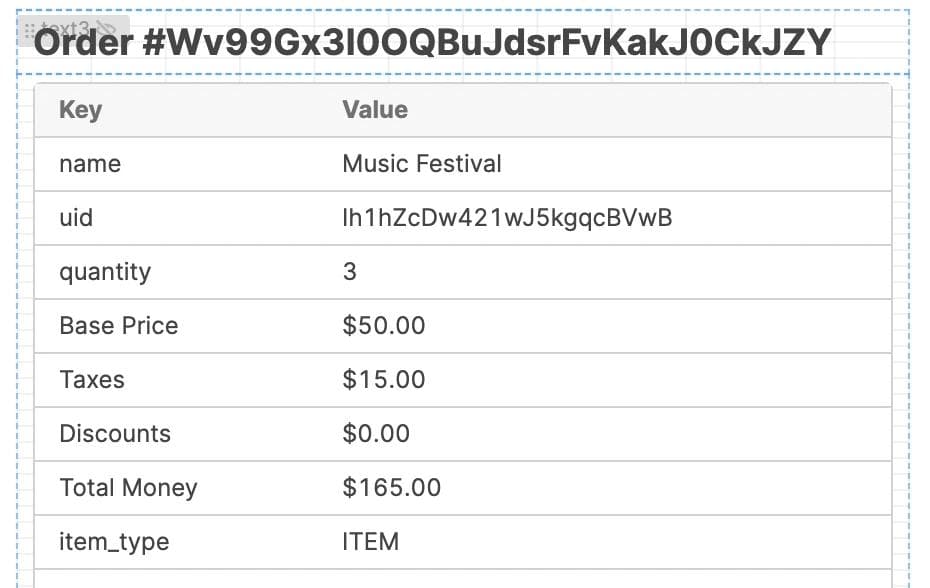
4. Create and fill out a Modal component to display the fetched order details when the 'View Details' button is clicked. I'm using a Key-Value component to display the information listed.
Testing and finalizing your dashboard
Once everything is set up, thoroughly test the app by purchasing tickets for different events and checking the order details in the 'View Orders' tab. Ensure that all API requests are functioning correctly and that the user experience is smooth and intuitive.
Conclusion
Congratulations—you've now built a lightweight ticket-selling dashboard in Retool using Square as the payment processor. This solution helps reduce those notorious ticketing fees while offering a smoother user experience for organizers. Building the dashboard also puts you in control, so you can customize your sales system to look and behave just how you like.
This is just one example of how you can integrate Retool with the Square APIs to create your own application that processes Square payments. You can extend this application to accept payments however you want, whether it be a donations platform like Patreon using the Subscriptions API, creating and selling gift cards via the Gift Cards API, or managing all your customer's loyalty with the Loyalty API. You can now easily integrate these into your Retool app to build whatever you need to build.
Want to learn more about how to build other cool applications in Retool? Check out our new Retool + Census integration, GPT-4 in Workflows, and join our Discord to connect with other Retool developers.
Reader