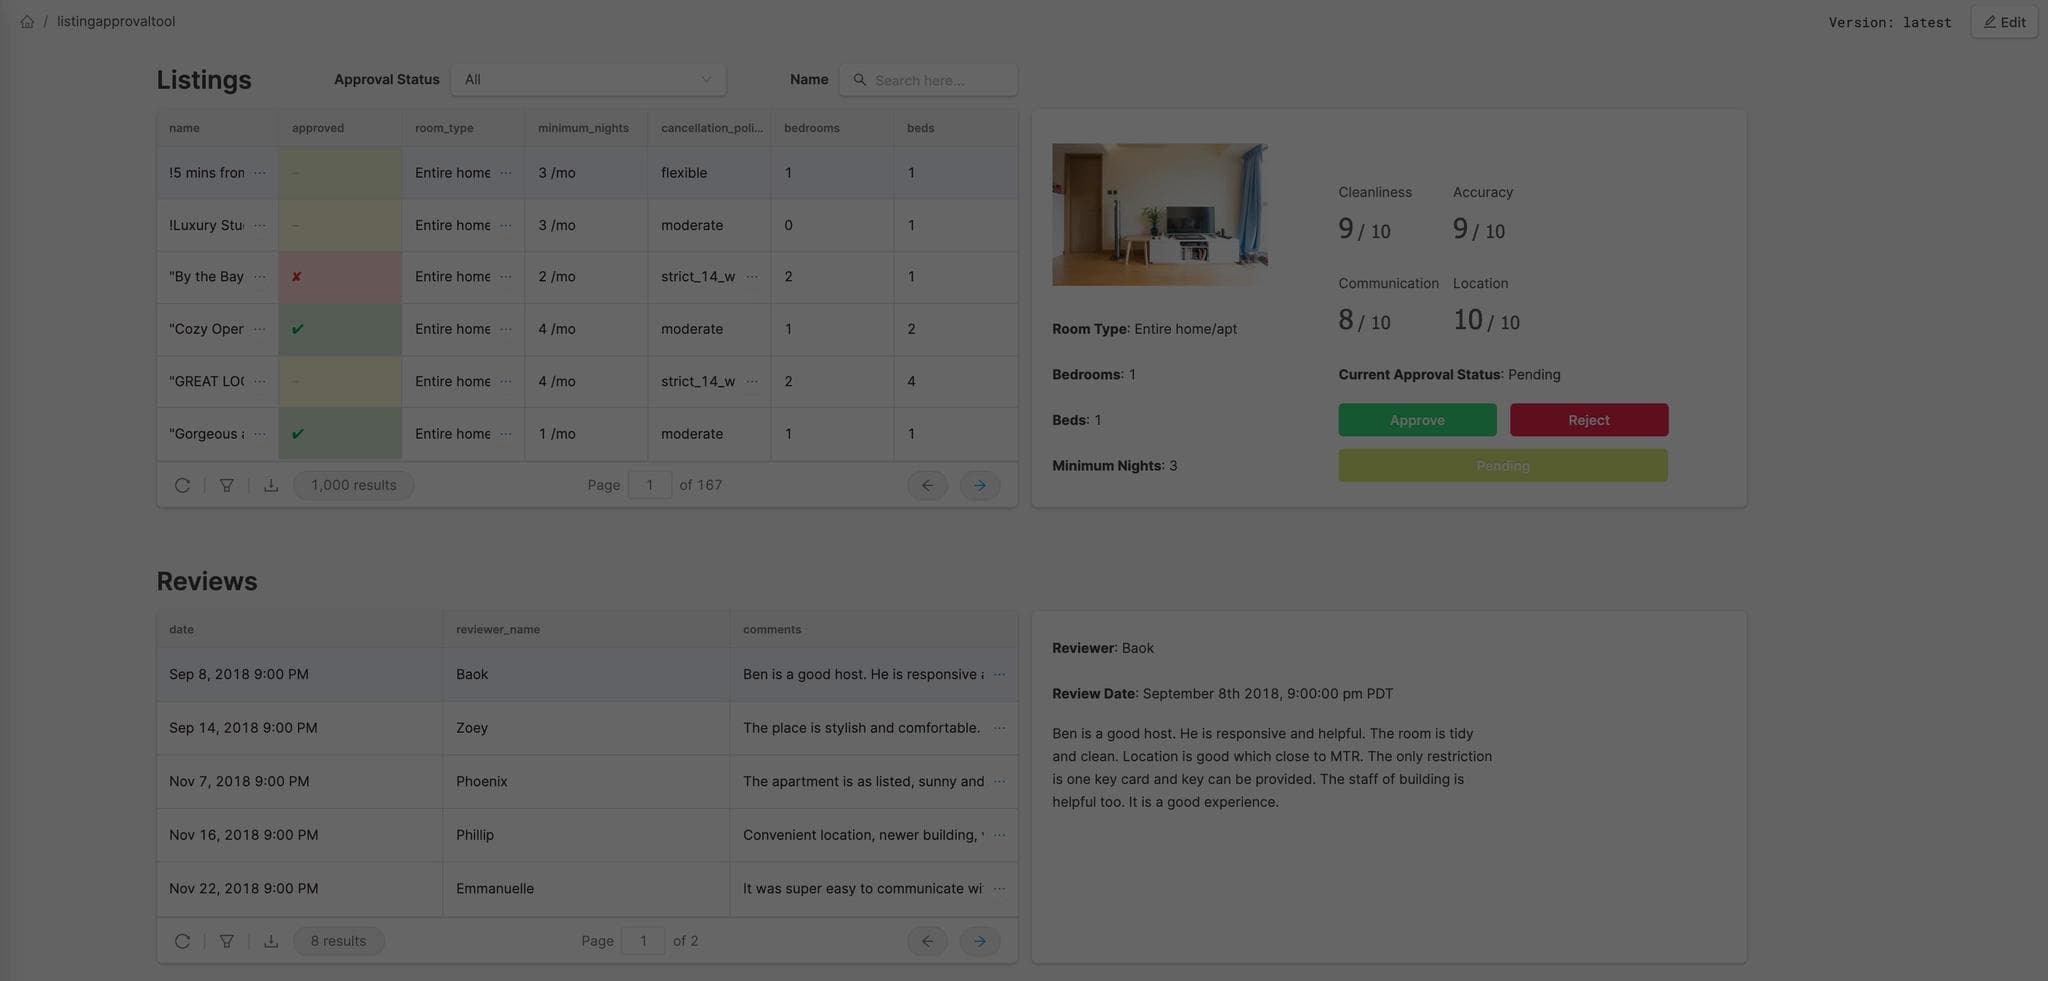

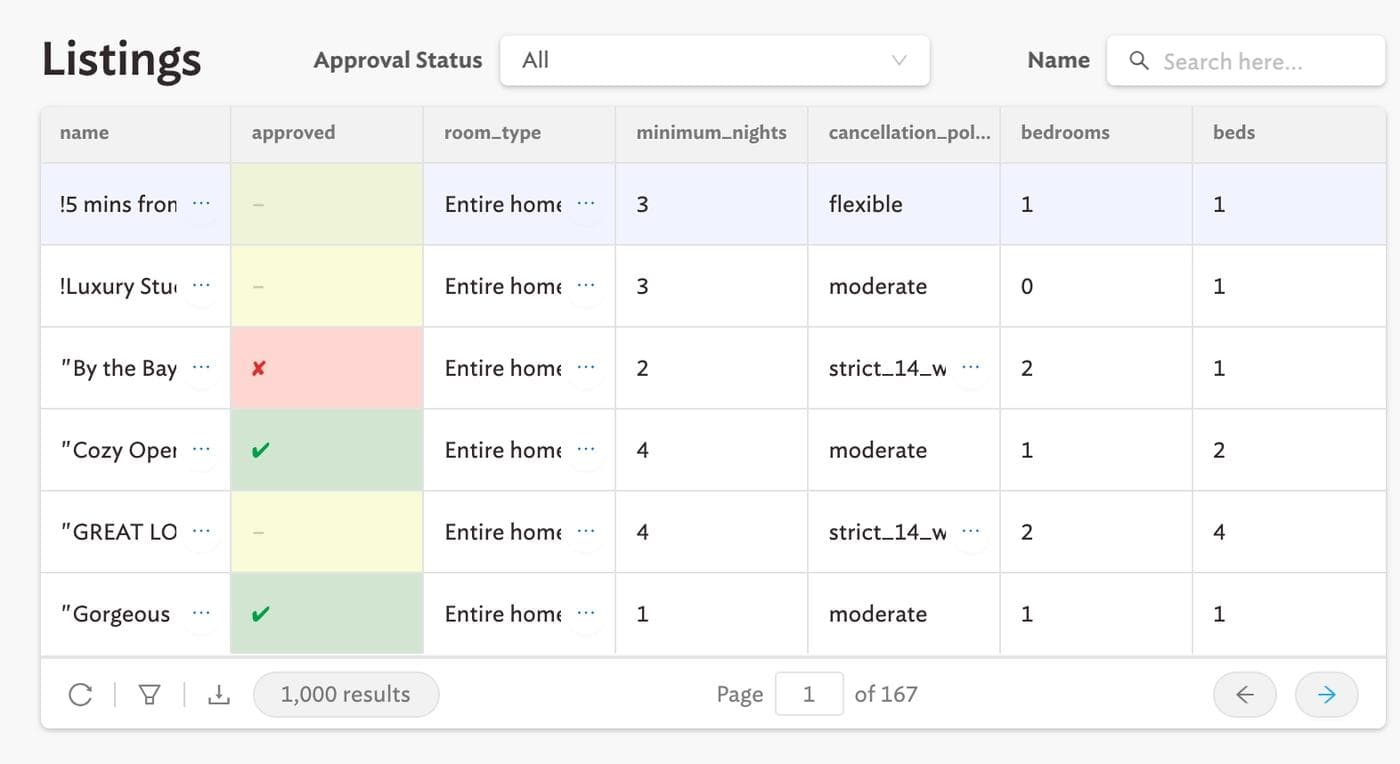
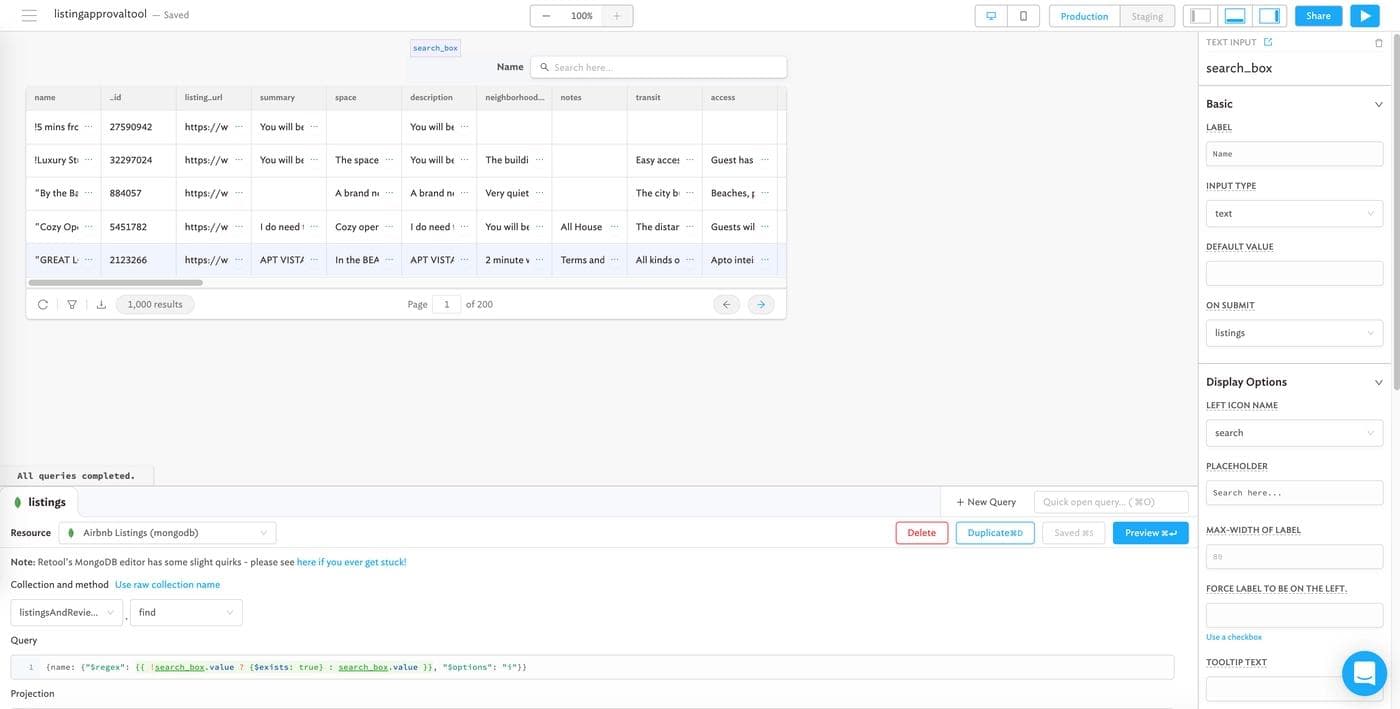
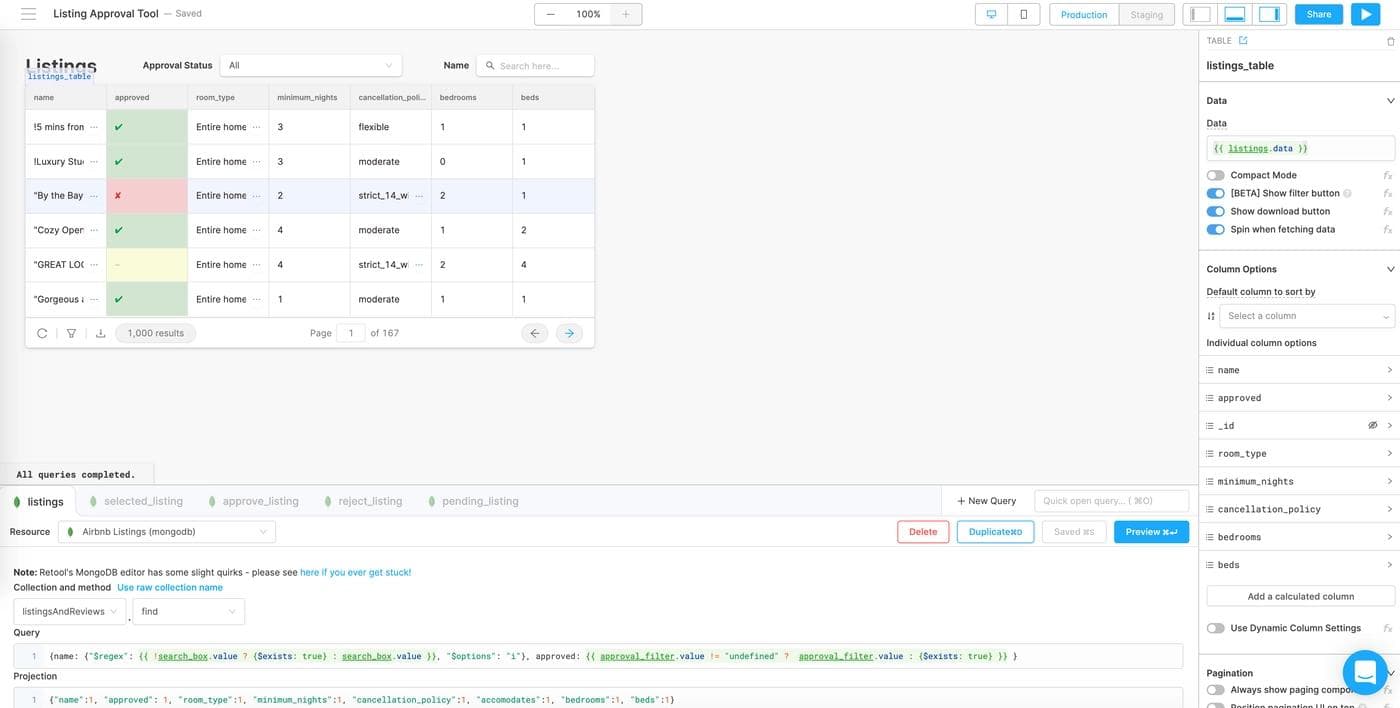
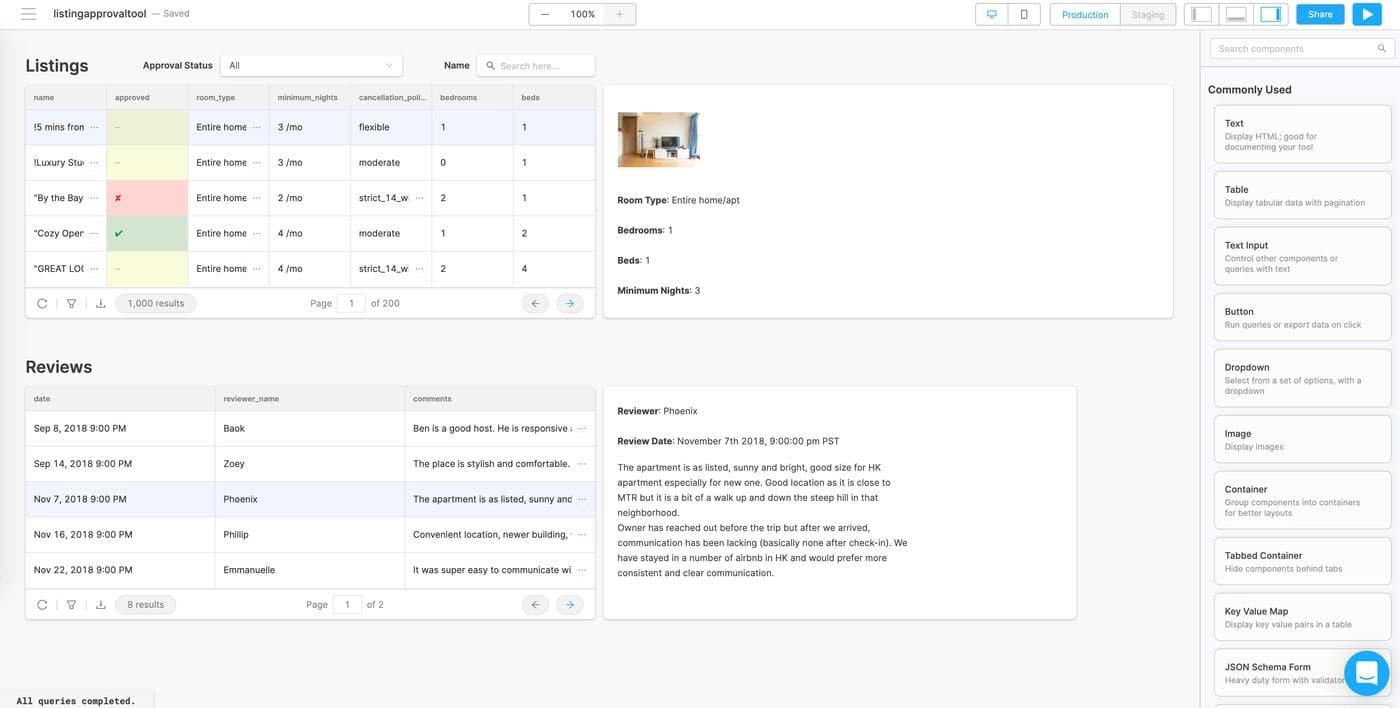
If you’ve ever worked at a marketplace company, you know that not every listing should be approved. If you’re managing any kind of listing data – apartments, ecommerce SKUs, or even vendor approvals – you might use or need a tool that lets you easily approve and reject them. In this post, we’re going to build a full featured Airbnb listing review app that reads and writes to MongoDB, with minimal code, in fewer than 60 minutes. Here’s what the finished product is going to look like (you can use it!):
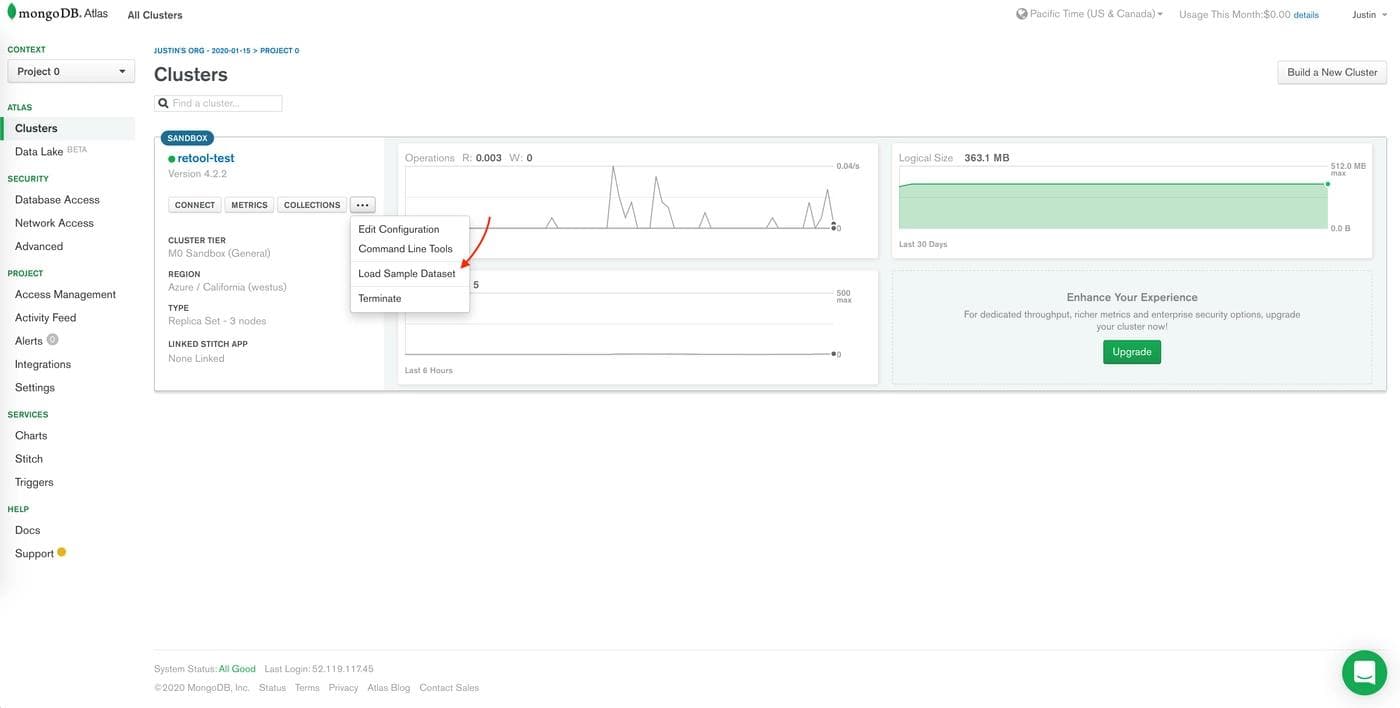
All you’ll need to get started is a MongoDB cluster loaded with their sample_airbnb dataset. MongoDB Cloud has a pretty generous free tier and great documentation, so you’re in good hands. If you already have a cluster up and running, you can add sample datasets to it through clicking on the 3 dots on your cluster homepage, and selecting “Load Sample Dataset.”
You can also follow along with your own data and make adjustments as we go.
To get your MongoDB instance hooked up to your Retool account, head over to “Resources” on the left of your Retool home screen and click (resource just means data source). Once you’re on the Resources page, click the add button on the top right, scroll down to “Databases” and click on MongoDB.
You can connect your MongoDB data through the default form, or just use a connection string instead by clicking on “Continue with connection string” on top of the form. If you use a connection string, make sure it ends with the right collection that you want to use; Mongo’s connection string generator on the console usually defaults to test which probably isn’t what you want. To get your connection string from the MongoDB console, just click on the “connect” button, select “connect your application” and copy the provided string:
The username and password (even if they're in your connection string) that you use to connect to your MongoDB instance in Retool is not the same as what you use to log into Mongo cloud. It’s the database username and password that you set up when you created your database.
Your connection string that MongoDB copies to your clipboard is going to look something like mongodb+srv://gagejustins:<password>@retool-test-betz7.azure.mongodb.net/test?retryWrites=true&w=majority. Remember, you’ll need to change this to point to the right database, so here’s what you should be entering into Retool: mongodb+srv://gagejustins:<password>@retool-test-betz7.azure.mongodb.net/sample_airbnb. The difference is that we changed the database from https://retool.com/test to https://retool.com/sample_airbnb and removed some of the optional parameters at the end.
Once you’ve got your details in there, click “save” at the bottom of the page.
One last thing: MongoDB’s sample_airbnb database doesn’t have any data related to approvals, so let’s create some! We’re going to add a field to every entry with a value of null called approved: we’ll use this later on for filters and approval buttons. If you’re in the Mongo shell, the command is pretty simple:
1 2 3 4 5 6 7 8 9 10db.listingsAndReviews.update( {}, { $set: {"approved": null} }, /* Set upsert to false, we don't have any values yet */ false, /* Set multi to true so it updates all of the documents in our collection */ true )
If everything went well, we’re all ready to go. After adding your MongoDB resource, you should automatically be redirected back to the Retool home screen, but if you’re not, click on “Apps” on the left sidebar. Let’s get building!
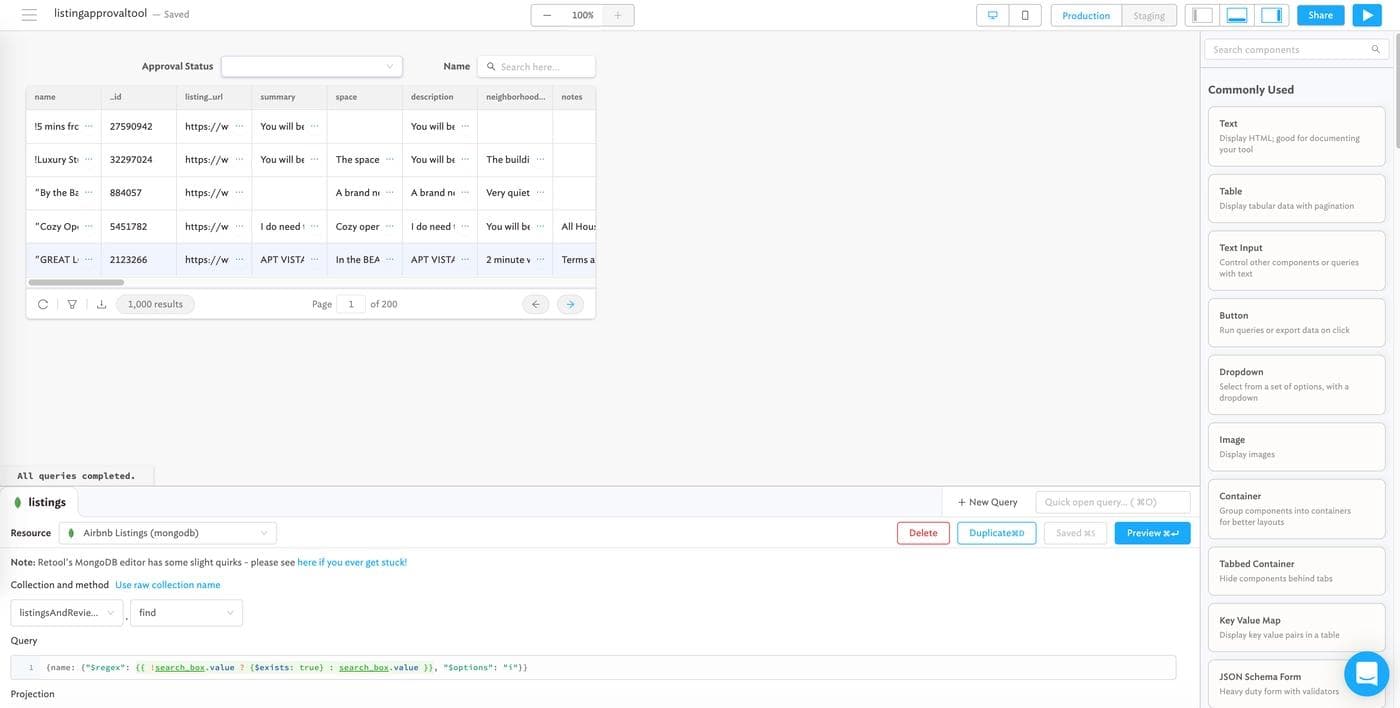
The first part of our tool is a table showing a few important pieces of data about our Airbnb listings. We’ll also add a filter and a search bar on top for easy browsing. Here’s what things will look like by the end of this section (hopefully):
Your app should start with a table component already on the canvas. If not, drag one over from the components pane on the right. It should default to showing you some hard coded data; we’ll replace that with queries from Mongo.
Move down to the Query Editor tab on the bottom of your screen (if you don’t see it, click on the bottom bar icon on the top right of the screen), and select your added MongoDB resource in the dropdown at the top (the default should be an onboarding_db postgres database). In Retool, you don’t write Mongo queries in pure code: we separate different types of queries (find, aggregate, etc.) into their own graphical forms. Pick the “listingsAndReviews” collection from the dropdown on the left, and choose “find” as the query type.
Add 1000 into the “Limit” box in your query (don’t want this to take forever!), and then click preview, and you should see some results at the bottom of your screen. Don’t forget to save your query by clicking save, or command + S! Let’s also rename the query “listings” by clicking on the query name in the tab (“Query1”) and changing it.
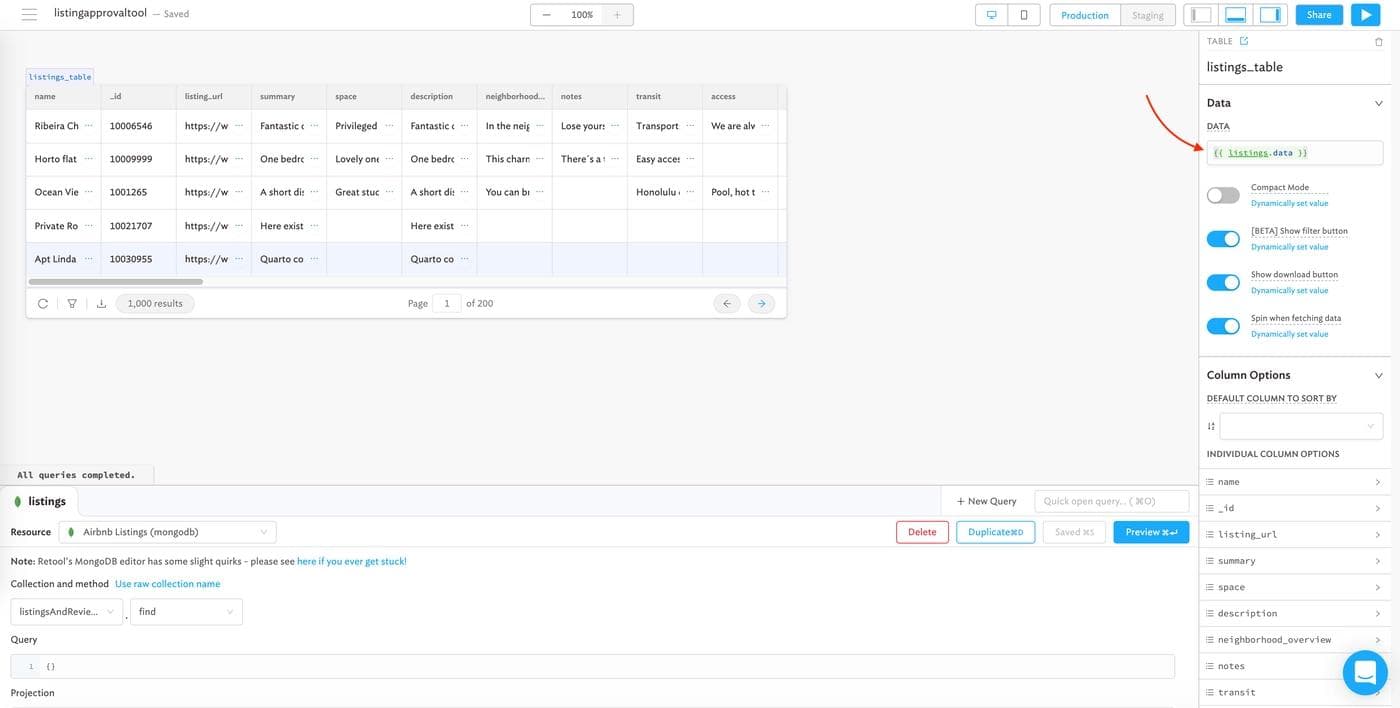
Now that we have a query, let’s connect it to our table: click on the table component, and the properties should show up on your right sidebar; in the “data” field, put a reference to the “listings” query with {{ listings.data }}. Now the table should have actual data from MongoDB. Off to a good start! Finally, let’s name the table “listings_table” so we can reference it more easily in the future. Here’s what the final config should look like:
This table isn’t too useful though, because there’s way too much data to look through. Let’s start by adding a search bar. Drag a text input component onto the canvas and place it just above the listings_table, and then rename it “search_box” by clicking on the component and updating the details in the sidebar on the right.
We’ll hook the search_box up to our listings query through a filter: replace the empty brackets ({}) in our listing query with {name: {"$regex": {{ !search_box.value ? {$exists: true} : search_box.value }}, "$options": "i"}}. This little snippet will check if the search box has any value in it: if not, it won’t apply any filters, and if there is a value, it’ll use Regex to search Mongo for that value in the “name” field. This is kind of like the MongoDB equivalent of SQL’s ILIKE operator. Don’t forget to save your query!
When using Javascript in Retool, you encase your code in two curly brackets like {{ so }}. Because MongoDB queries also use a similar syntax, things can get a bit confusing – if you’re running into errors, make sure you’re opening and closing snippets correctly.The last thing we need to do for search is make our table update (rerun the listings query) every time we put a value in the the search_box. Click back to the search_box component, and on the right sidebar, you’ll find the “On Submit” dropdown. Our listings query should show up in the dropdown; click it, and we should be ready to go. To make sure things are working smoothly, try typing in the search_box and make sure the table updates!
Now that we’ve got search working, the only thing left for our listings_table is an approval status filter. We want our users to be able to quickly see which listings are pending and need approval. Let’s start by dragging a dropdown component onto the canvas to the left of the search_box (remember, if you ever want to get to the component picker, just click on a blank area of the canvas). We’ll rename the component as “approval_filter” and make everything a bit smaller so we can have more space. Here’s what things should look like so far:
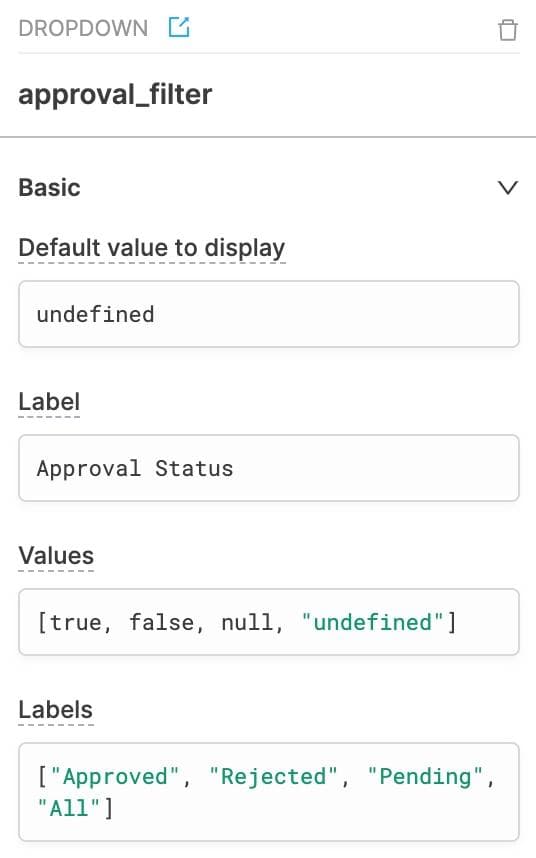
To get the approval_filter working, we’ll need to give it some labels and values, and update our listings query again. Click on the approval_filter and head over to the right sidebar:
- Set the
valuesto[true, false, null, "undefined"] - Set the
labelsto["Approved", "Rejected", "Pending", "All"] - Set the default value to display (on top) as
undefined(to point to “All”)
Make sure to enclose the"undefined"in thevaluesbox in string quotes, but don't enclose theundefinedin the default value box in string quotes
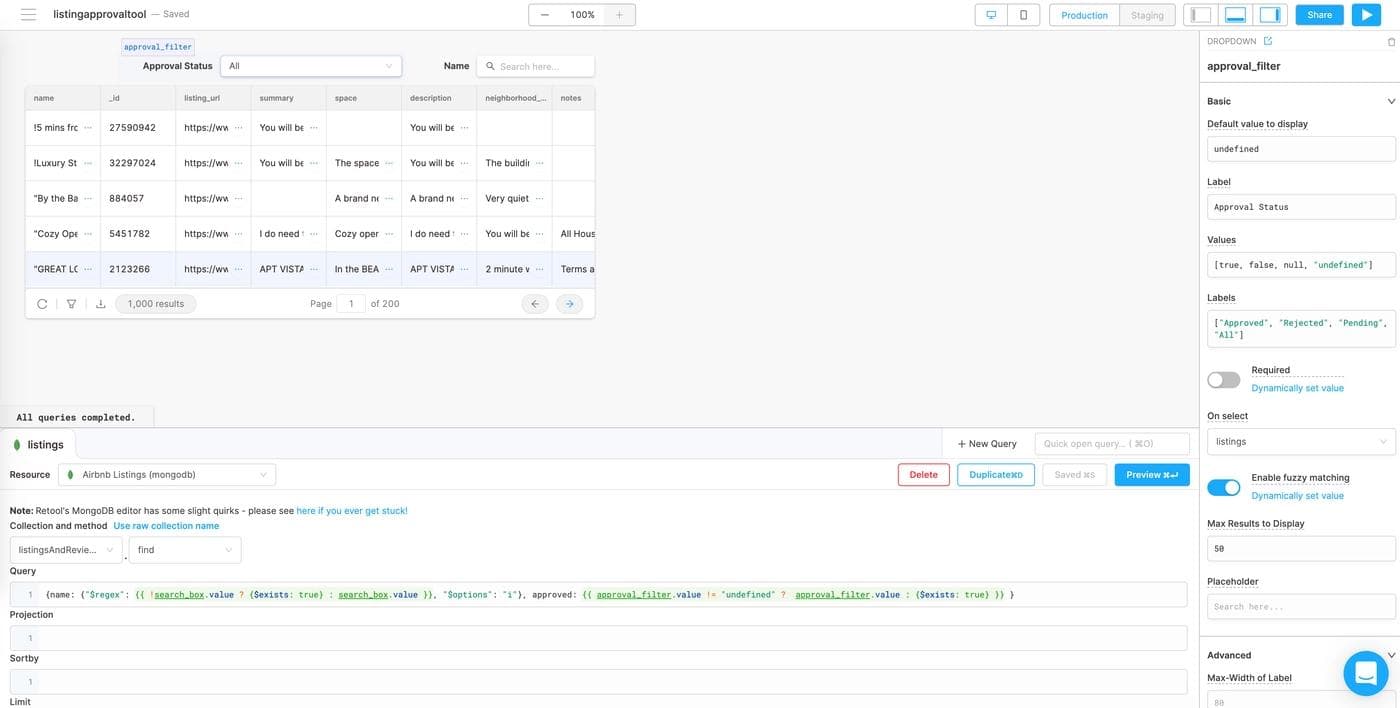
In the dropdown component, values map to labels in order, so when the Dropdown shows “Approved” it maps to true on the backend, when it shows “Rejected” it maps to false, and so on and so forth. Let’s also make sure we choose the “listings” query in the “on select” parameter on the right sidebar so the listings query reruns every time the approval_filter is updated.
The last thing we need to do is update our query so the filter actually does something. Let’s add this line in to our listings query:
1 2 3approved: {{ approval_filter.value != "undefined" ? approval_filter.value : {$exists: true} }}
We’re doing the same thing here as the previous part of the query: if there’s a value in the approval_filter, query for that value; if not, show all data. For the search bar we used the name field, and here we’re using the approved field we created beforehand. The final query should look like this:
1 2 3 4 5 6{ name: {"$regex": {{ !search_box.value ? {$exists: true} : search_box.value }}, "$options": "i"}, approved: {{ approval_filter.value != "undefined" ? approval_filter.value : {$exists: true} }} }
Double check your opening and closing brackets, kids.
At this point your app should look something like this:
Before we’re done, let’s just make our table a bit easier to look at by using a MongoDB projection to filter which fields we want. Insert this into the Projection box in the listings query:
1 2 3 4 5 6 7 8{"name":1, "approved": 1, "room_type":1, "minimum_nights":1, "cancellation_policy":1, "accommodates":1, "bedrooms":1, "beds":1}
Now we’ll only see those columns in our listings_table. Finally, we can color code the “approved” column to make it a bit more visually appealing. If you click on the listings_table and scroll down your table component settings on the right sidebar, you should see all of the column names; click on “approved” and scroll down to the “color” input. We’ll use a simple mapping function to make approved listings green, rejected ones red, and pending ones yellow:
{{ self == null ? '#e6e600' : self == true ? 'green' : 'red' }}
Callout: we’re chaining ternary operators in Javascript here, which is sort of like branching logic. We could probably make this work a bit smoother with a switch statement.We can also click on the little “eye” icon for the _id column to hide it. Mongo returns the _id even if it’s not in your projection, but it’s not something we’d want to show in a table. Finally finally, let’s drag a little text component over the listings table so we know what it’s showing. We’ll use markdown in the “value” form (### Listings).
That’s it! You should have a working listings table with filters and search. Let’s get some more info on those listings and their reviews!
When we’re approving or rejecting listings, we definitely want to be able to read the reviews that guests have posted about a property, but they’re nested objects in Mongo, and the table component isn’t a great place to read them. Let’s drag a second table onto the canvas and name it “reviews_table” – we’ll also put a text component on top with the value ### Reviews.
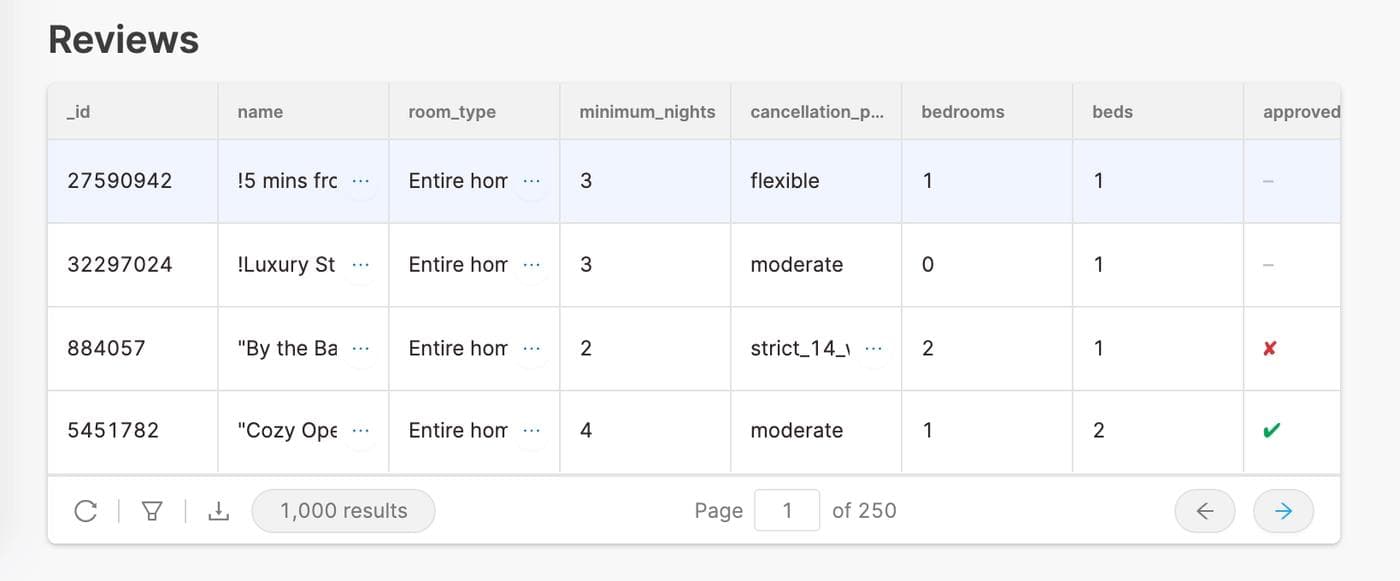
The table automatically populates with the same data as our listings table, but we’re going to write a new query that finds the reviews of whichever row our user clicks on in the listings table. So when you click a row in the listings table, the reviews for that listing show up in the reviews table below.
We’ll start by creating a new query and name it “selected_listing” in the bottom query pane. If you got rid of it to move components around, you can always bring it back by clicking the little bottom bar icon at the top right of your screen. Use the same options as before: select the “listingsAndReviews” collection and the “find” method. This time, we’ll use Retool to choose the selected row of the listings table:
{"_id": {{ listings_table.selectedRow.data._id }} }
This line should filter the database for the _id of the row that’s currently selected in the listings_table. In the Projection box, we’ll choose a few fields that we’ll want to use later:
1 2 3 4 5 6 7 8 9 10 11{ "images.picture_url": 1, "name": 1, "room_type": 1, "minimum_nights": 1, "bedrooms": 1, "beds": 1, "reviews": 1, "review_scores":1, "approved": 1 }
The whole query should end up looking like this (don’t forget to save):

Now let’s hook up this data to our reviews_table: click on the reviews_table and in the data box, put a reference to the reviews data from query we just wrote:
{{ selected_listing.data['0'].reviews }}
Callout: we need that index in there ([‘0’]) because MongoDB stores data as objects.If all went well, the reviews_table should now be showing the reviews from the selected from in the table above. Note: we could have done all of this with one query, but this is a bit simpler to grok the first time. We only really want a few columns related to the reviews, so click on the reviews_table component, head over to the right sidebar, and hide (with the “eye” icon on the columns) the _id, listing_id, and reviewer_id columns so that you only see the reviewer’s name, the review date, and the review content (“comments”).
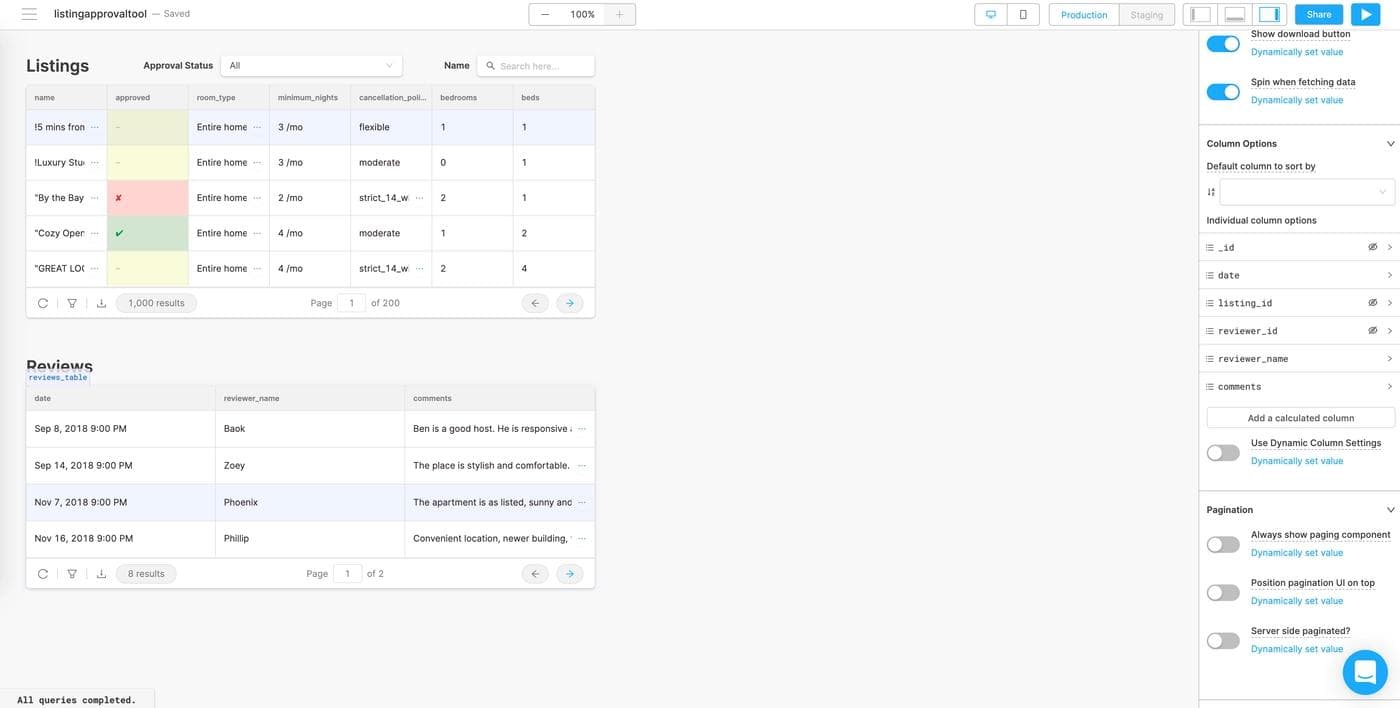
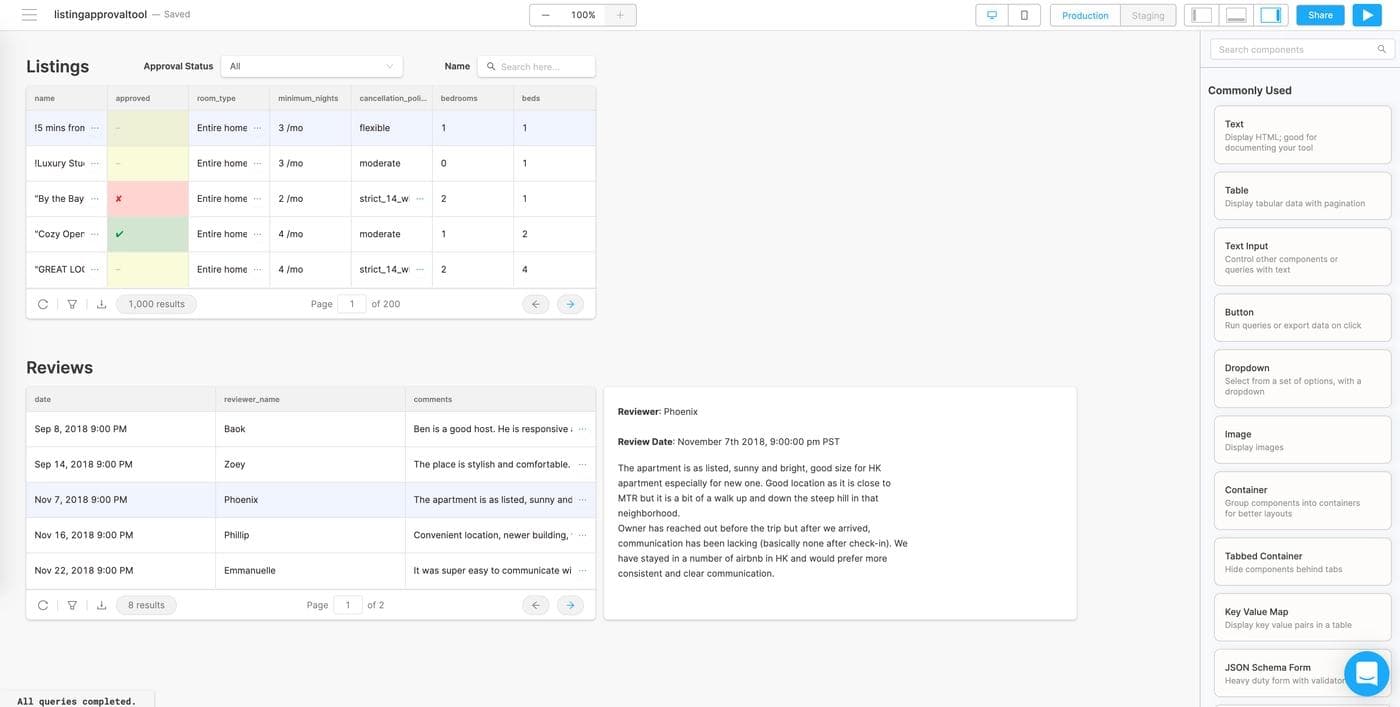
It’s hard to read the comments in that table, so let’s make a little panel on the right of the reviews_table where we can read the whole thing. Drag a container component onto the canvas next to the reviews_table, and then drag a few text components onto it:
- One on top for the reviewer name
- One under that for the review date
- One under that for the review text
For the reviewer name, we’ll replace the text component’s placeholder value (in the right sidebar) with **Reviewer**: {{ reviews_table.selectedRow.data.reviewer_name }}. For the review date, we’ll use a value of **Review Date**: {{ moment(reviews_table.selectedRow.data.date).tz("America/Los_Angeles").format('MMMM Do YYYY, h:mm:ss a z') }}. We’re using Moment.js to format the raw data as a PST timestamp, but you can use whatever format you want.
Finally, for the review text, we’ll use {{ reviews_table.selectedRow.data.comments }} as the value. Because these reviews can be kind of long, we’ll want to toggle “Scroll on overflow” to on. Here’s what your app should look like!
If any of the text is overflowing, you can always extend and resize your text components.
The last thing we need – and probably the most important – is a panel to approve and reject listings. We’ll also bring in a few pieces of data in to help inform the decision.
Let’s start by dragging a container component onto the canvas, to the right of our listings_table. We’ll add in a few pieces of data before the approval buttons:
- The image for the listing (image component)
- Room type (text component)
- The number of bedrooms and beds (text components)
- The minimum nights for a stay (text component)
- The ratings for cleanliness, accuracy, communication, and location (statistic components)
Let’s start with the image: drag an image component onto the container. It should default to a (cute) picture of a cat; click on it, head over to the value box, and replace the value with a reference to the selected row’s image. The data is nested, so you’ll need to account for that:
{{ selected_listing.data['0'].images.picture_url }}
Drag and resize to your heart’s content. Let’s also drag a few text components onto the container below the image, and replace their values with references to the right data:
- Room type:
**Room Type**: {{ selected_listing.data['0'].room_type }} - Number of bedrooms:
**Bedrooms**: {{ selected_listing.data['0'].bedrooms }} - Number of beds:
**Beds**: {{ selected_listing.data['0'].beds }} - Minimum nights:
**Minimum Nights**: {{ selected_listing.data['0'].minimum_nights }}
Here’s what things should look like:
Now let’s add a few statistic components to the container for the ratings. Keep in mind that these are also nested values, so we’ll need to go a bit deeper in the reference. We’re going to change the component settings in a second, so start with just creating one of these and then copy and paste to save time.
- Cleanliness:
{{ selected_listing.data['0'].review_scores.review_scores_cleanliness }} - Accuracy:
{{ selected_listing.data['0'].review_scores.review_scores_accuracy}} - Communication:
{{ selected_listing.data['0'].review_scores.review_scores_communication}} - Location:
{{ selected_listing.data['0'].review_scores.review_scores_location}}
There’s a little more work to get these looking good. In each statistic component, lets:
- Change the precision to 0 (there are no decimals in these ratings)
- Remove the “$” prefix that comes as default
- Change the “/lb/ suffix to “/ 10”
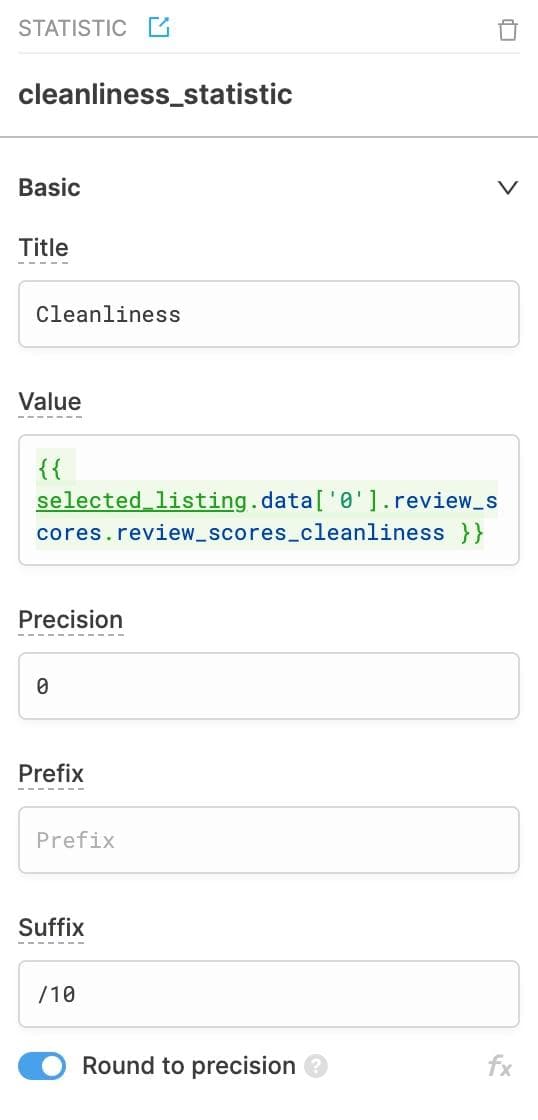
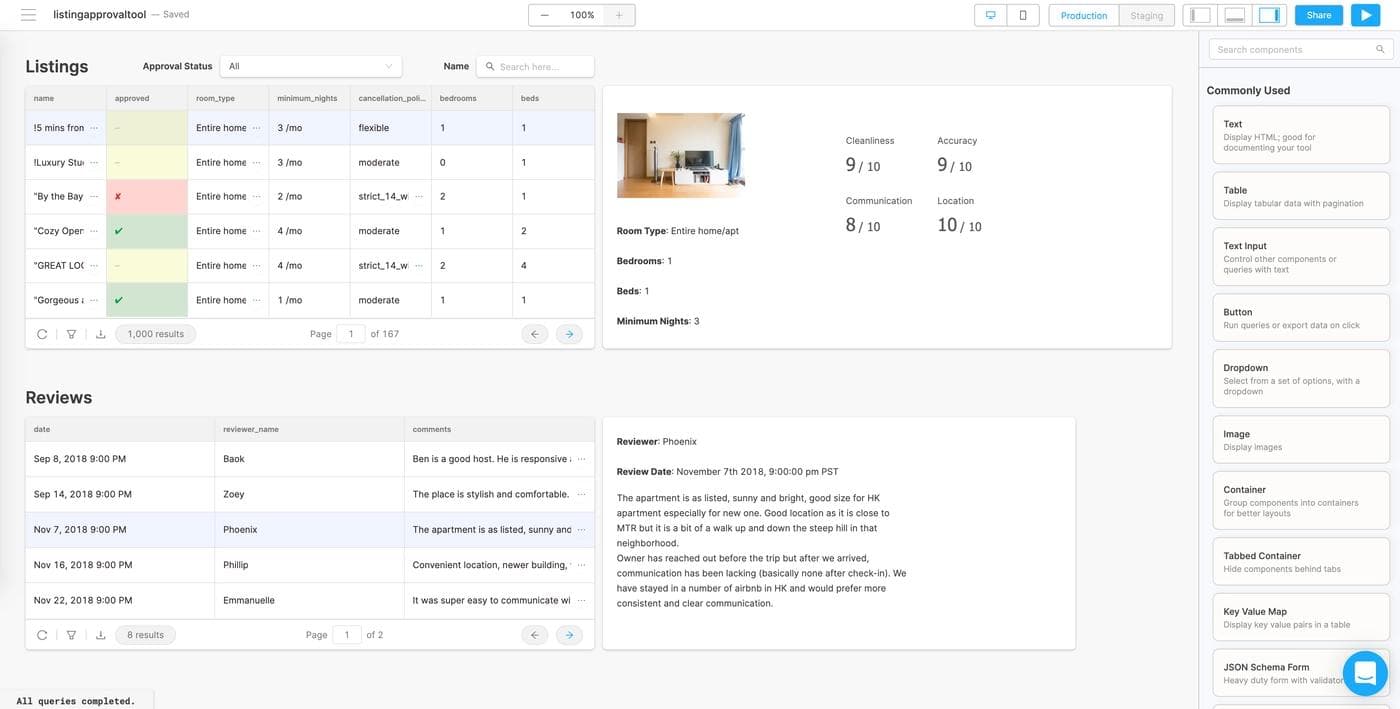
The final product should look like this:
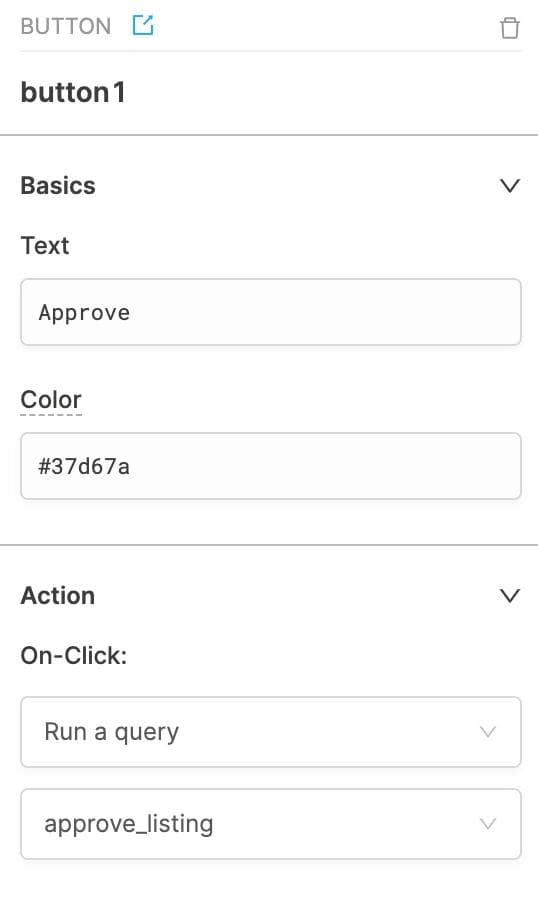
Almost there! The last thing we need is an approval system: a few buttons to mark listings as approved, rejected, or pending. Let’s start by dragging three buttons onto the container: one each for Approve, Reject, and Pending. We’ll also change their colors to green, red, and yellow to make things easier to use.
We’ll also add a small text component on top to show the selected listing’s current approval status. Because we’ve decided to encode approval status values in our database as boolean, we’ll need to write a little Javascript that maps these values to something more human readable:
**Current Approval Status**: {{ selected_listing.data['0'].approved == true ? "Approved" : selected_listing.data['0'].approved == false ? "Rejected" : "Pending" }}
This is just a little bit of chained logic (with the ternary operator) that translates true, false, and null to Approved, Rejected, and Pending.
To get our buttons working (even though they’re pretty), we’ll need to hook them up to queries that actually update our MongoDB data. We’ll create three separate queries, one for each of the buttons. For each of these queries, we’ll filter for the selected row’s _id and set the approved value to the desired one.
Let’s start with approval. Create a new query called approve_listing, and put {_id: {{ selected_listing.data['0']._id }} } into the “query” field. In the “update” field, we’ll put a MongoDB statement that updates the approved field to true:
1 2 3 4 5 6{ $set: { approved: true } }
This query should filter for the row we’ve selected in the listings_table and update its “approved” value.

Let’s create two more of these – reject_listing and pending_listing – with the appropriate updates. reject_listing should have its update statement as:
1 2 3 4 5 6{ $set: { approved: false } }
pending_listing should have its update statement as:
1 2 3 4 5 6{ $set: { approved: null } }
All three queries should have the same query field that filters for the selected row.
Before we hook these up to our buttons, we want to make sure that the listing_table reloads every time we make an update to an approval status through our buttons. In each of these queries (approve_listing, reject_listing, pending_listing), scroll down to the “After this query runs” section and add in “listings,” which is our original listings query.

Now let’s hook them up to the right buttons: click on each button, and in the right sidebar in the action section, choose the right query from the dropdown. For the approve button we’ll choose the approve_listing query, and so on.
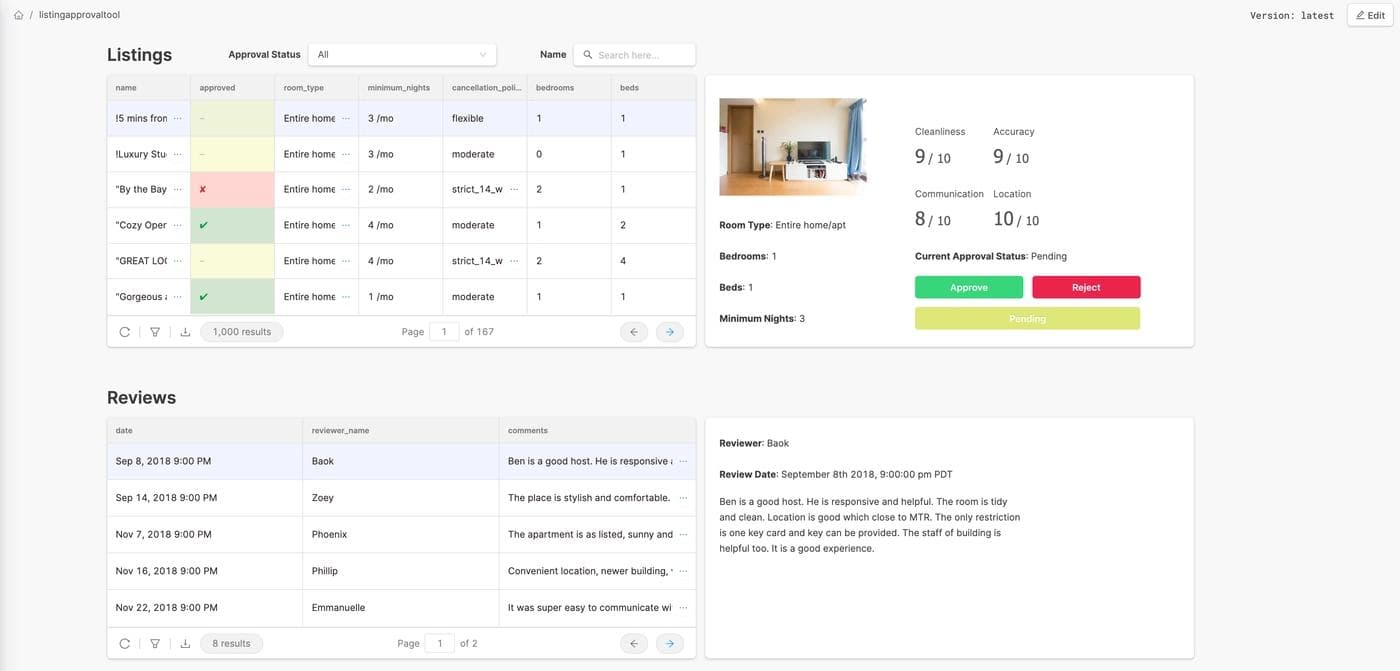
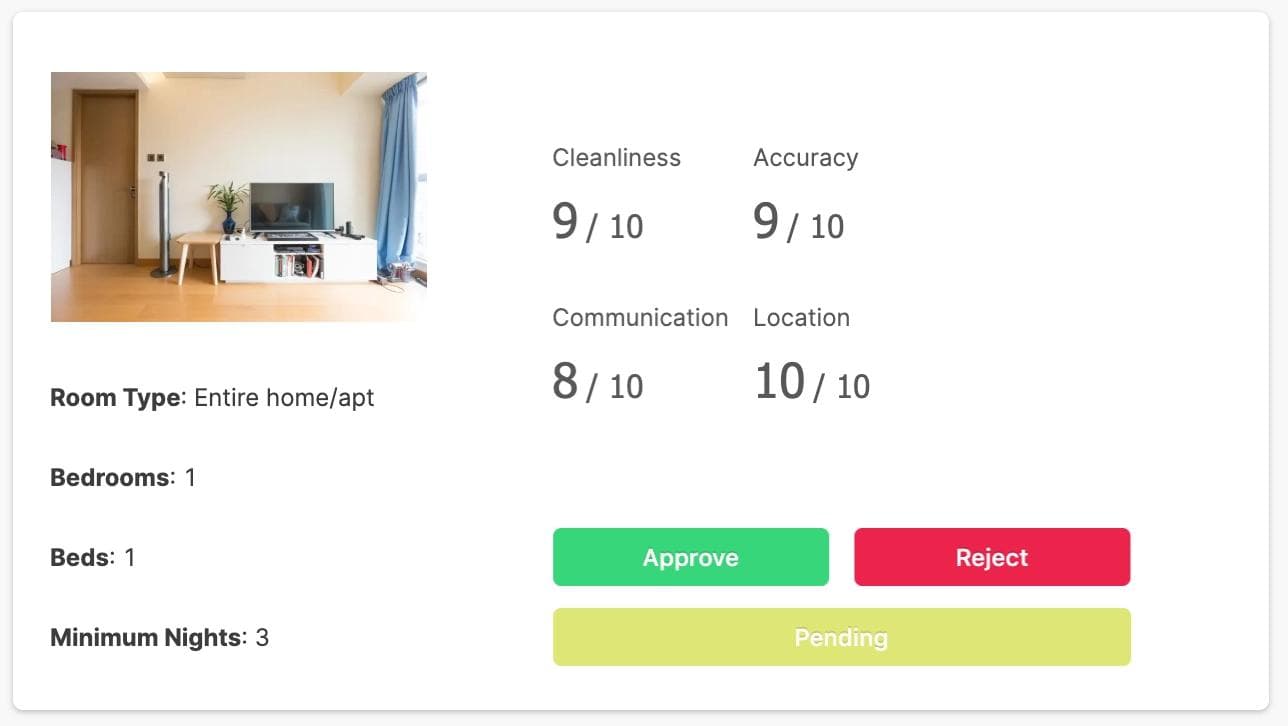
Triple check that everything works by clicking around, and you should be done! This is what our finished app looks like:
Congrats: you’ve built a functional approval app that reads and writes from a data store in under an hour (can you imagine how long this would take from scratch?). If you run into any problems, always feel free to reach out to us through Intercom (the little chat icon on the bottom right).
Reader